DIY-Case tuned housing VIM3 + Modified TONE2 Pro (PHASE 2)

Hello all, …

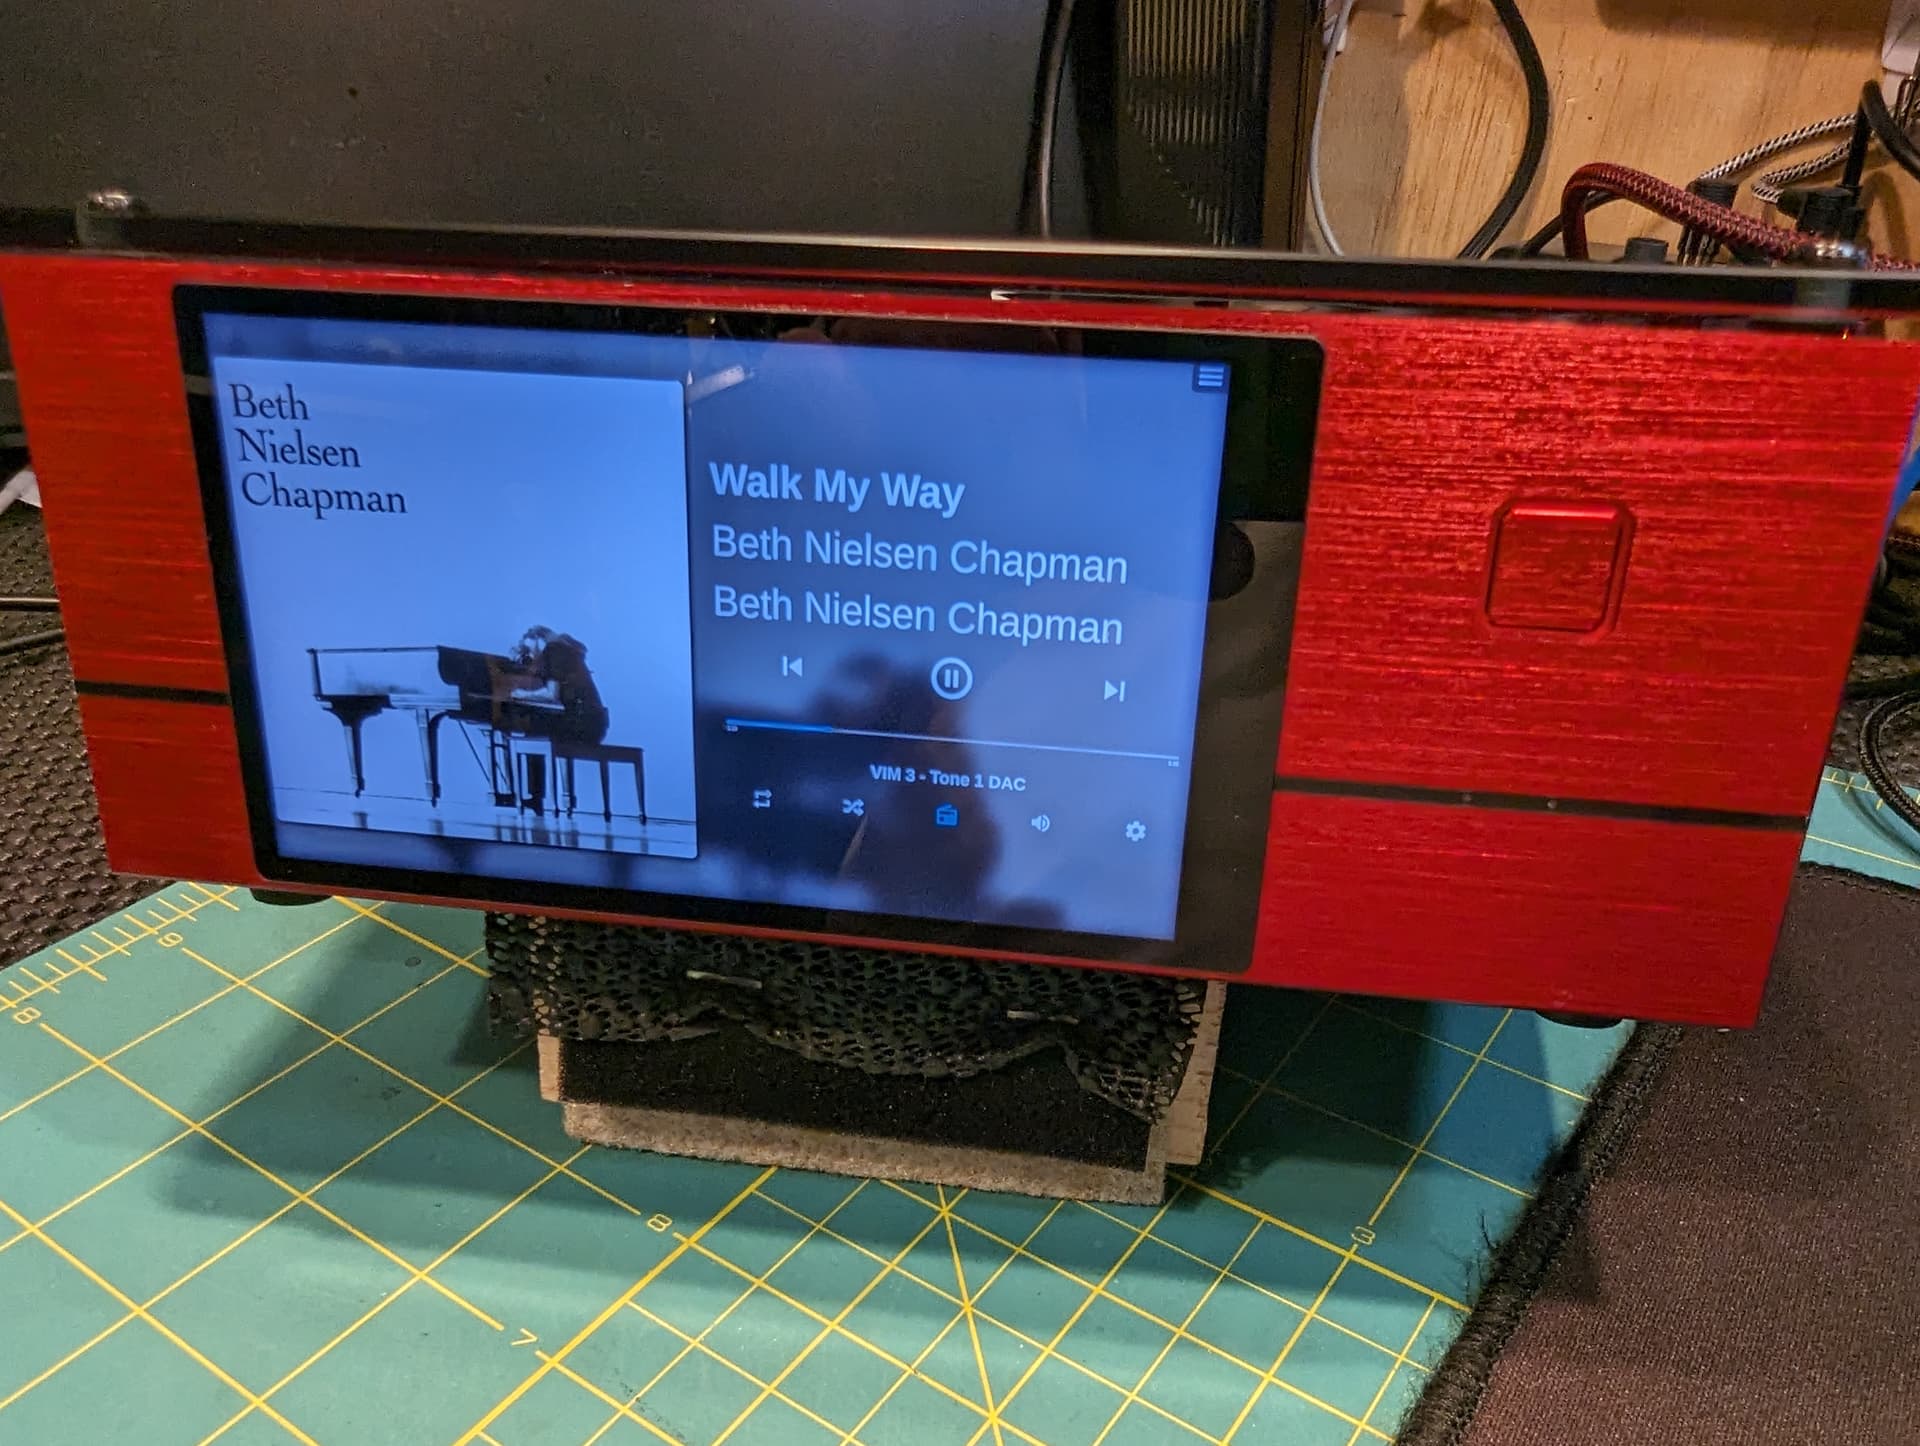
Here we go for the phase 2 of the homebrewed "DIY-Case tuned housing VIM3 + Modified TONE2 Pro", all-in-one assembly, this part deals with the modification of the DIY-Case and the assembly of the modified Tone2 Pro on the VIM3 Pro.

If you have missed the phase one, you can read all about it here


… Let’s go for the second phase of this assembly !!! …


solid but removable…
Because I always want everything to be easily removable, I first had to think about how the assembly should be mounted.

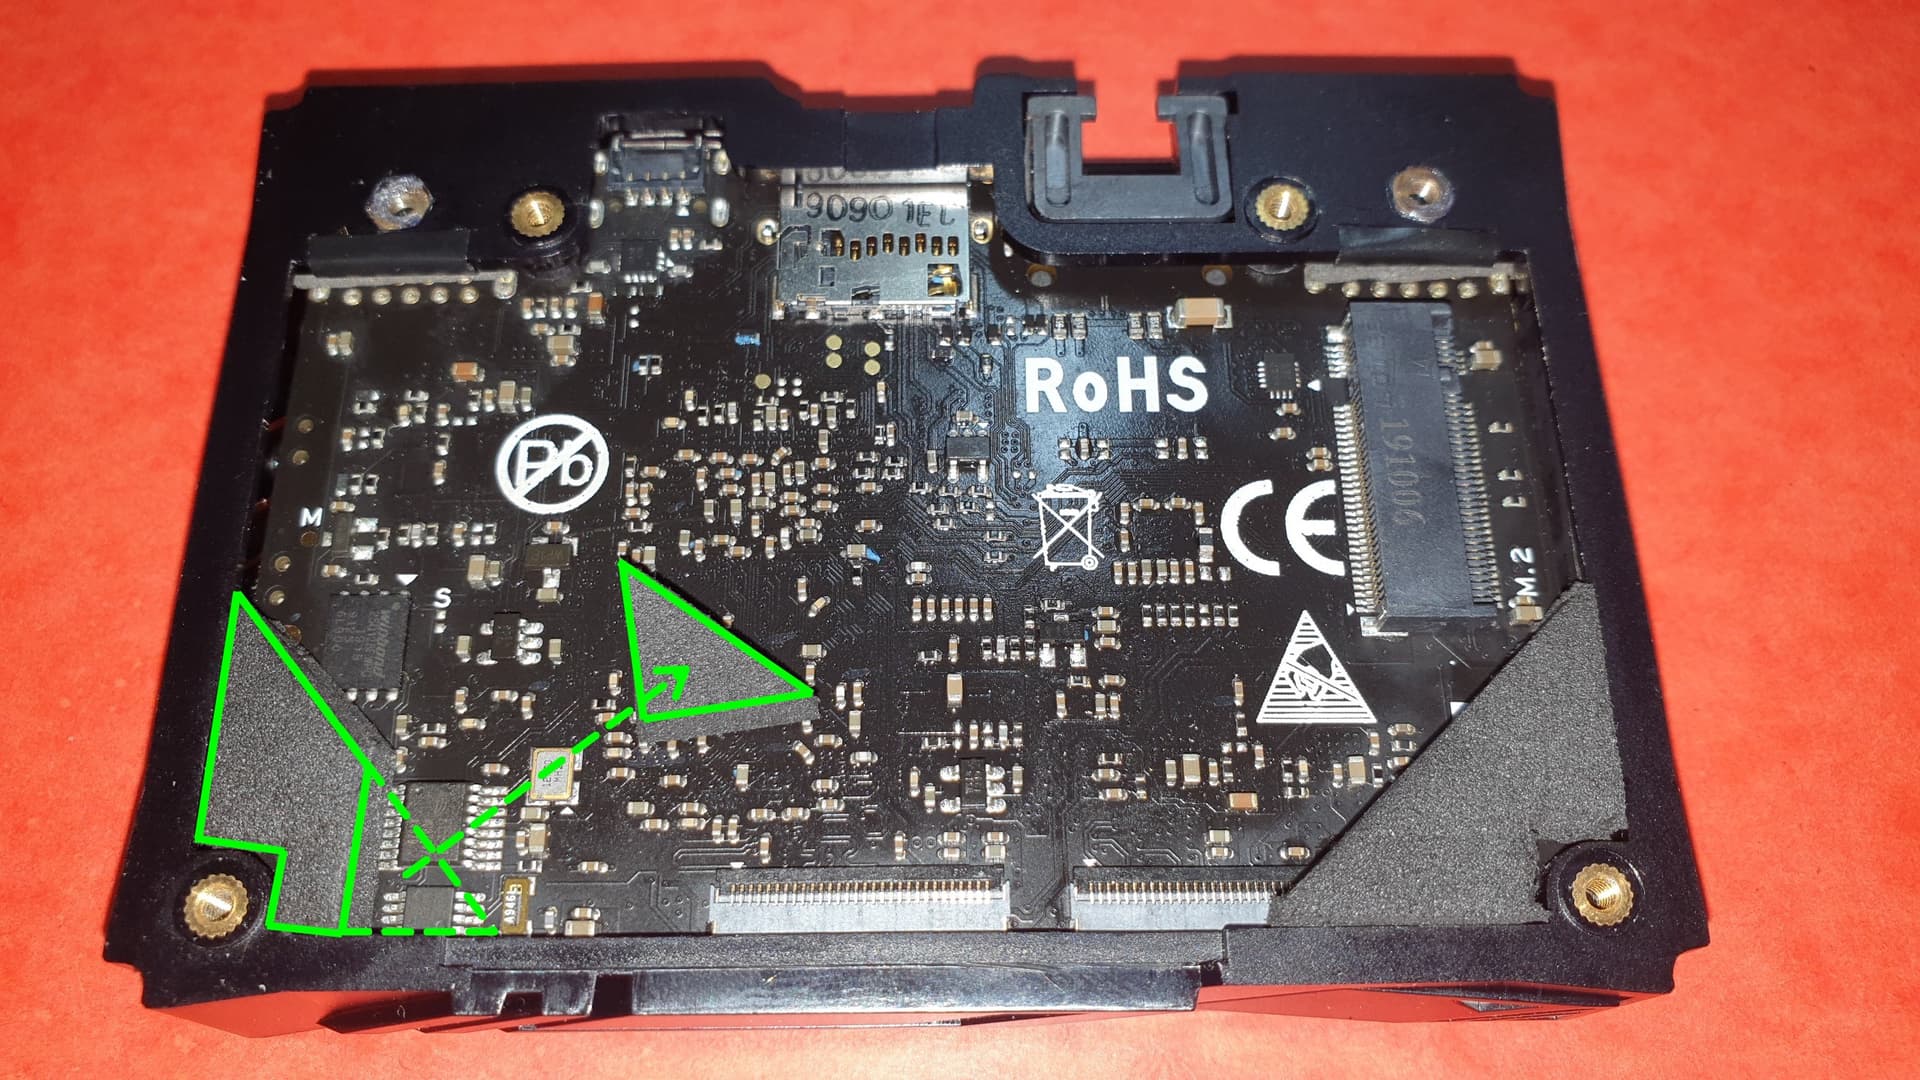
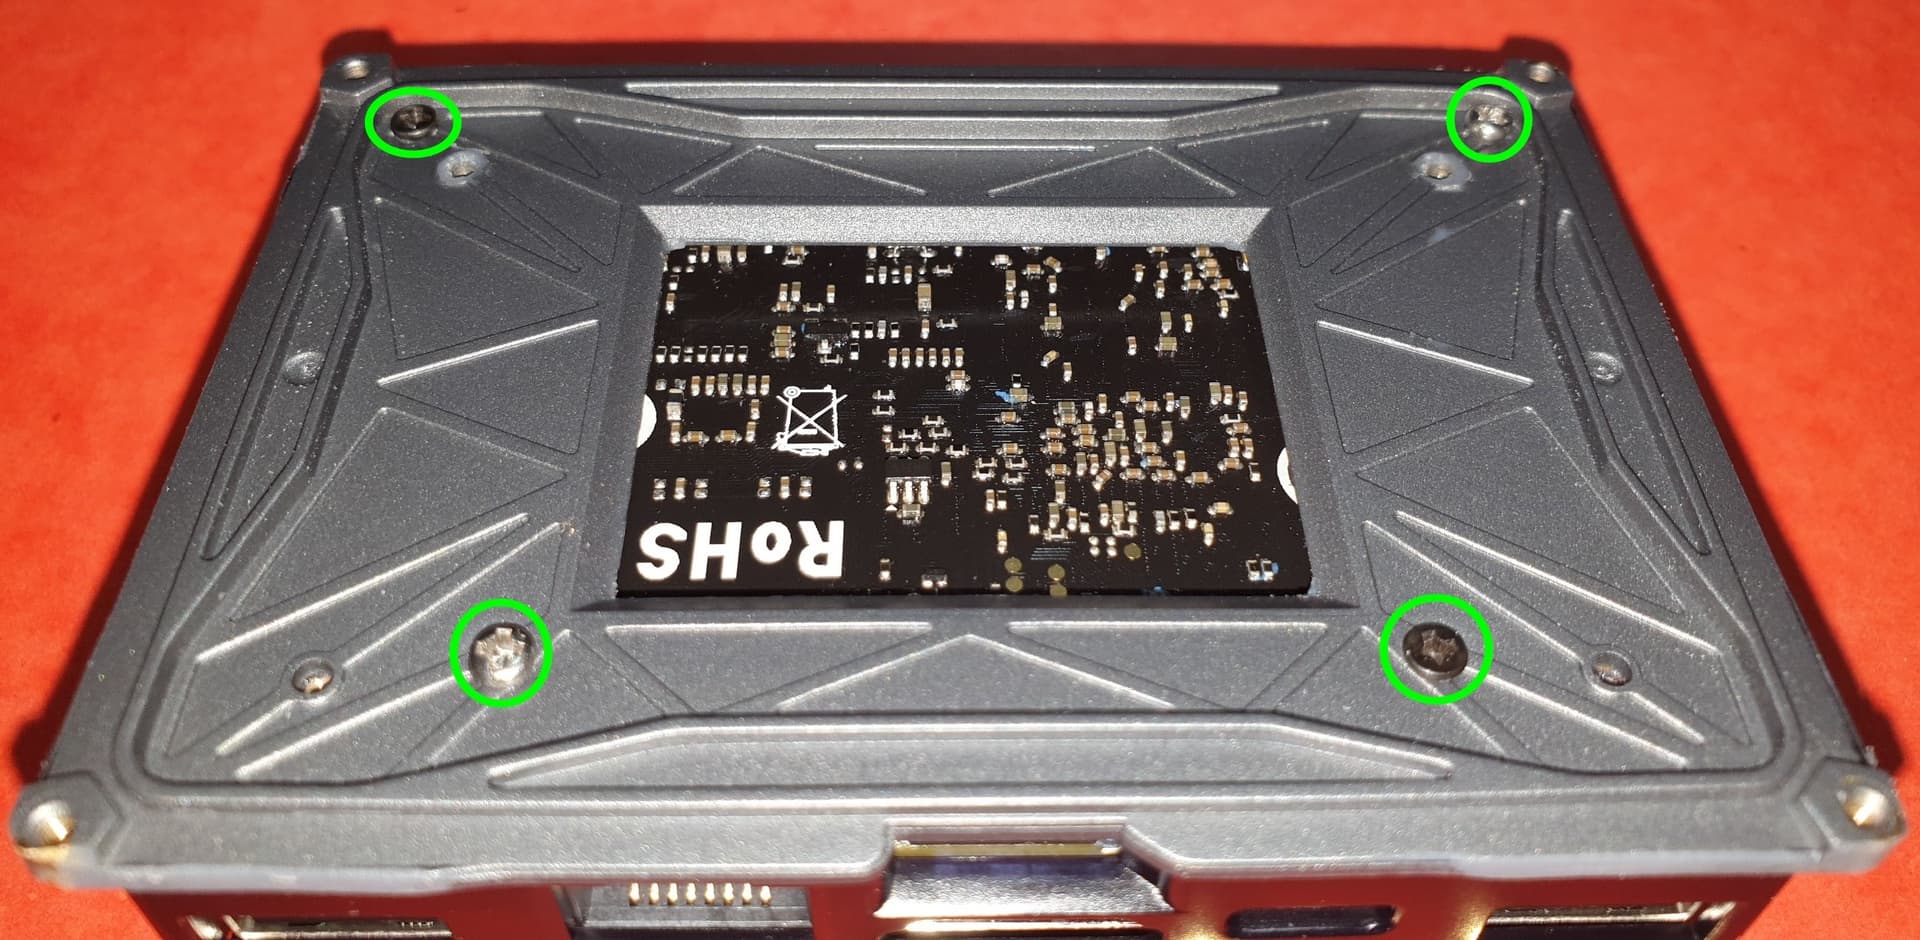
I first thought that the Tone2 Pro should be fixed at 4 points (its 4 lower screws).That was before I noticed that Khadas had used 2 types of screws to hold the lower-rear plastic part of the Tone2 Pro !
2x M2 screws (no problem there) and 2x M1 screws (much harder to find ! )

How to do for the 2x M1 screws ?..
As I needed M1 screws longer than the one in place, I first thought of re-threading M2 screws into M1 5 or 6mm long in their end part, but I found it too long to do , not necessarily the tools to do it and surely too fragile …

So I gave up replacing the M1 screws, I thought that 2x M2 screws plus the 40-pins header would be enough to hold the Tone2 Pro.

What followed gave me reason not to waste too much time with these 2x M1 screws which would remain as originally.

Then how to close the box…
I also had to find a way to close the box…
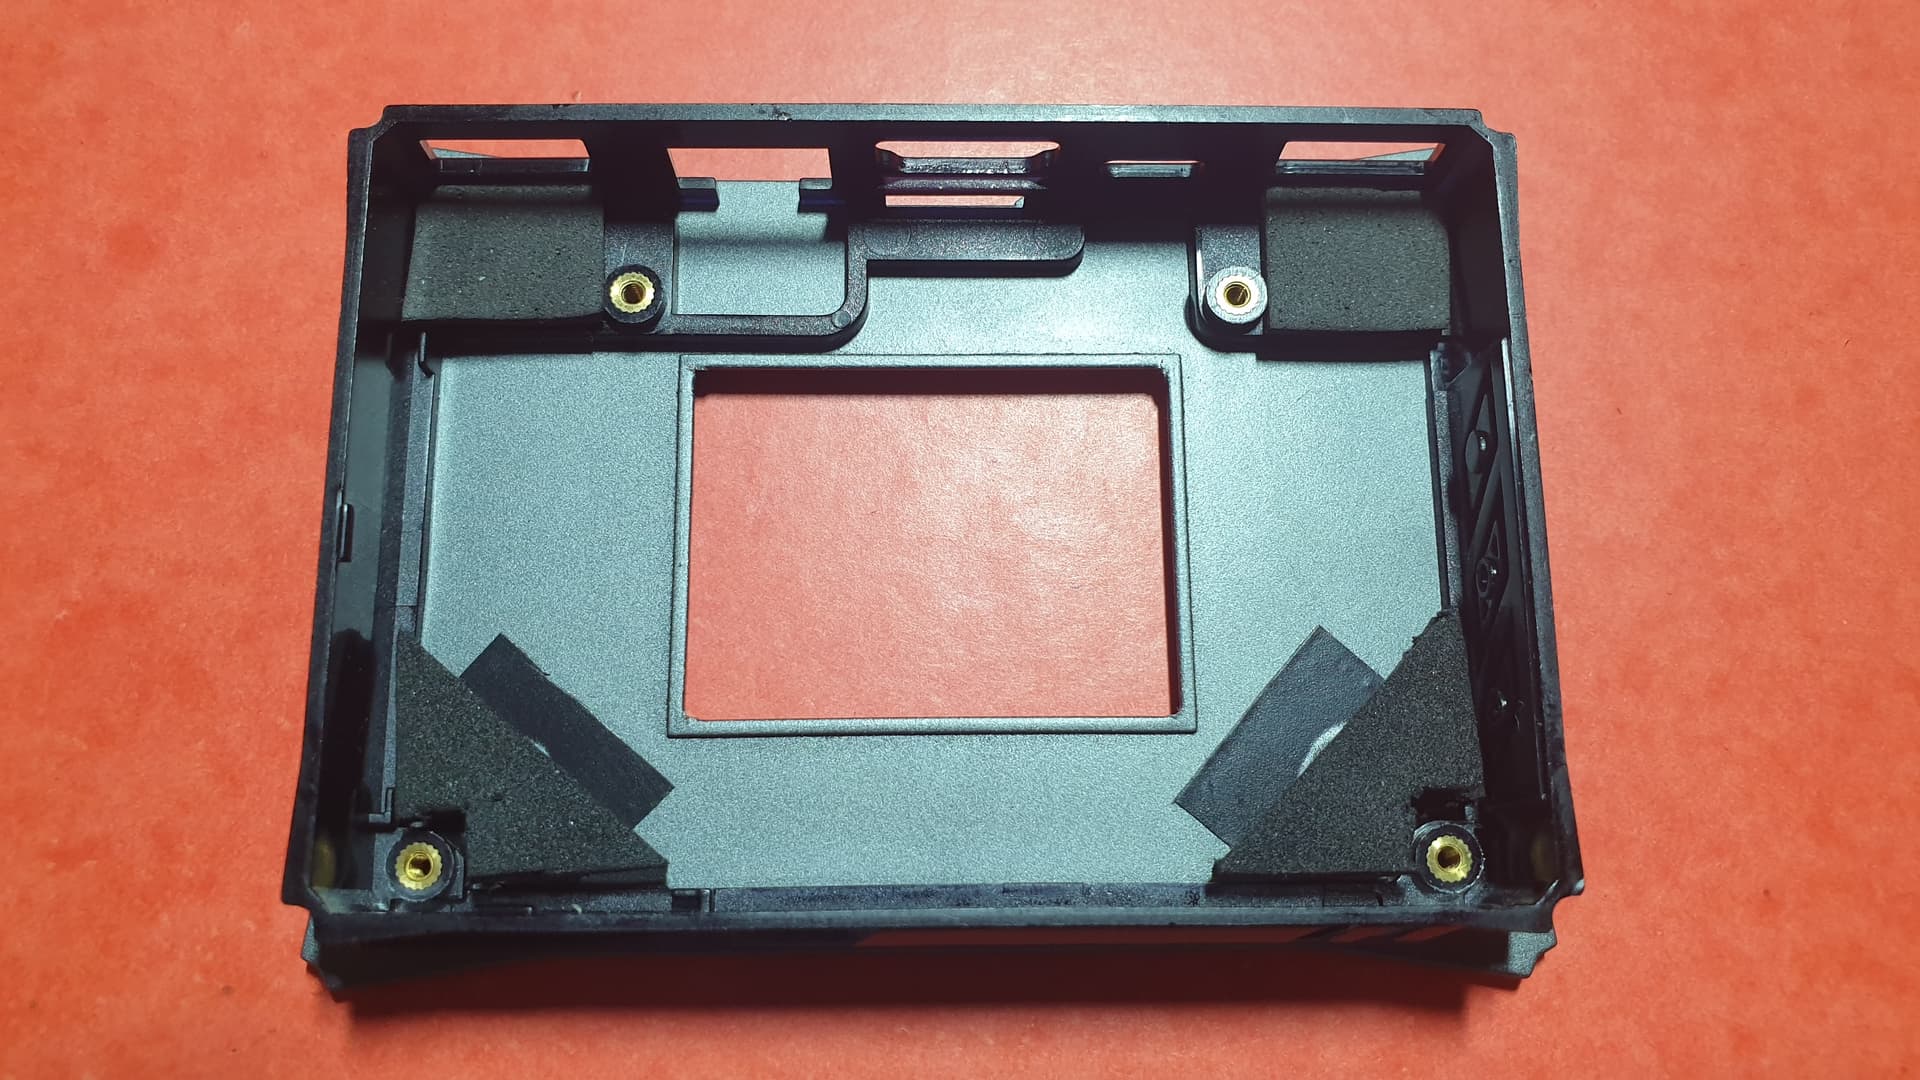
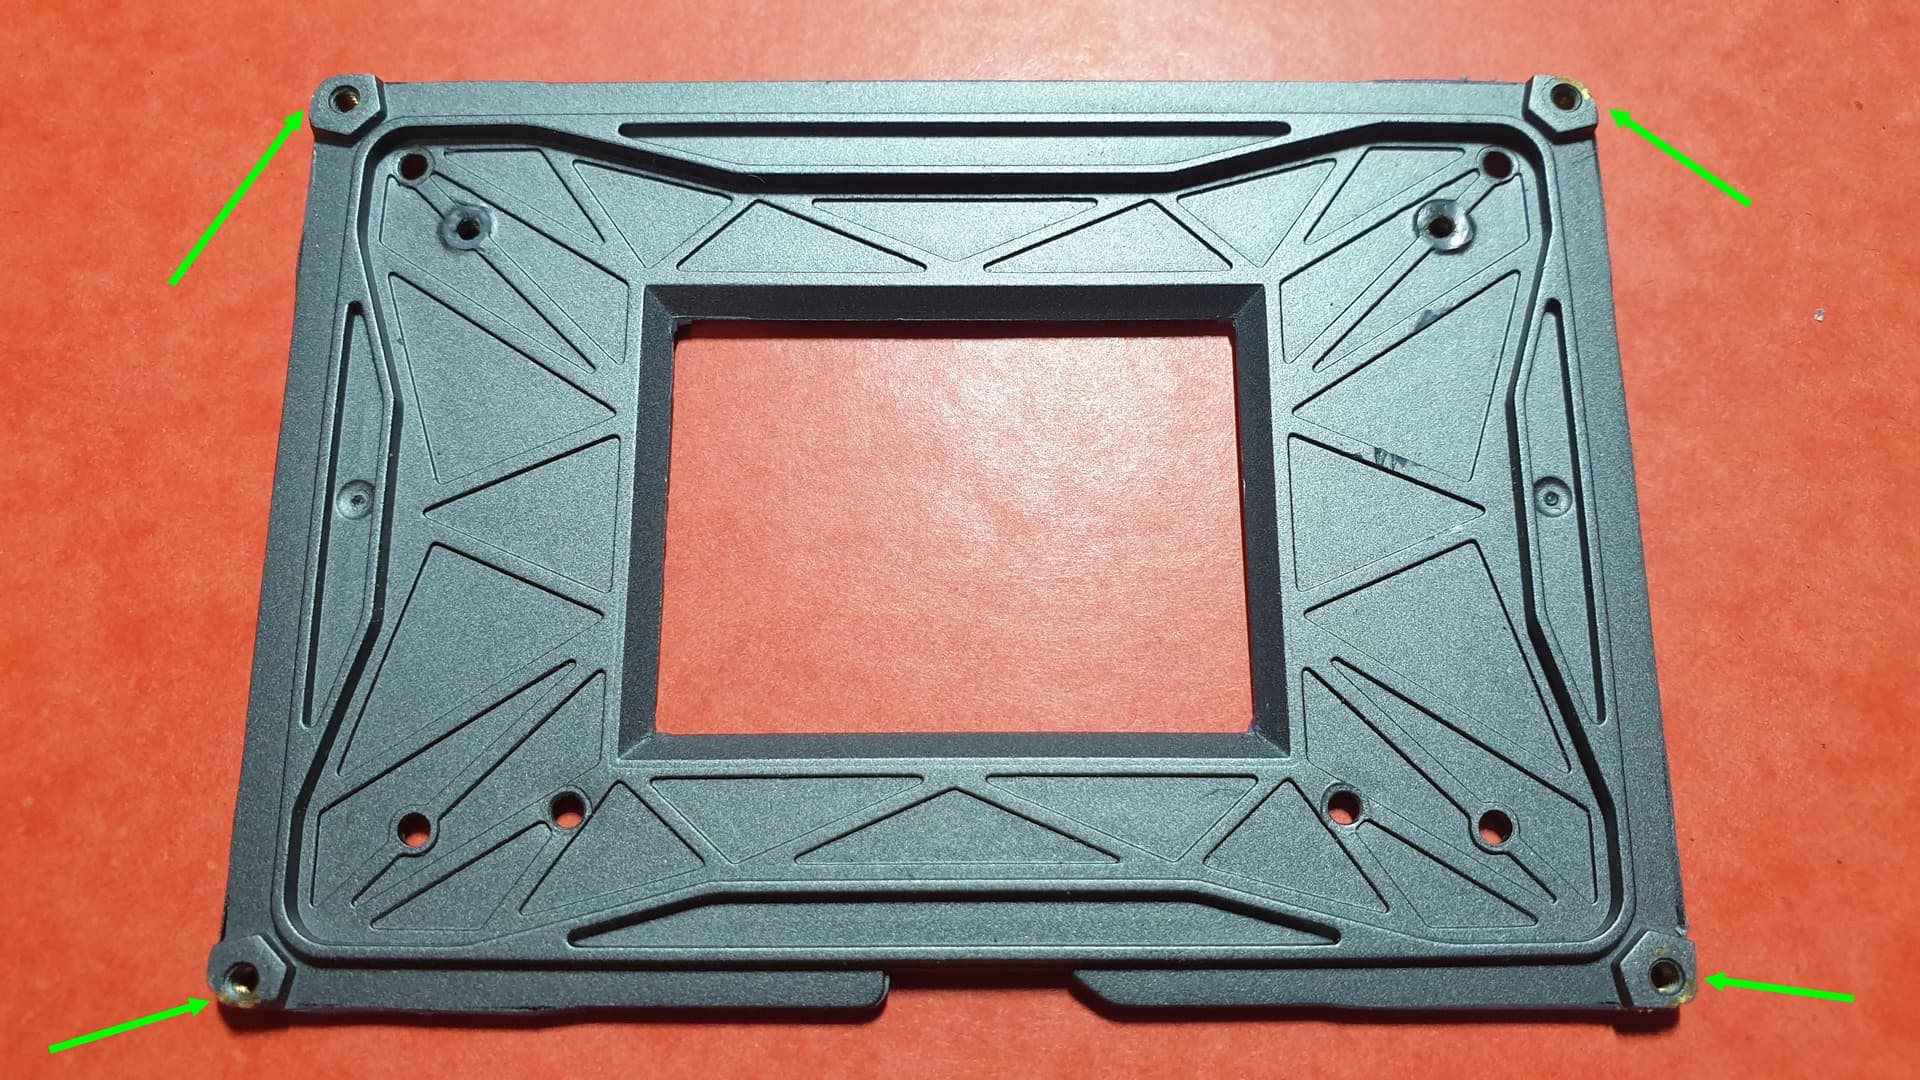
The metal plate is threaded in M2, so I just had to find a way to hold this metal plate on the DIY-Case without going through the inside as originally planned…

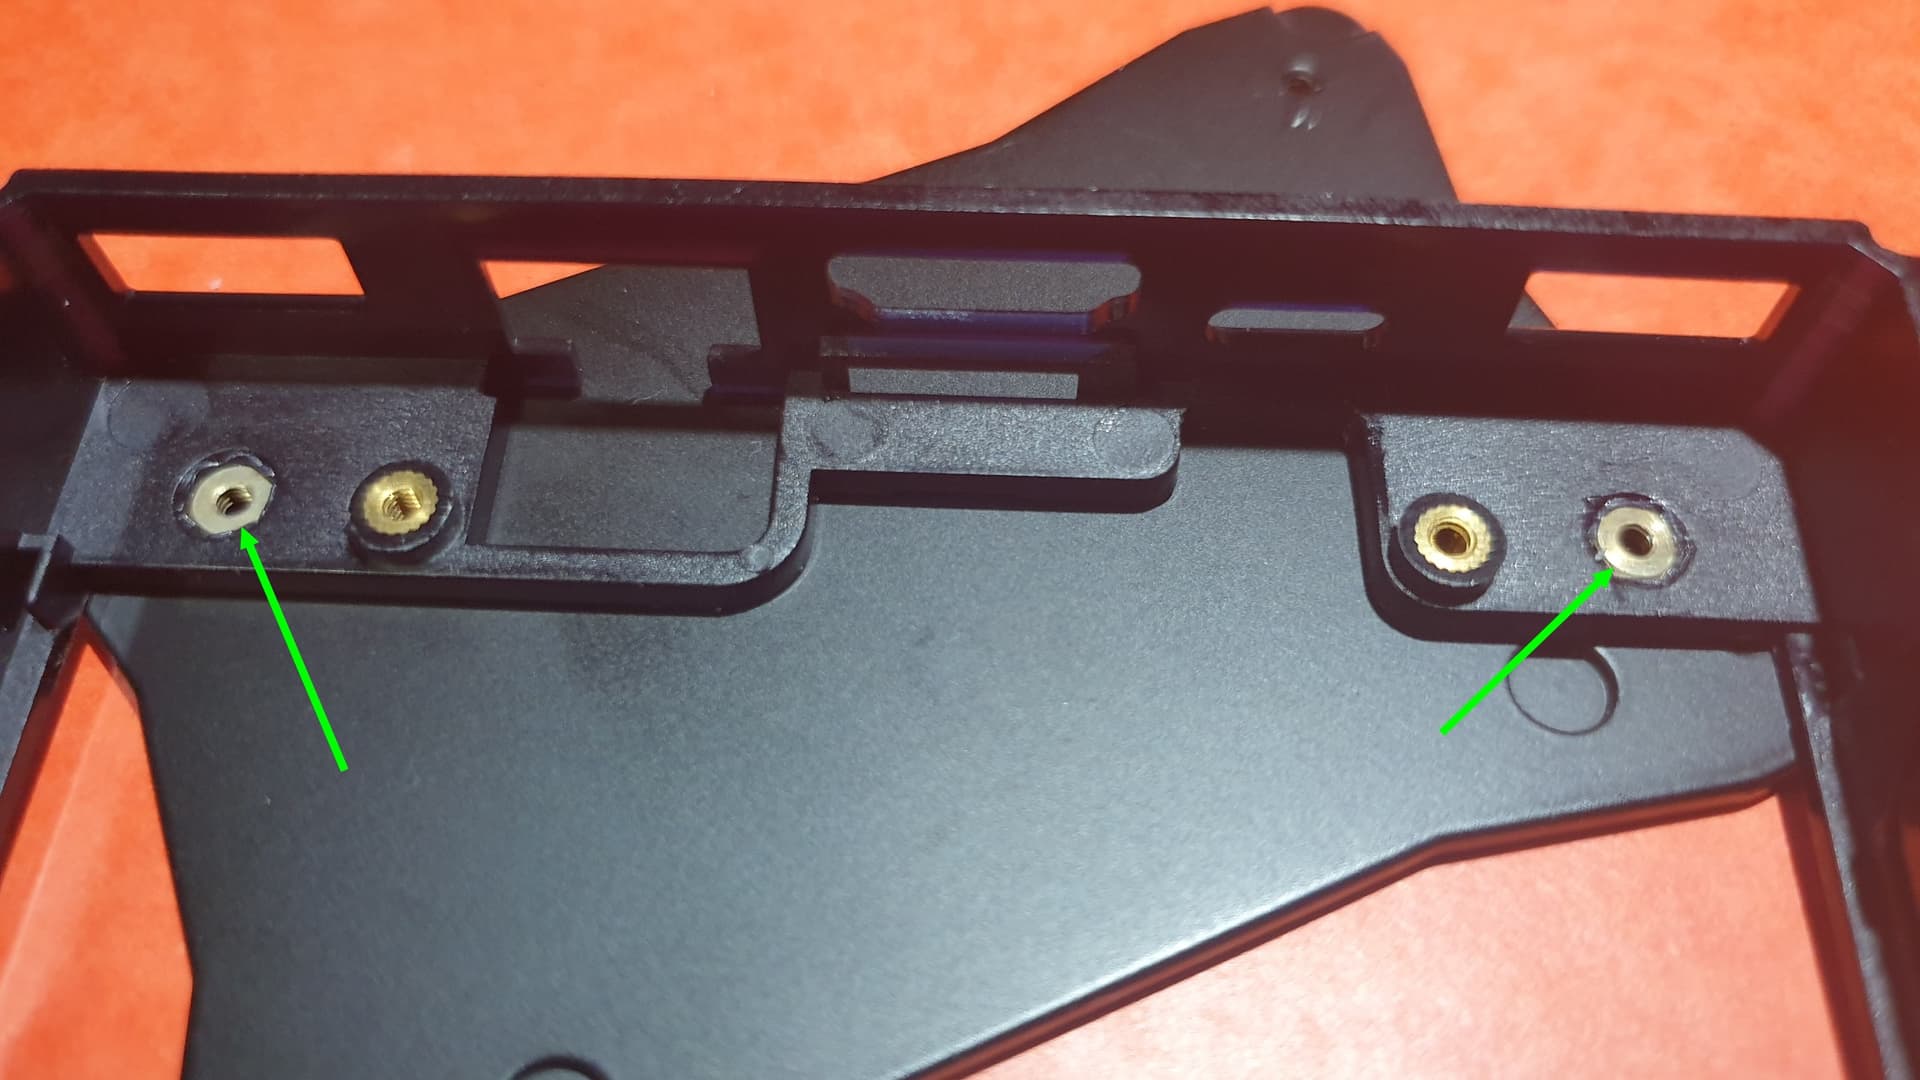
The only solution, making captive nuts in the body of the DIY-Case and in its lower cover…


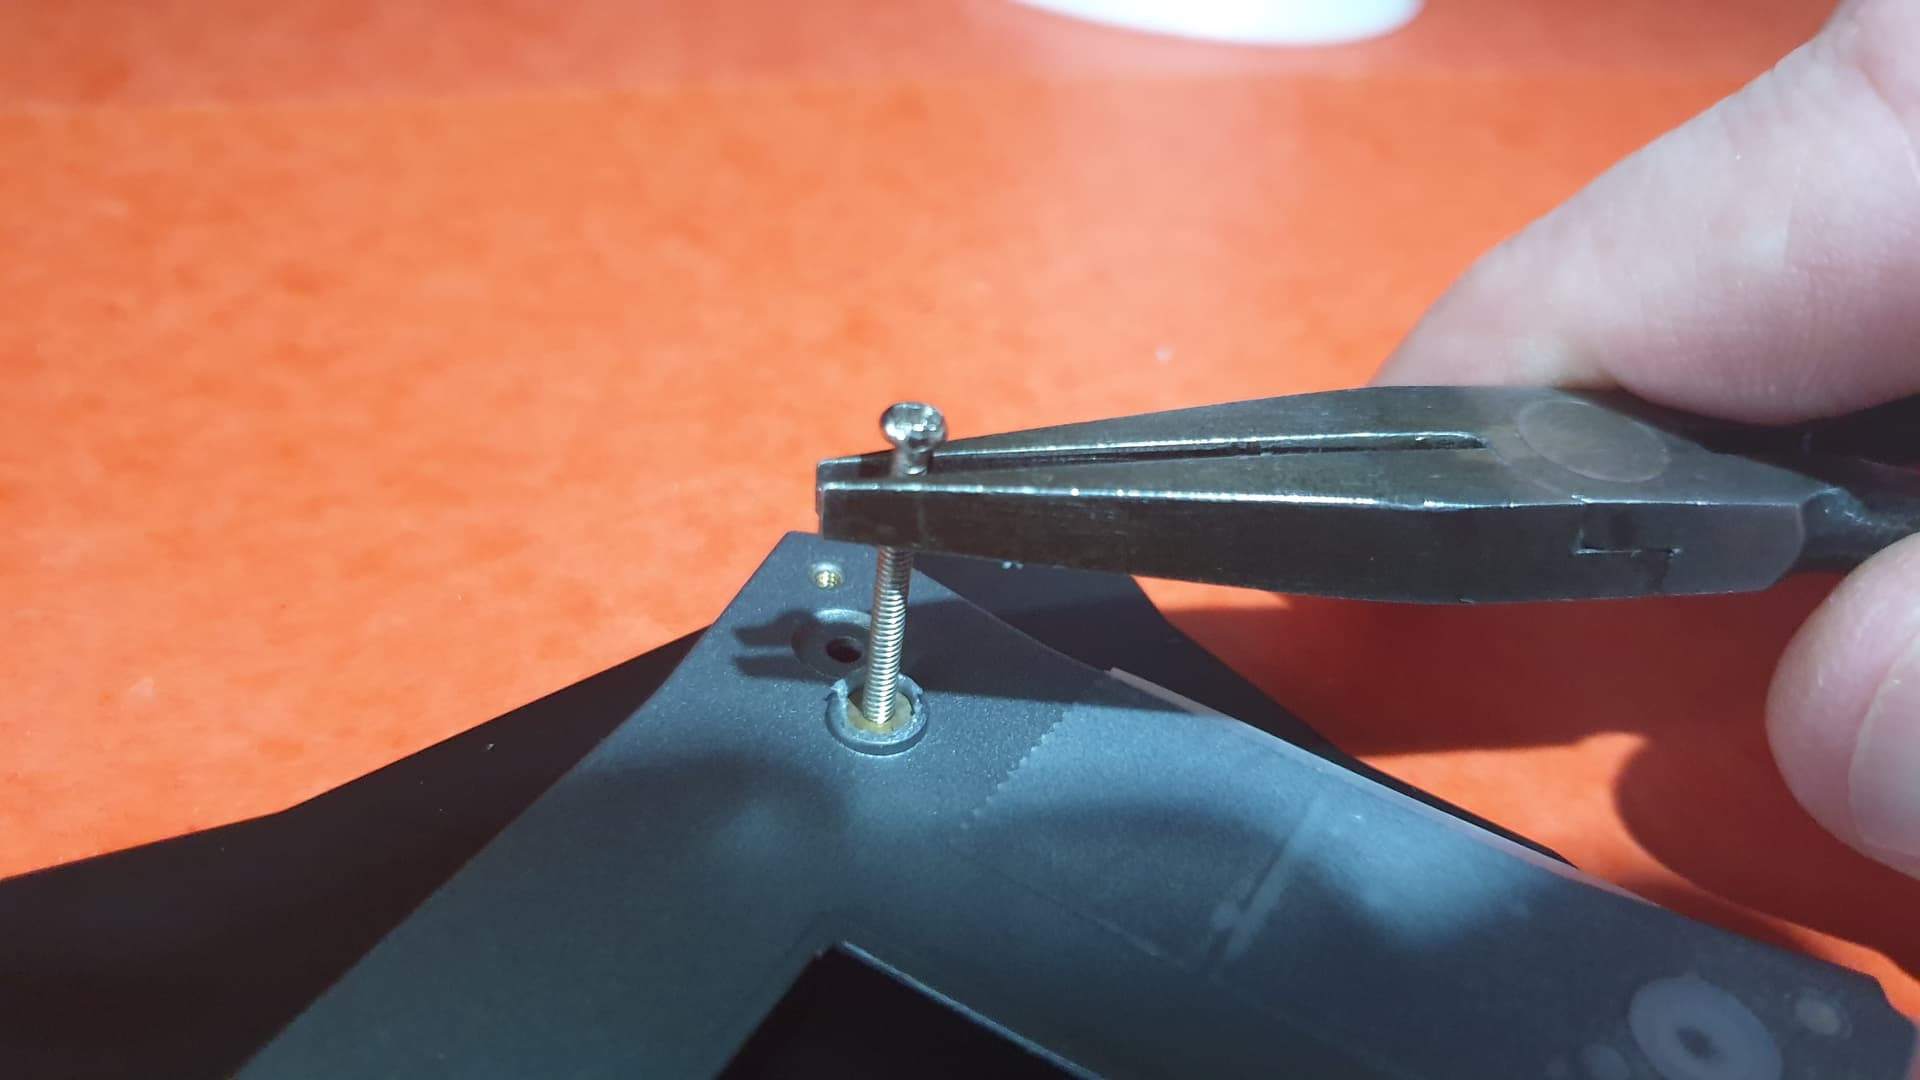
Lock the nuts in the plastic parts of the DIY-Case…
By using a small torch to heat a nut held on an M2x30 screw, it is easy to melt the plastic to trap them.


…in the body of the DIY-Case…


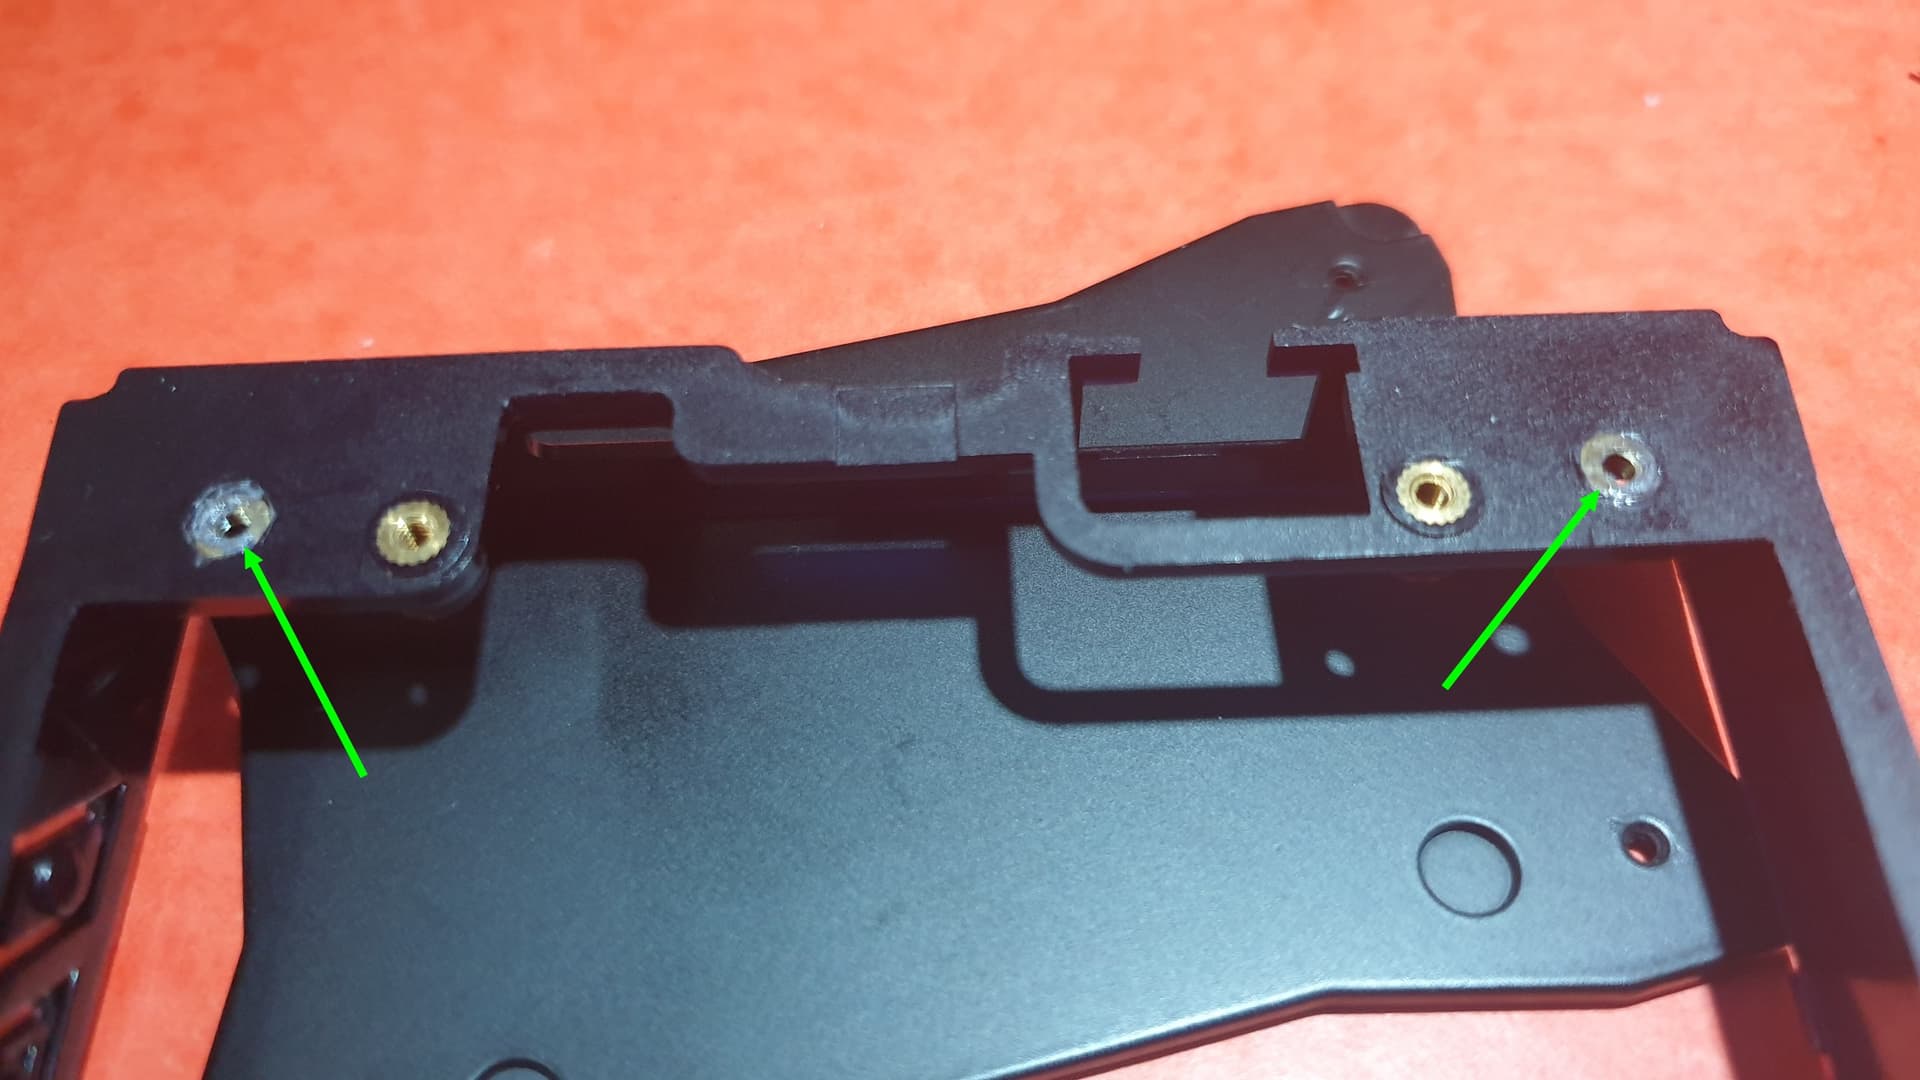
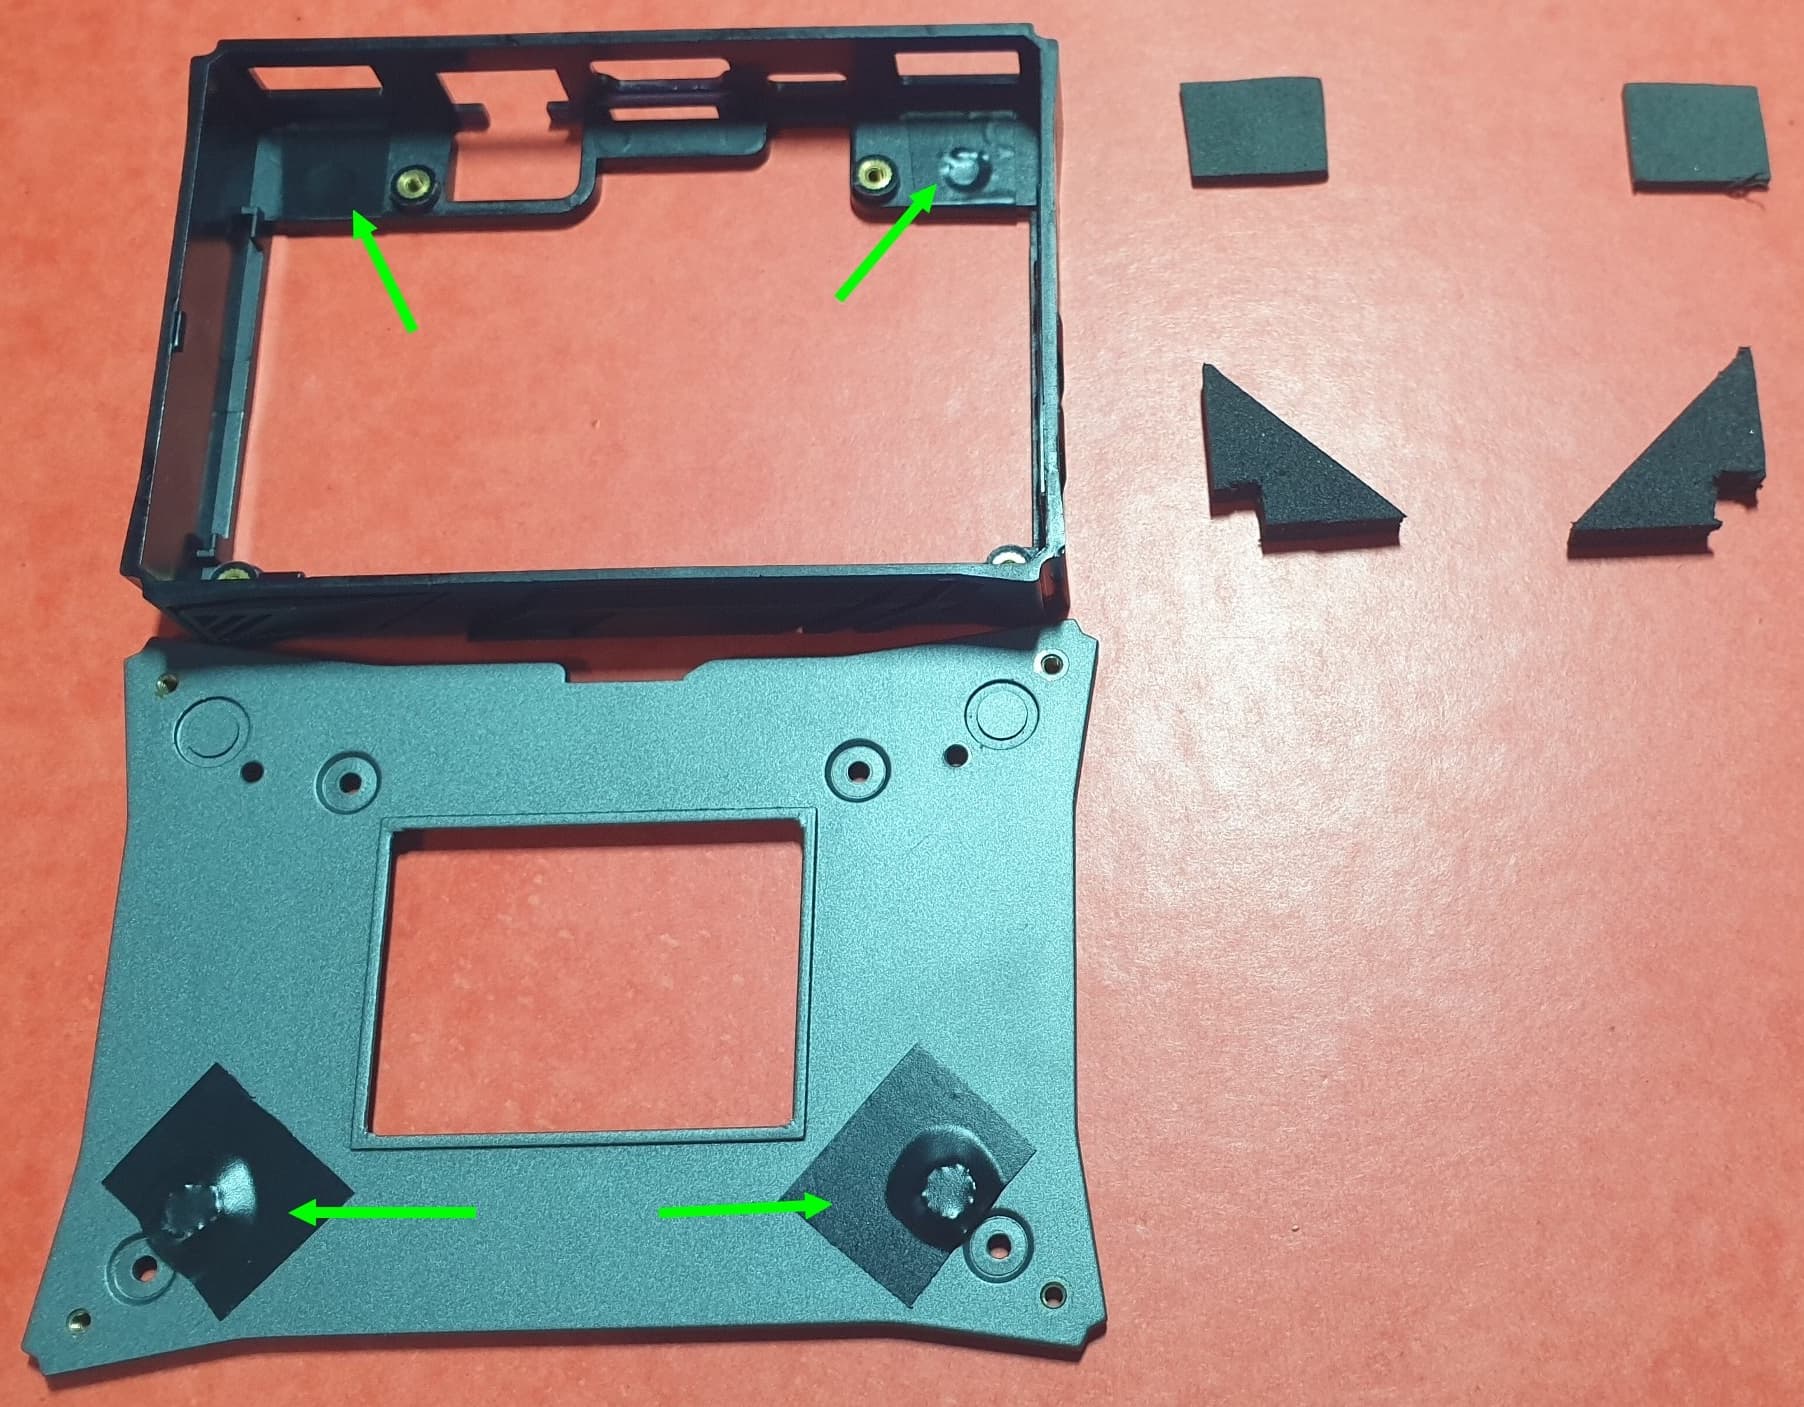
…in the lower cover…


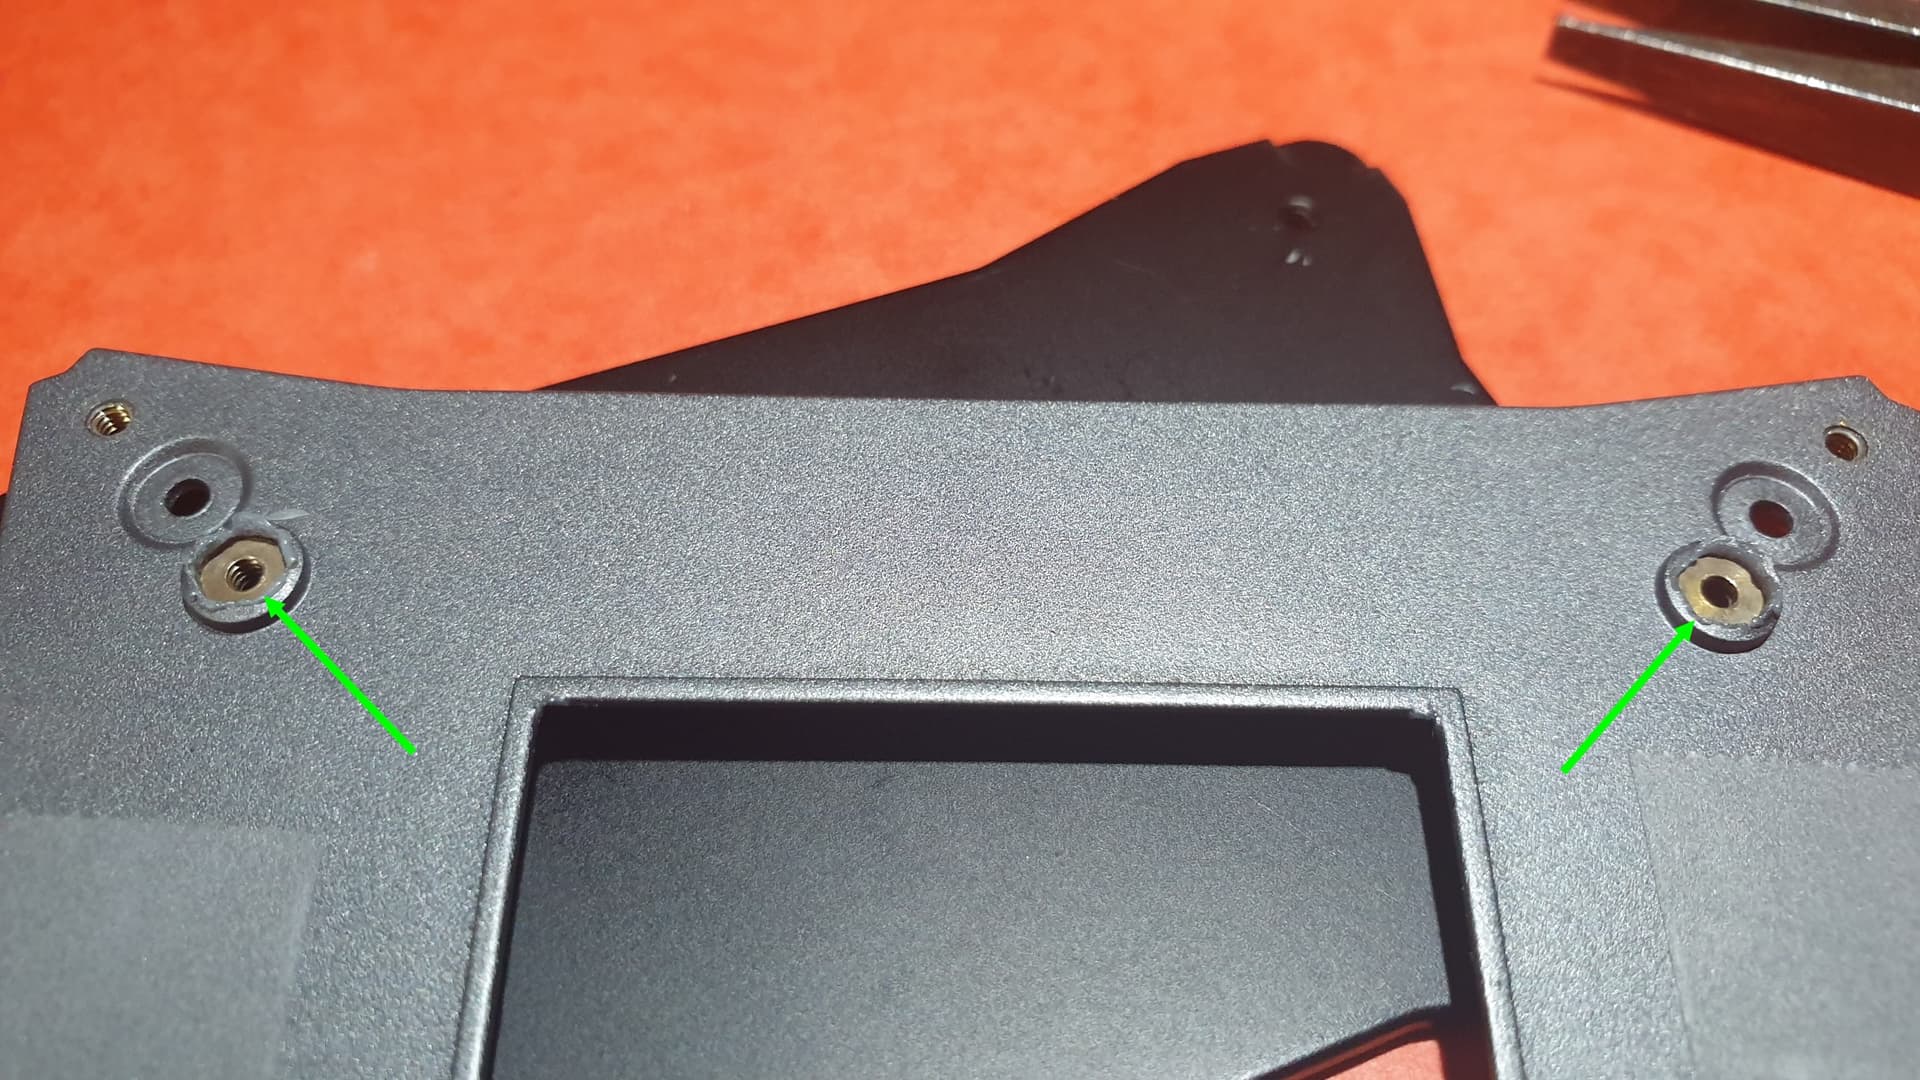
All that remains is to trim everything and voila !!!
Let’s go to the assembly !!!..


The assembly :
To prevent the captive nuts from making contact with the electronic parts of the VIM3, I isolate them with isolating plastic tape.


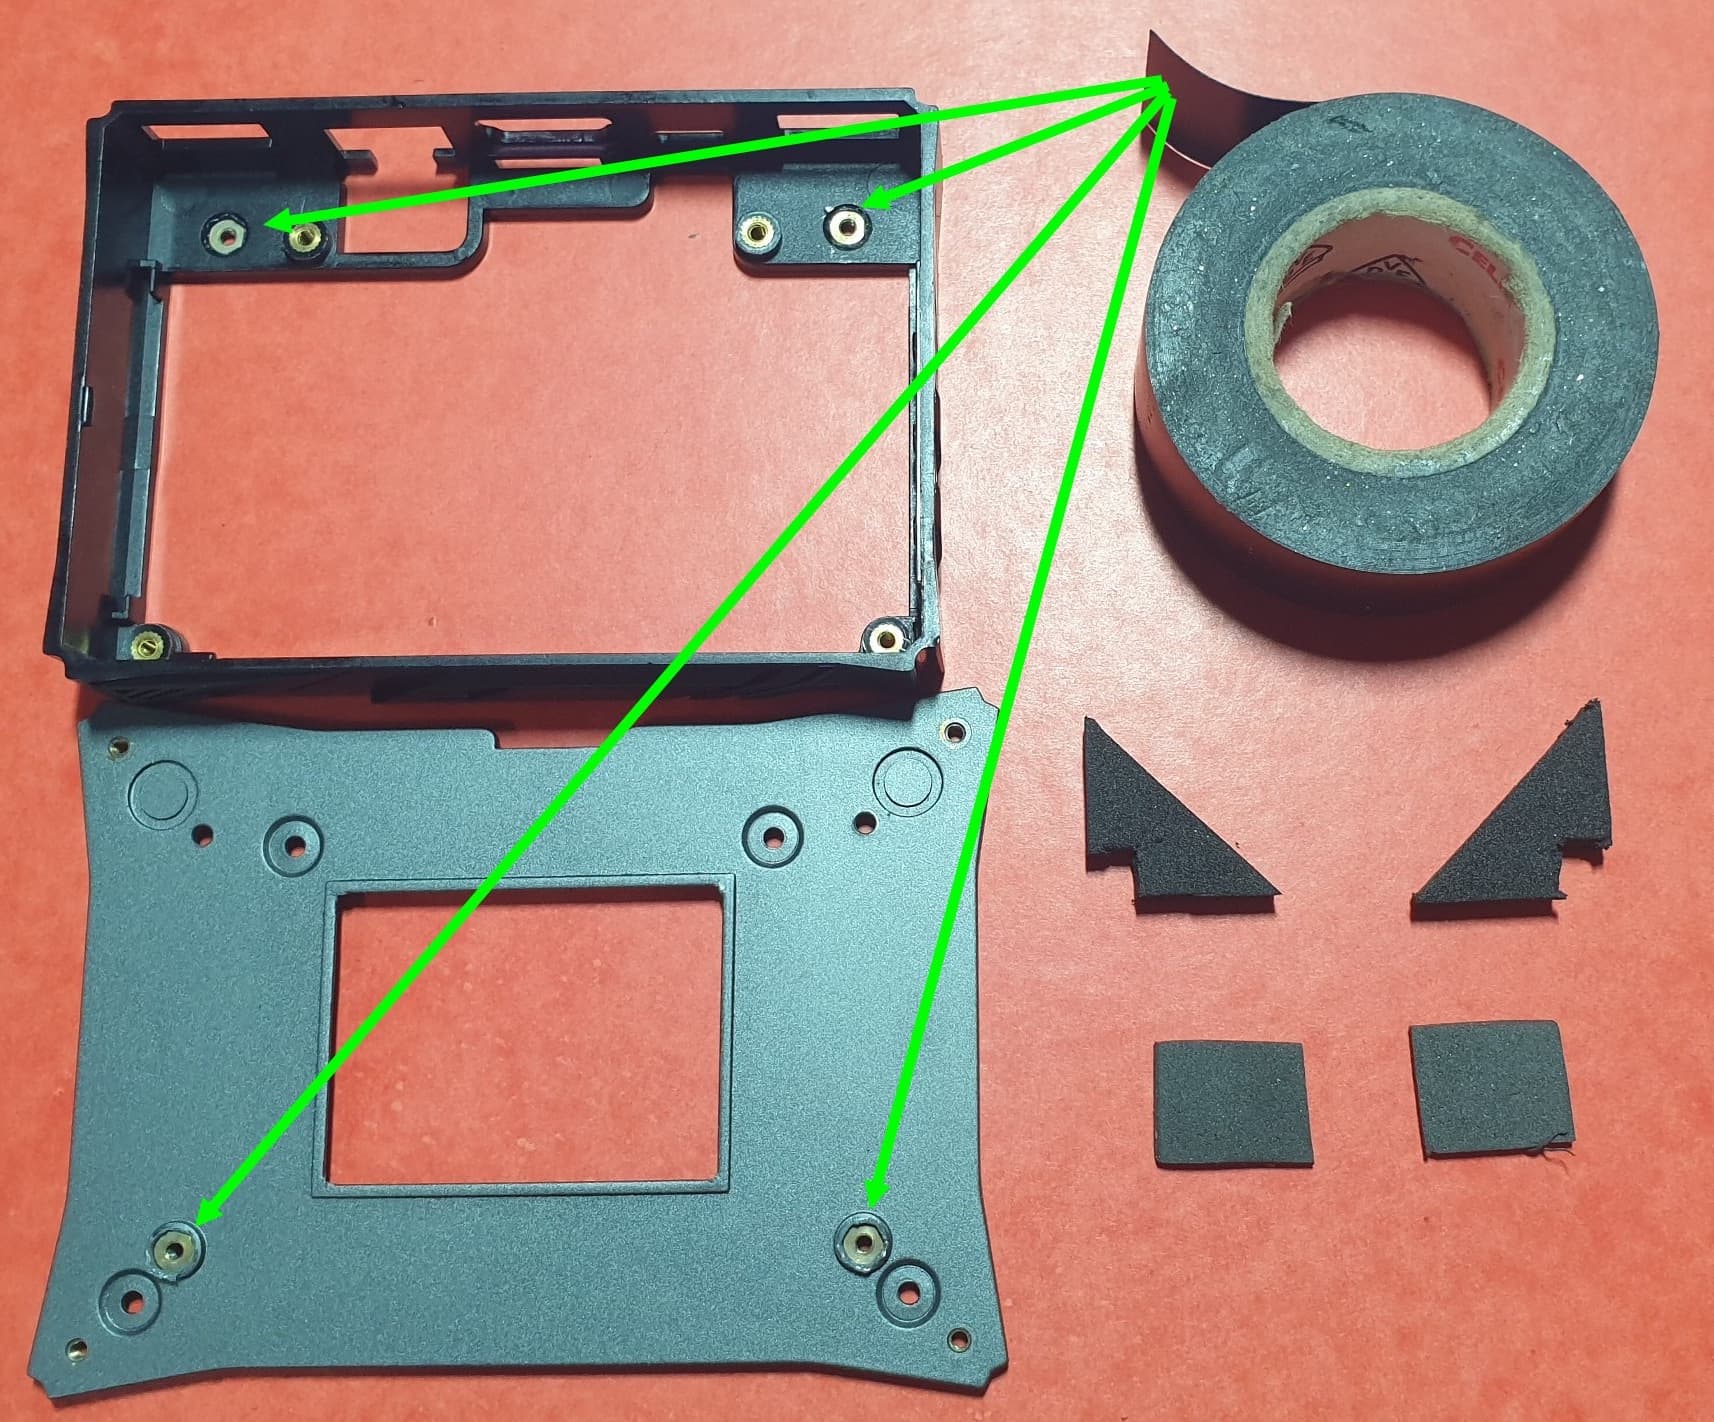
And since 2 precautions are better than one, I planned to add additional pieces of insulating foam…


As everything is ready, it’s time to place the VIM3 Pro in the body of the DIY-Case…


Placement of the VIM3 Pro in the body of the DIY-Case…
As the two original M1 screws of the Tone2 Pro remain in place, the two screws of the venti-rad of the VIM3 Pro next to them will also be used and mounted as originally…


After trying to place the Tone2 Pro on the DIY-Case, I found that the corners of the lower part of the DIY-Case were too protruding,…

…so I decided to reduce them…


…limiting the number of screwing constraints…
To fix the Tone2 Pro to the assembly, you must limit the number of screwing constraints. We therefore need to drill the 10mm spacers with a 2mm drill so that the screw can slide there…


…the spacers and their washers are ready…

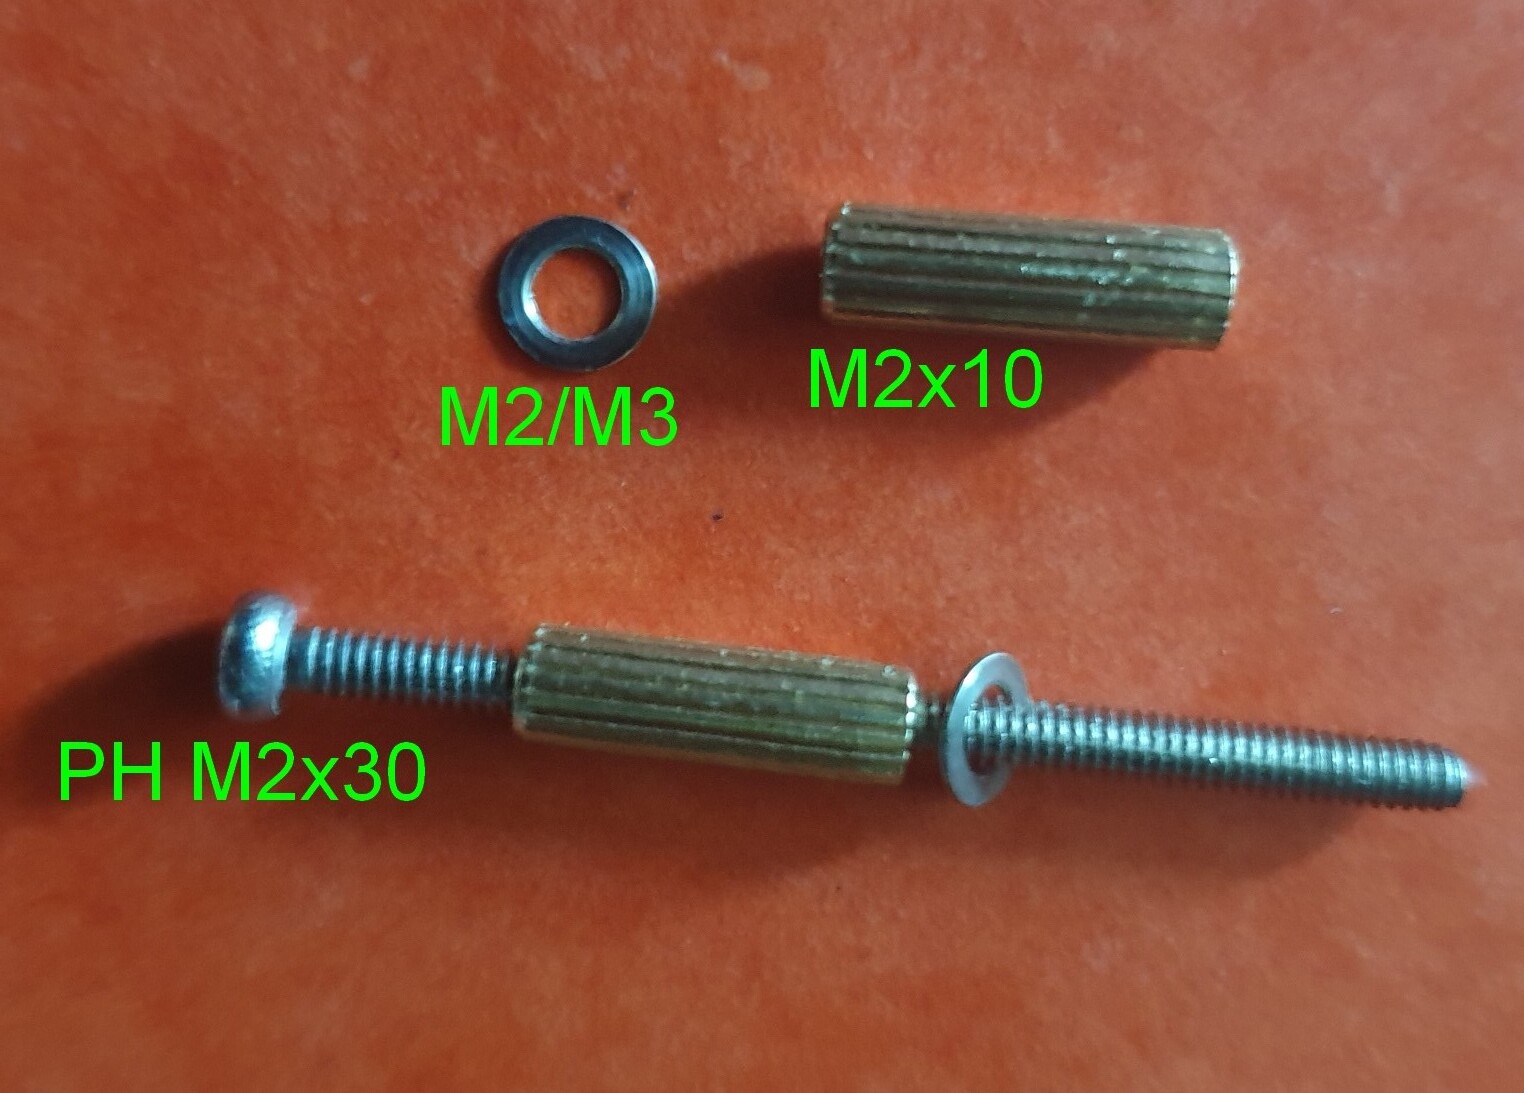
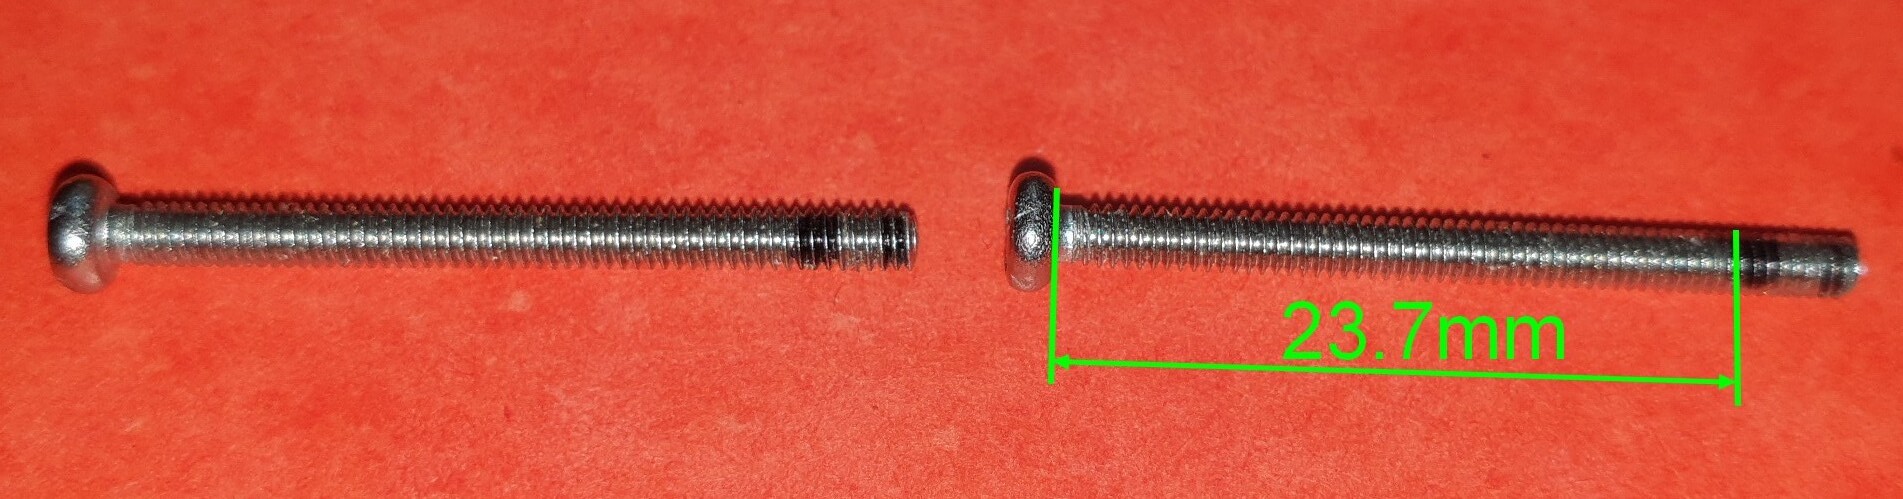
All that remains is to adjust the PH M2x30 screws to the correct length…


Installation of the lower part of the DIY-Case…
By setting up the isolating foams we can see that the one in the lower left corner covers two integrated circuits. To prevent them from heating up, we cut the foam…


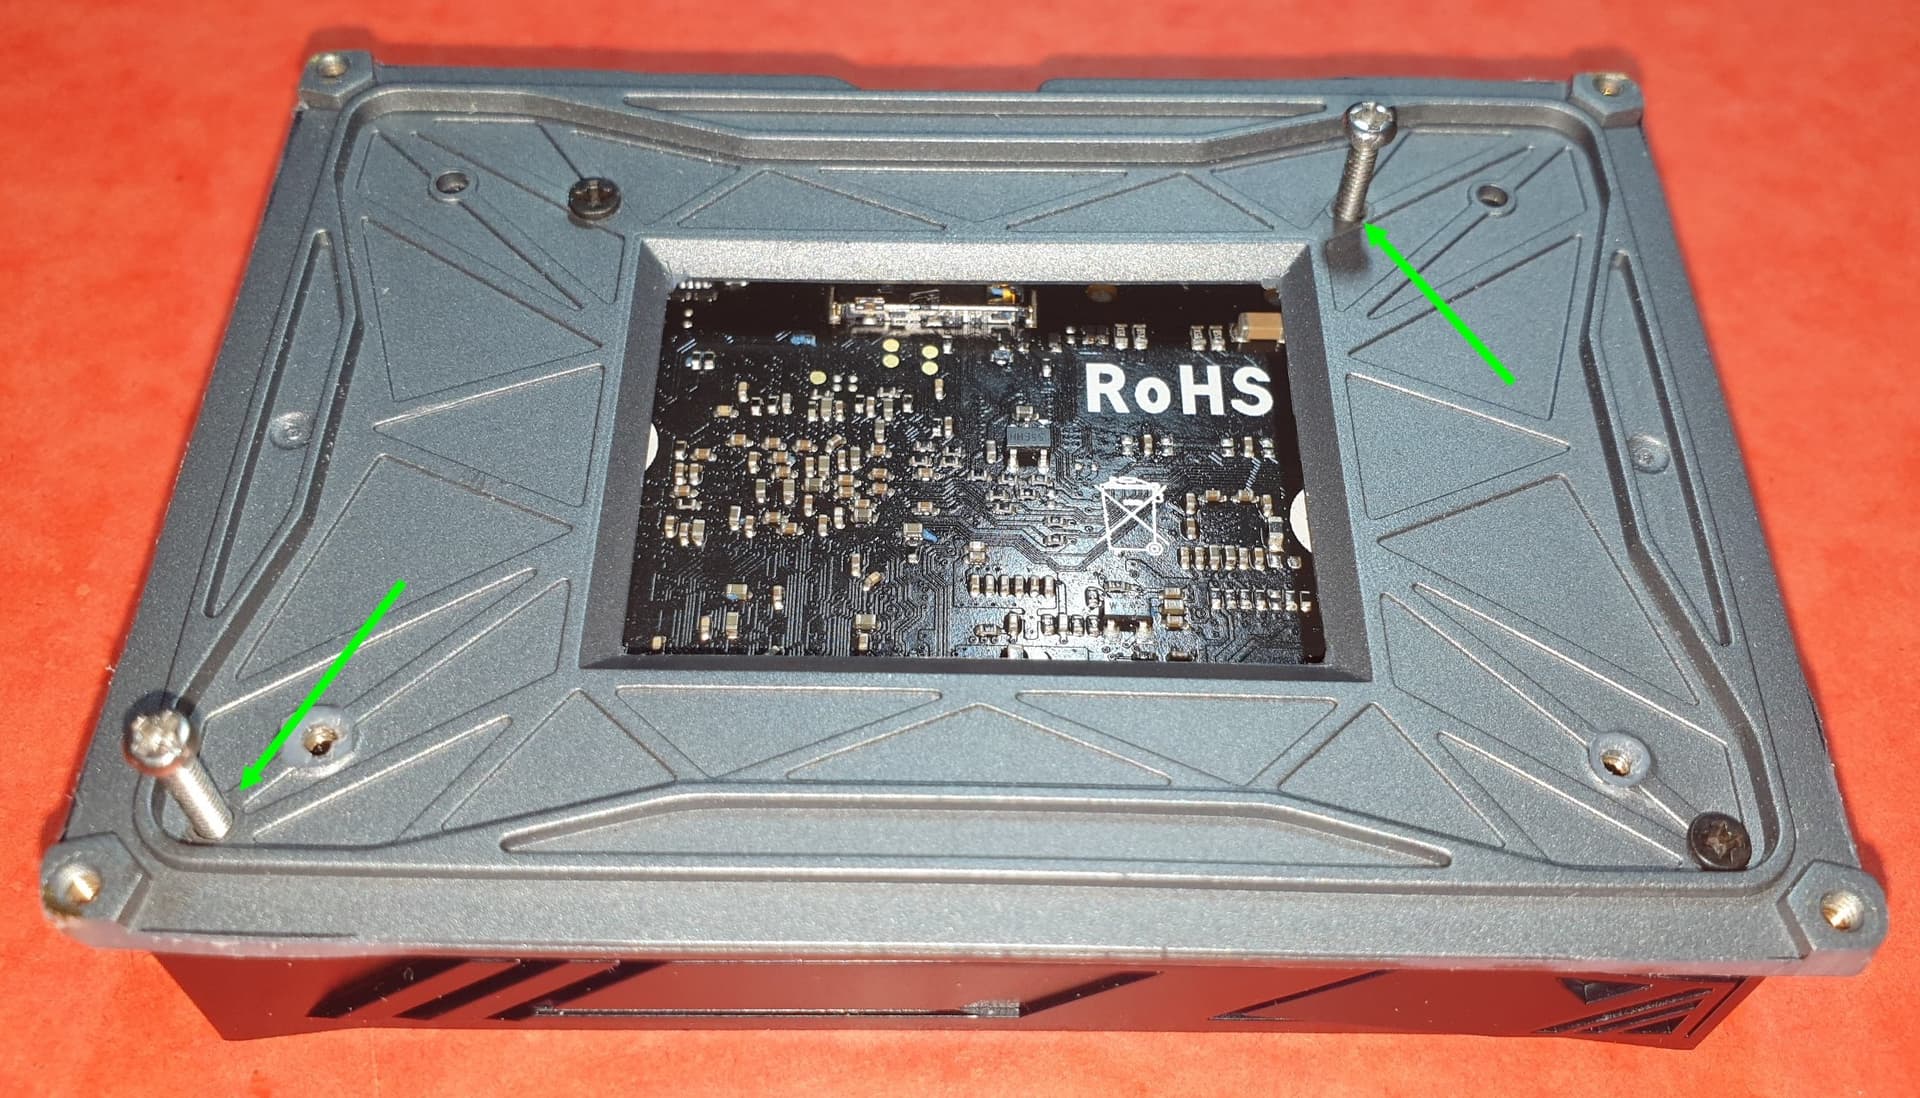
We can now screw the lower part of the DIY-Case on its central part with 2 of the the original screws and prepositioning the 2 main retaining screws PH M2x30 cut to 23.7mm…


Finalizing the tightening of the venti-rad…
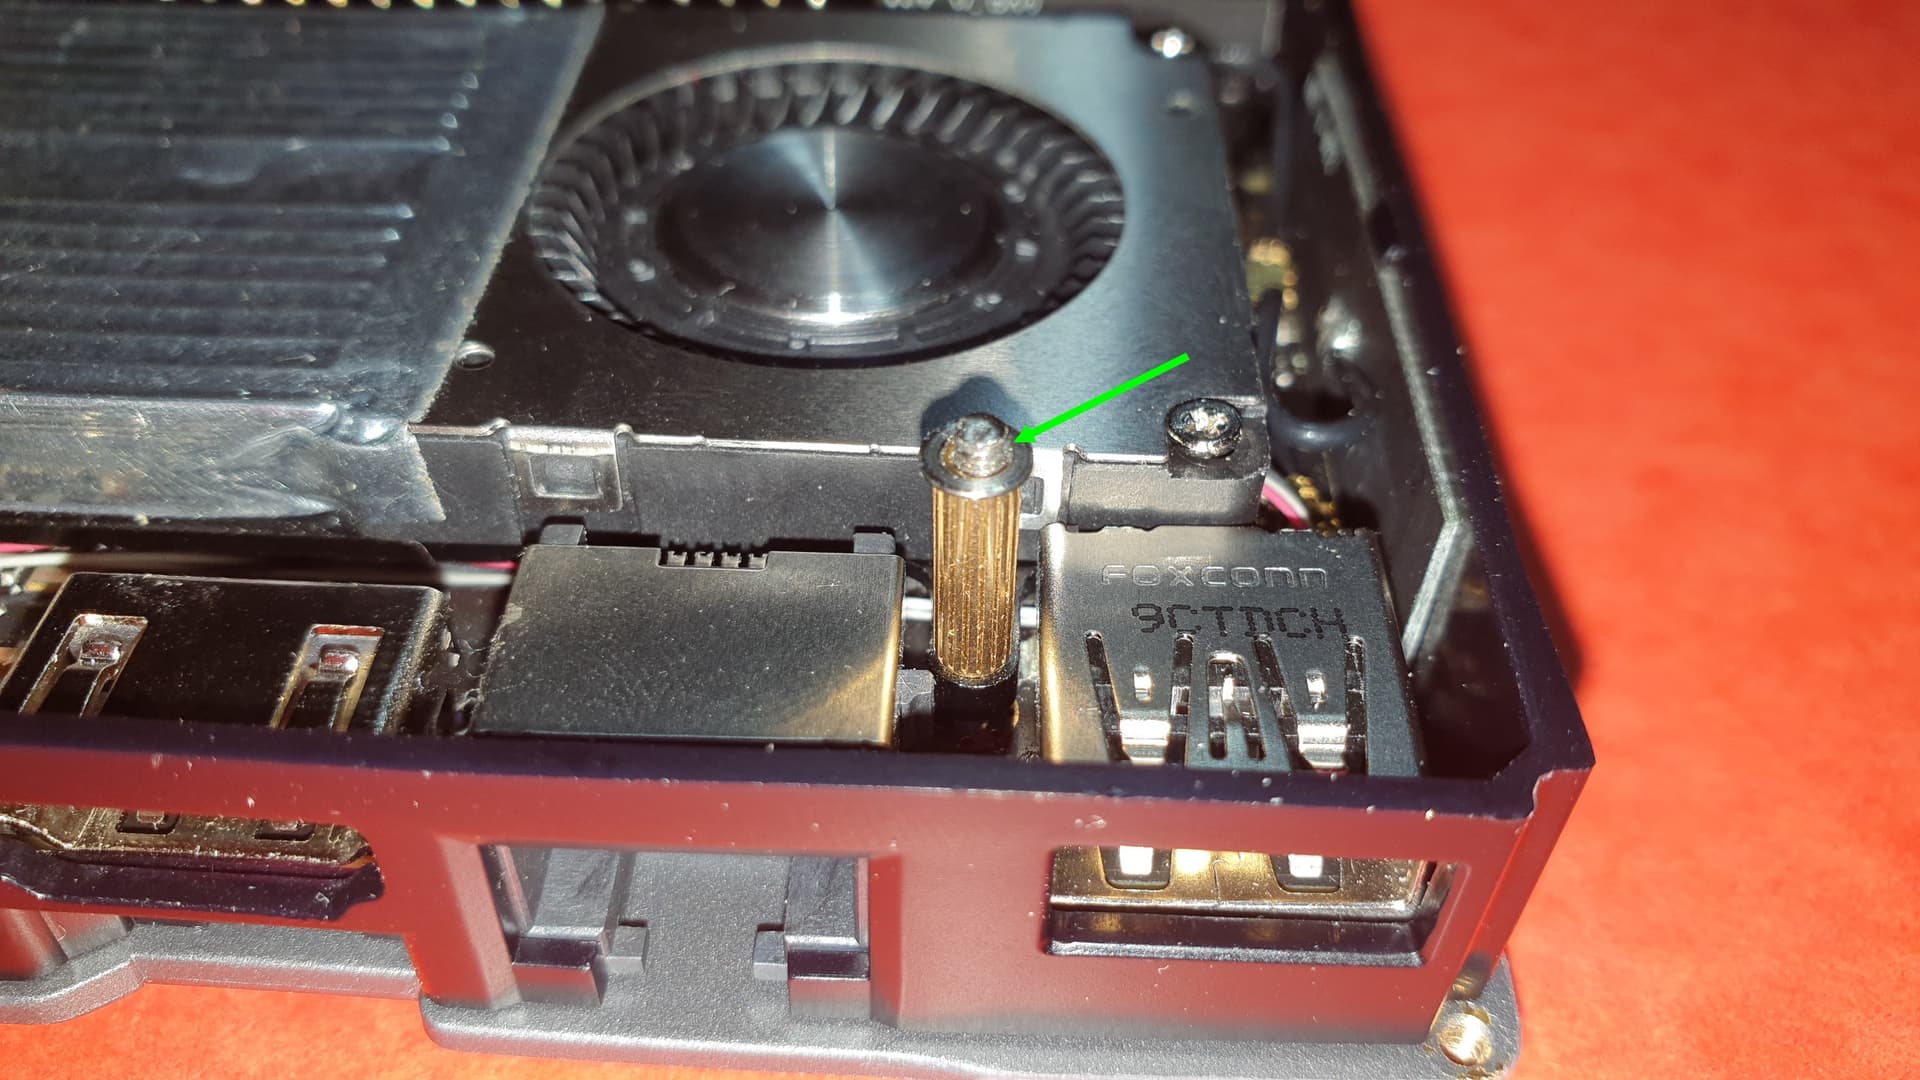
By pressing strongly on the venti-rad screw the 2 PH M2x23.7,…


…so that we can thread the spacers and the washer and that the screw protrudes by about 1mm…


Setting up the Tone2 Pro on the VIM3…
Now we can present the 40-pins header of the Tone2 Pro on the one of the VIM3, taking care that the washers placed on the PH M2x23.7 screws do not fall out…and tighten the two main screws PH M2x23.7…


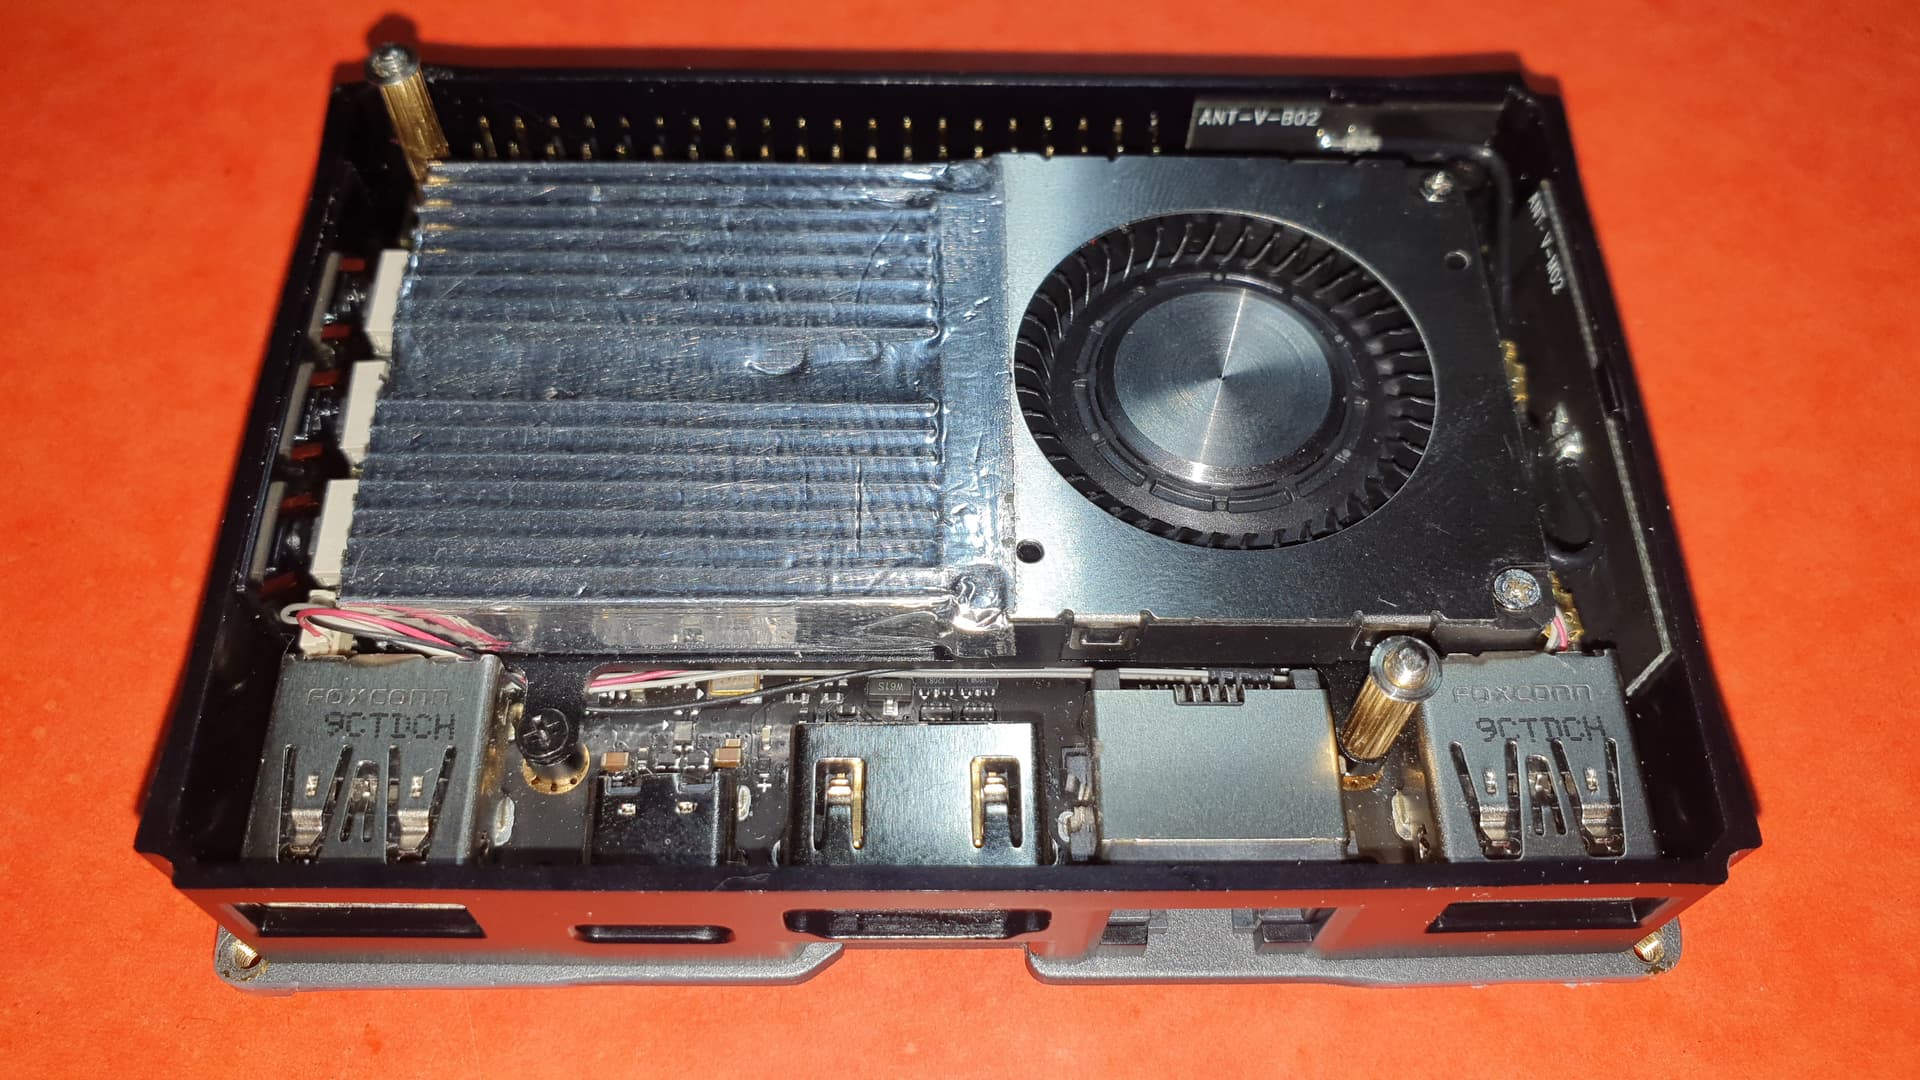
The assembly is now finished,…

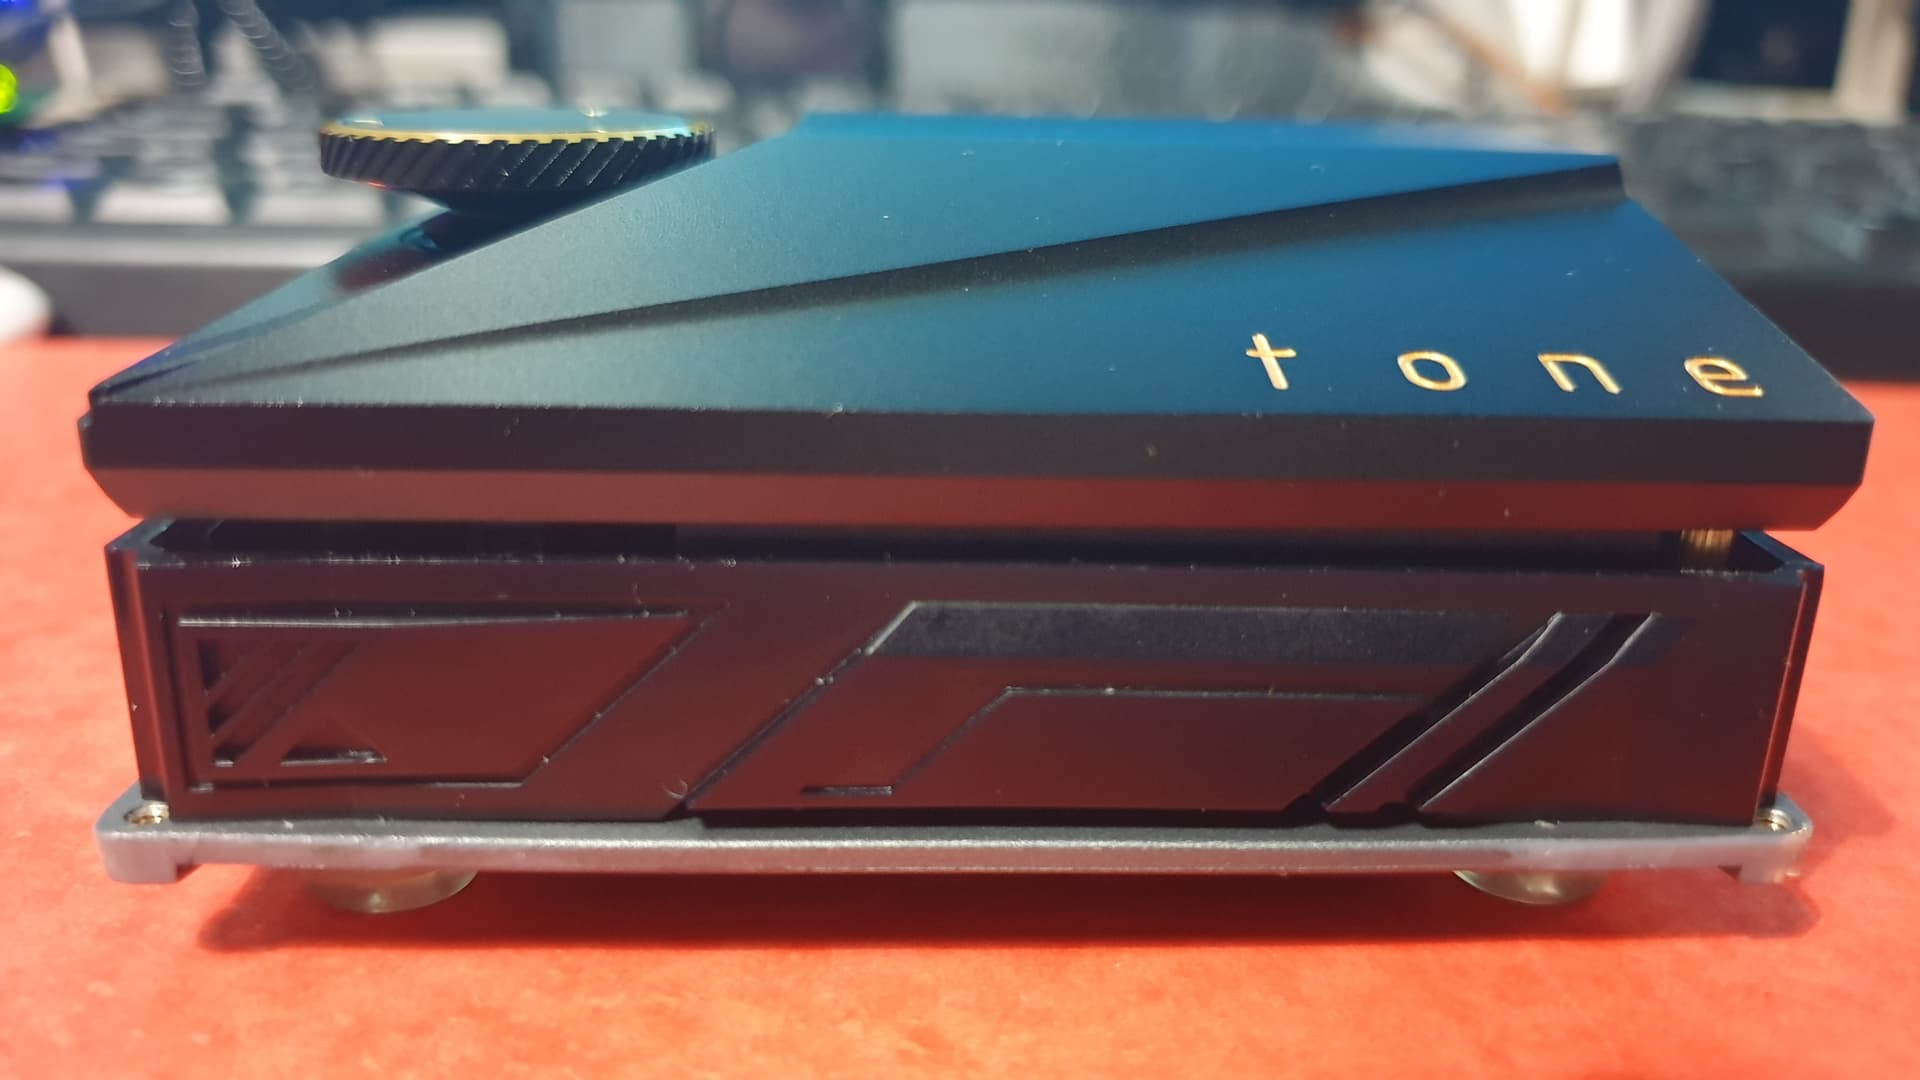
We can see the 2 to 2.5mm of free ventilation space thanks to the use of the 40-pin 11mm header instead of the 8.5mm one…


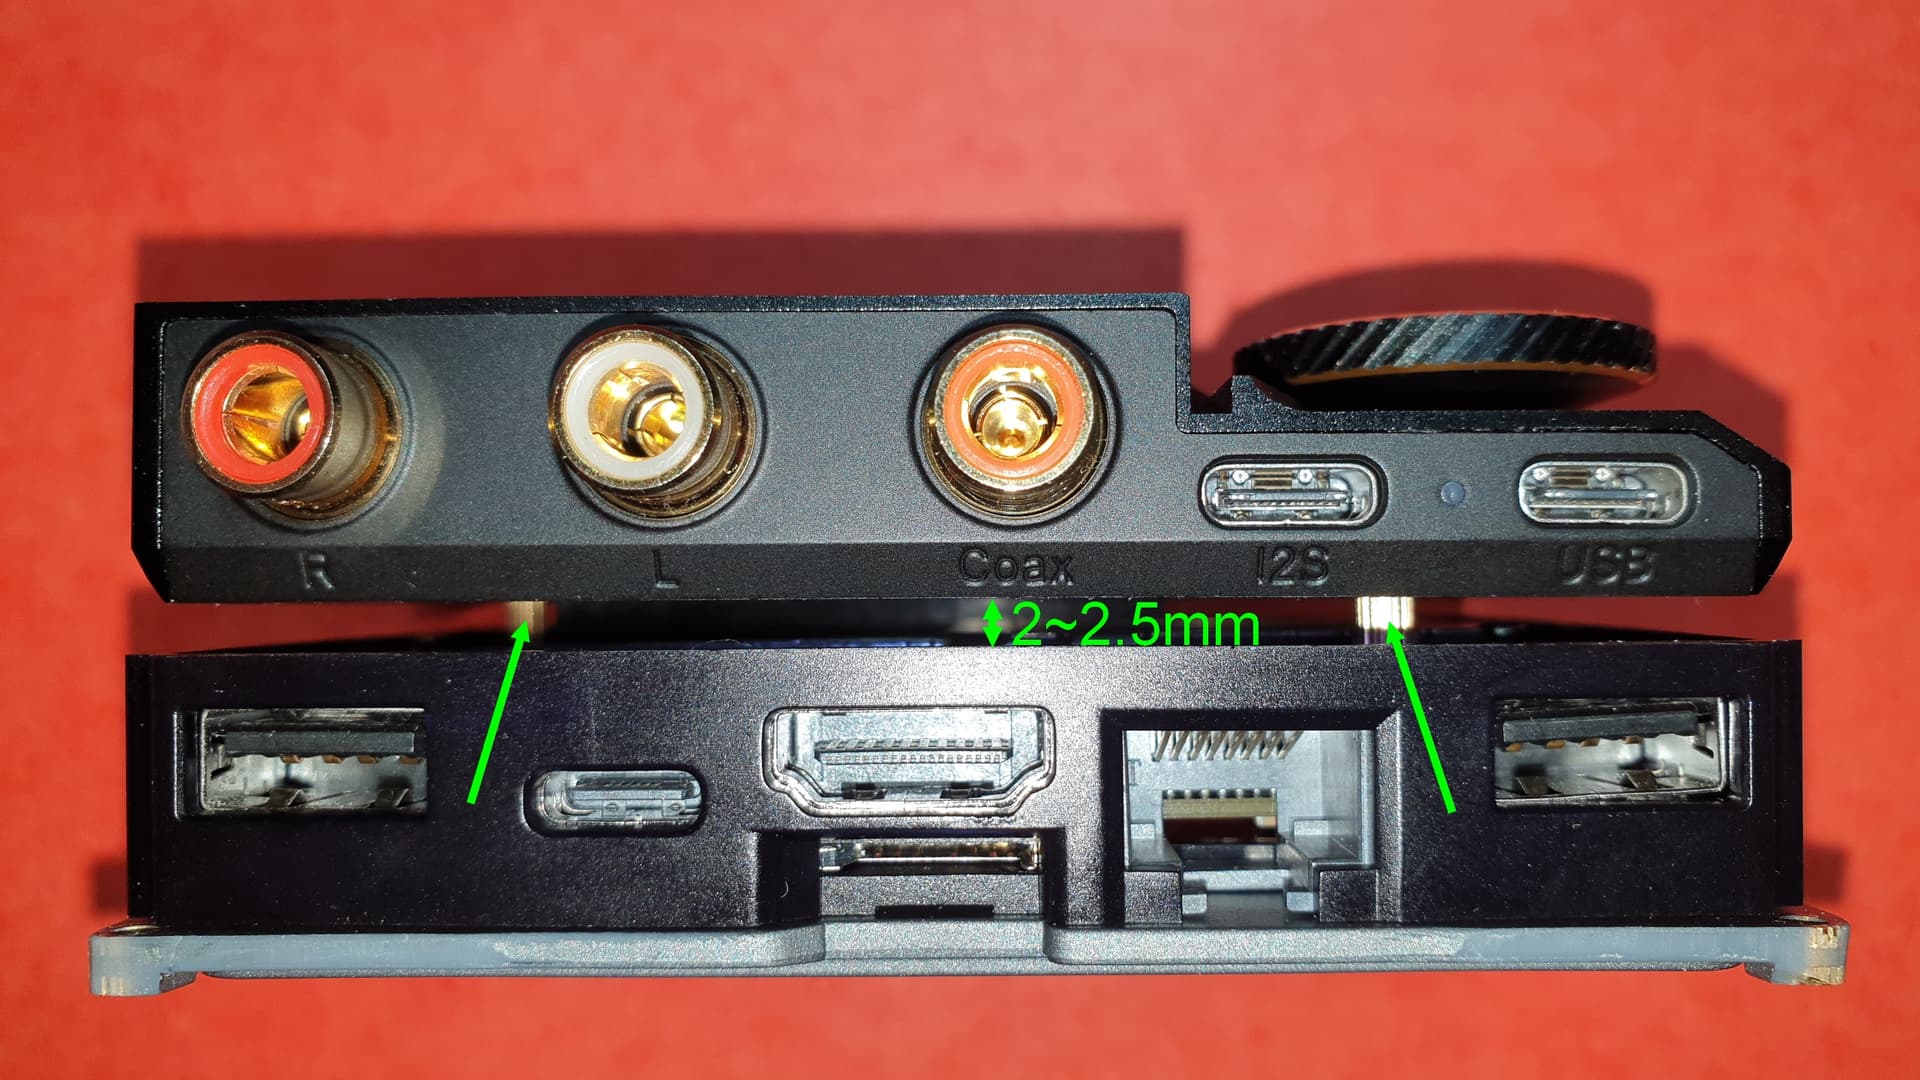
we can go to the finalization and the closing of the box…


Closing of the box with the metal plate…
The metal plate can be used as a heat sink, we are not going to deprive ourselves of it…

We cut a rectangle the size of the open part of the lower part of the DIY-Case in a plate of thermally conductive paste 5mm thick and we slide it into the gap…


…fixing the metal plate…
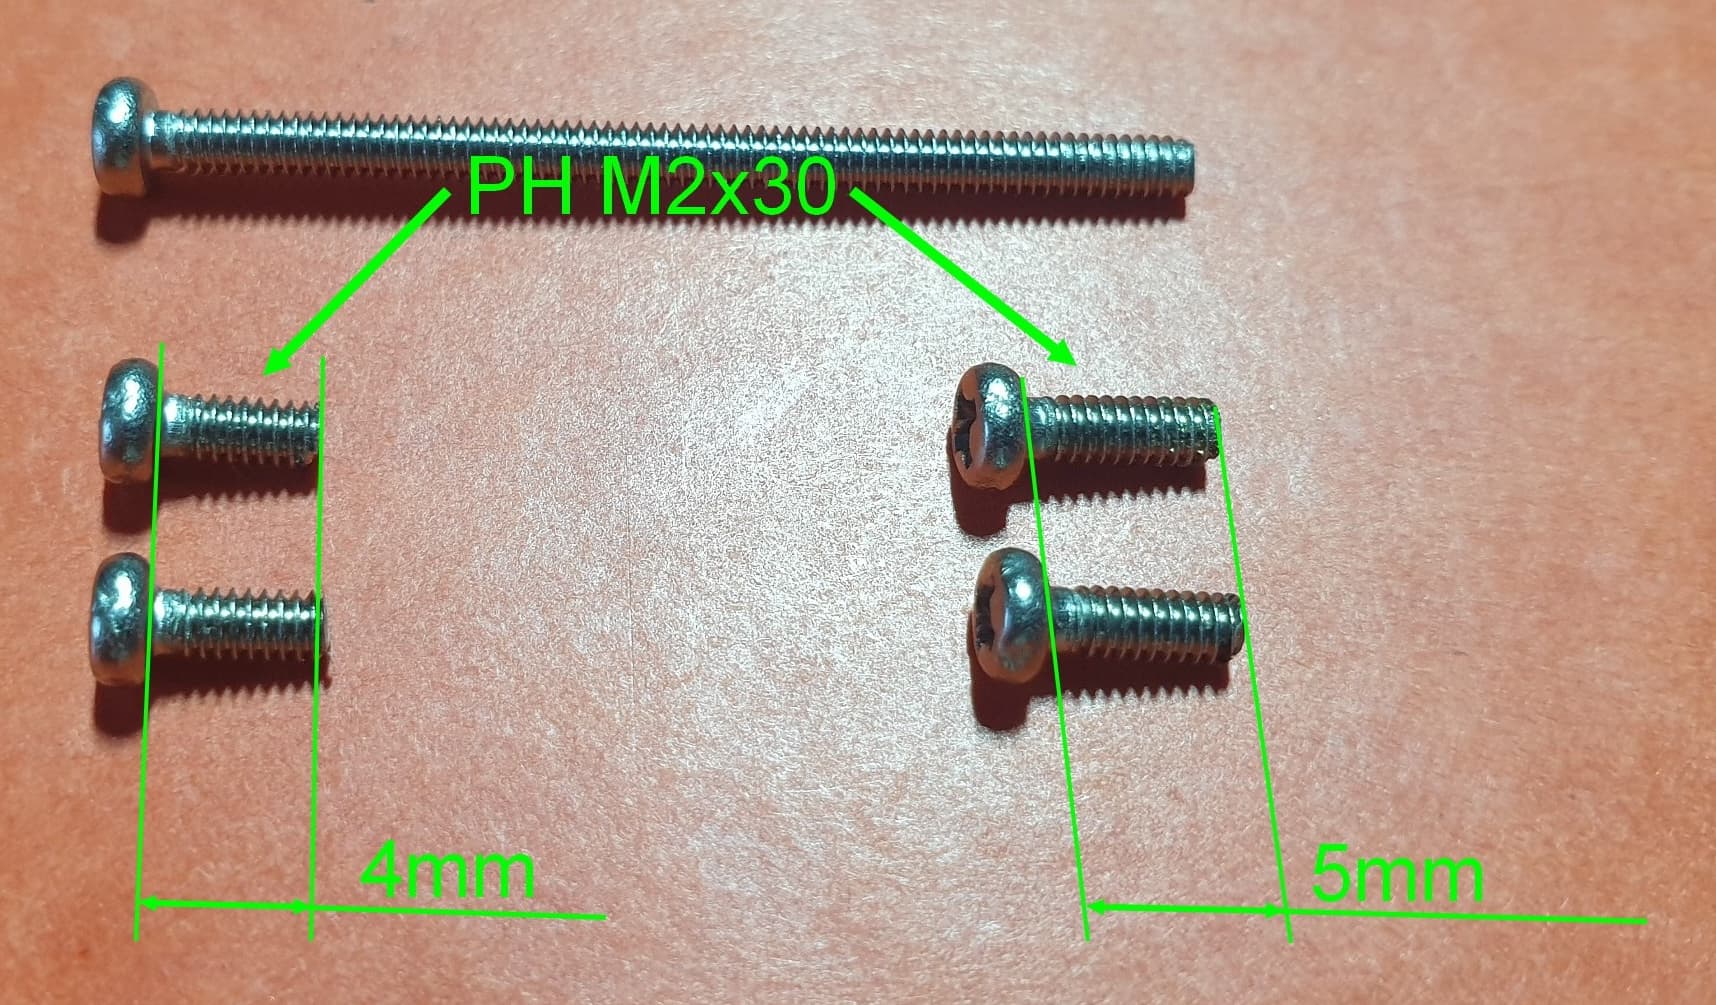
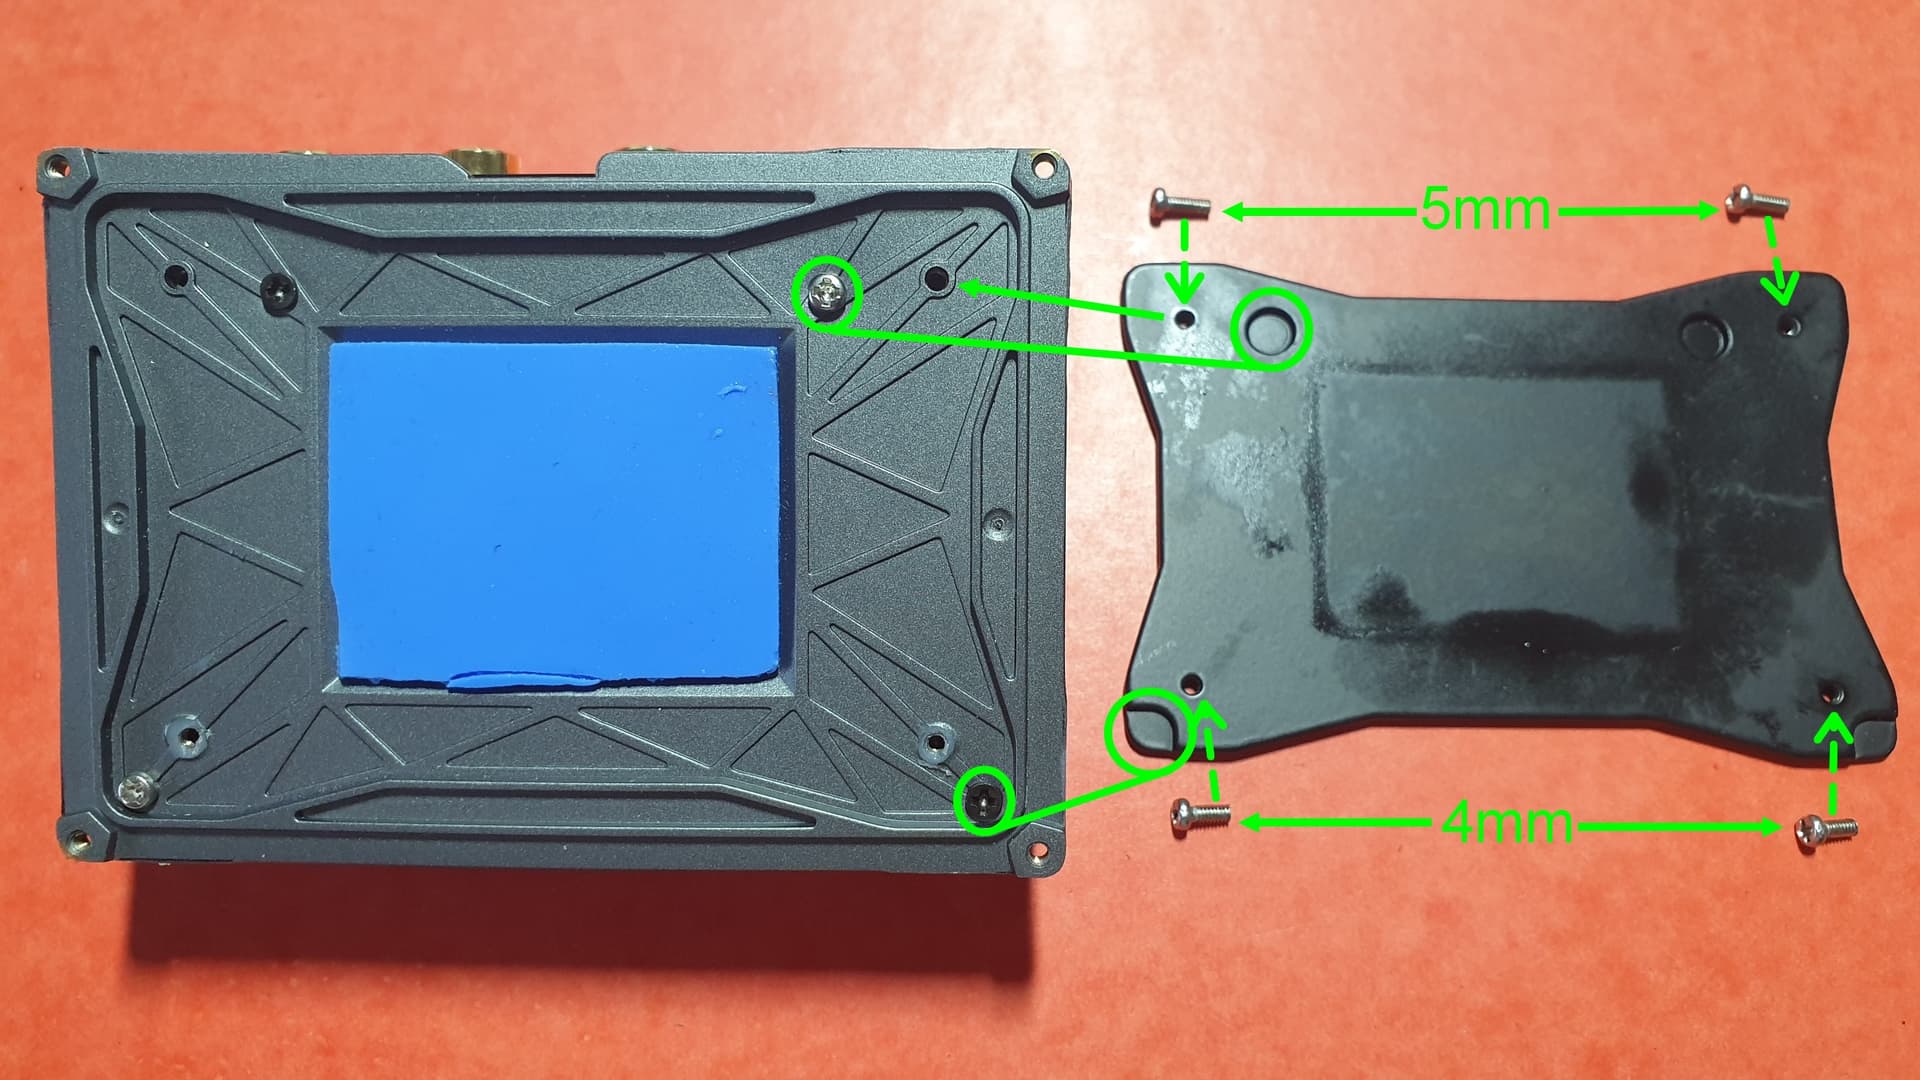
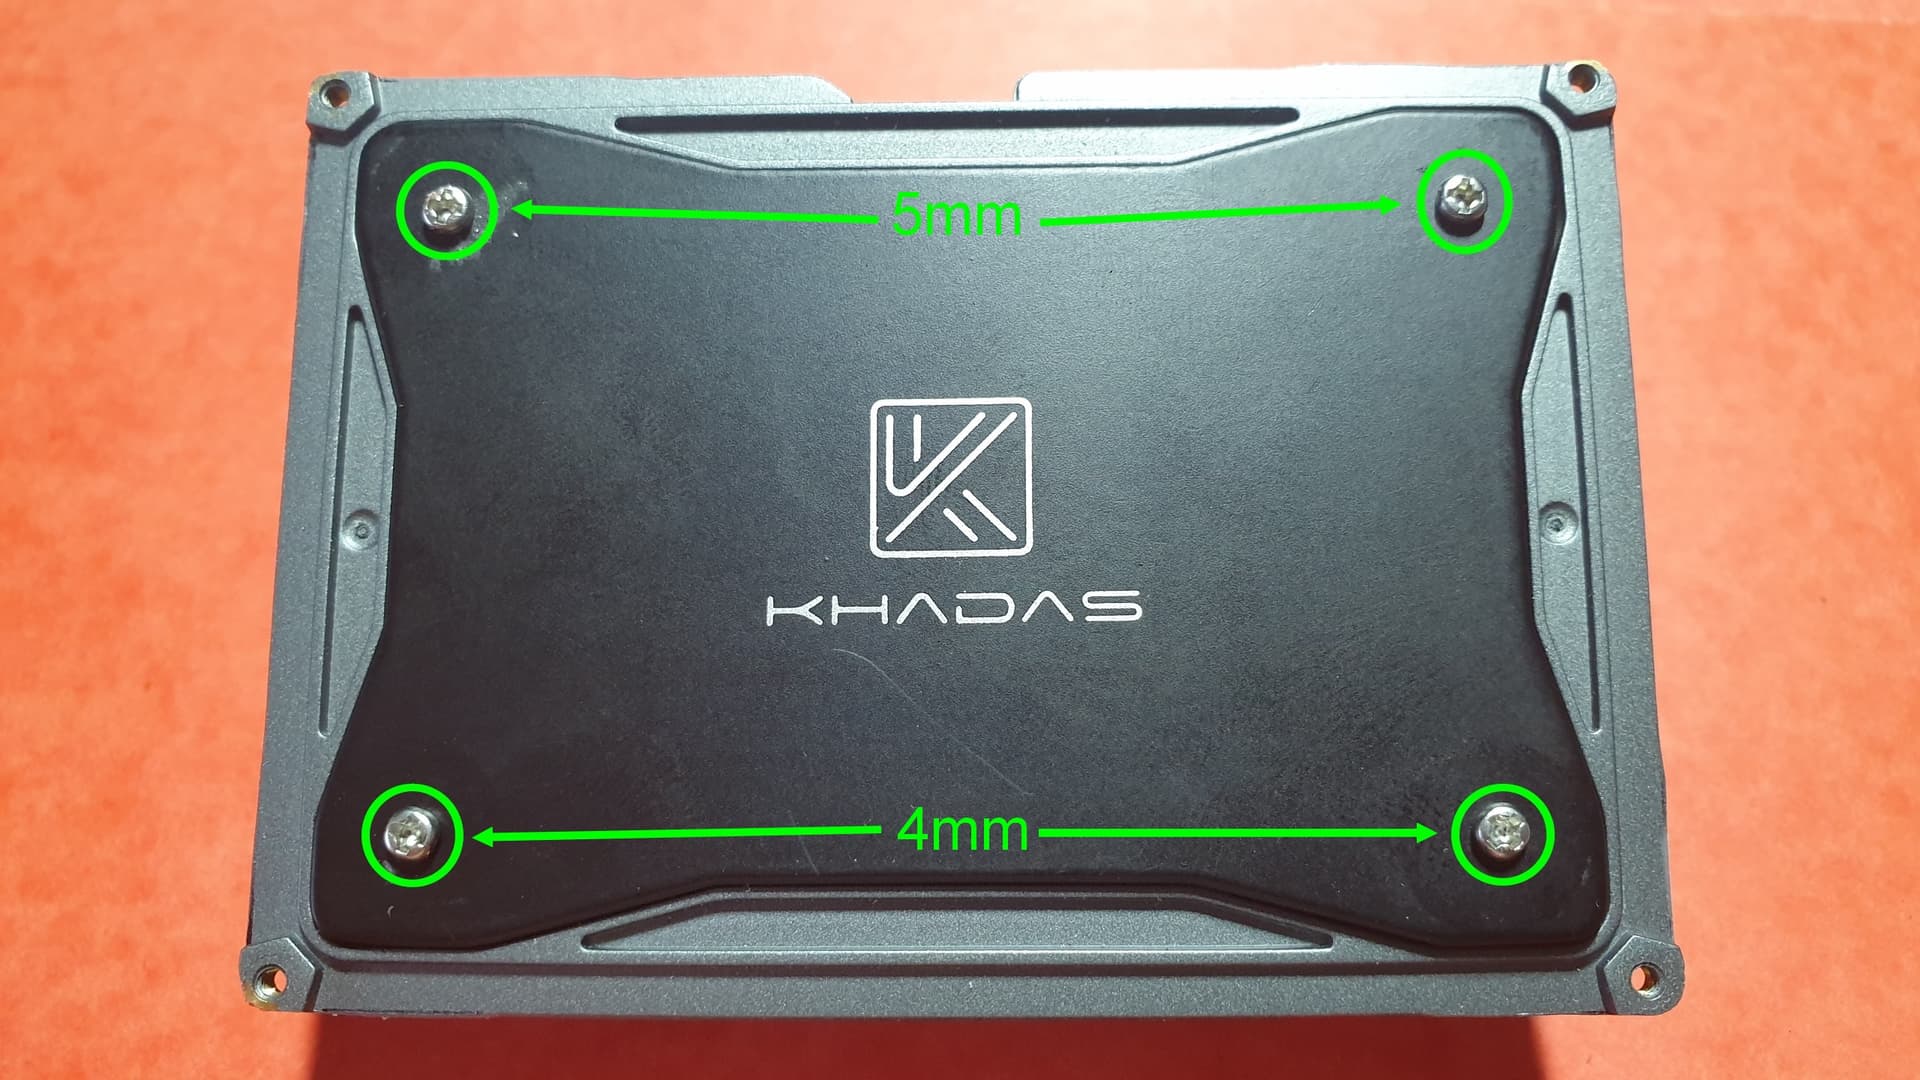
To fix the metal plate we need 4 M2 screws of two different sizes…
2 M2x4 and 2 M2x5 screws that we cut from 4 PH M2x30 screws…

The screws go in this arrangement…
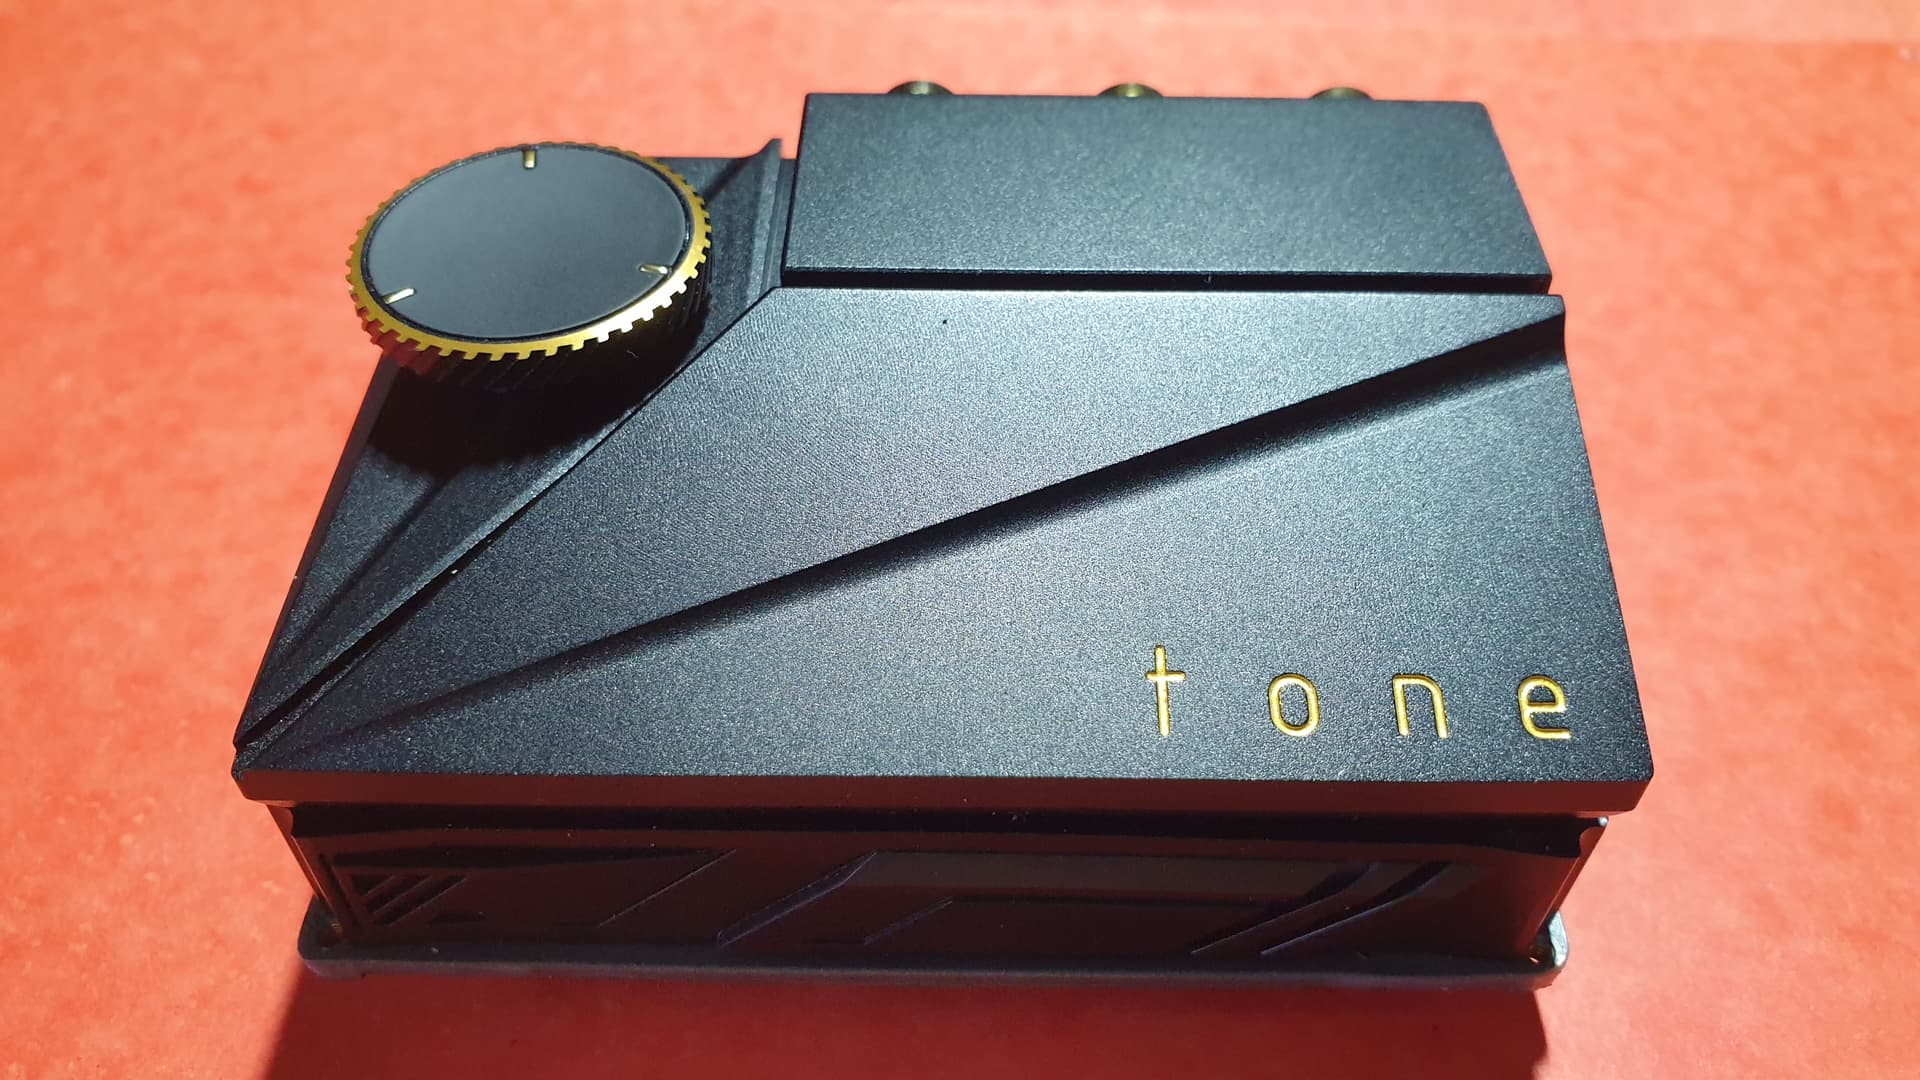

Finalization…
The assembly is now complete…


All that remains is to have the pads on the screws…

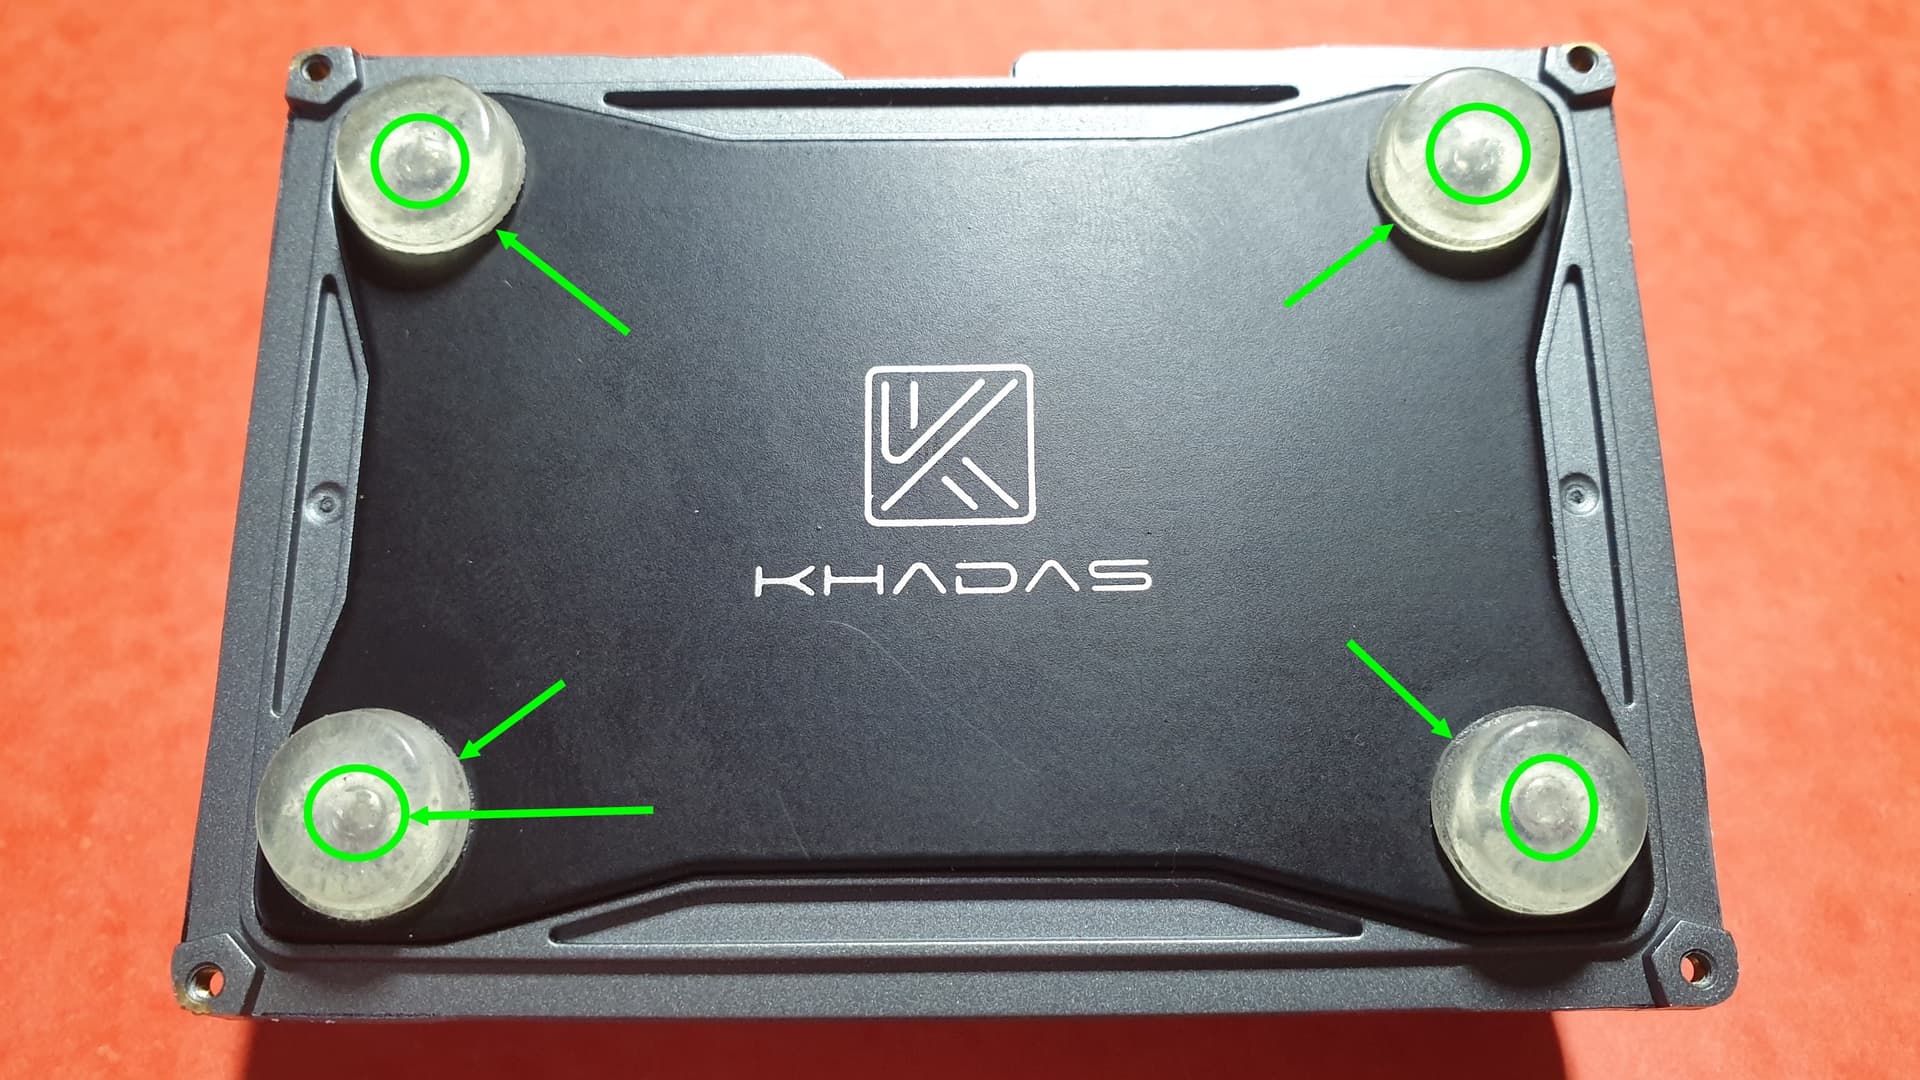
…so that they do not scratch and allow the metal plate to dissipate the heat…


List of what we needed :

BOARDS and CASE :

  • Khadas VIM3 Pro (or not)
  • Khadas Tone2 Pro
  • Khadas red DIY-Case (and its metal plate)

ELECTRONICS PARTS :

  • 40-pins 11mm header (ordered 8 pcs = $6,04)

BRASS STANDOFF :

  • 2x M2x10 (ordered 6 pcs = $0,28)

SCREWS :

  • 6x M2x30 PH (ordered 50pcs = $2,11)
  • 2x M1x4 (Khadas Tone2 Pro parts)
  • 2x M2x8 (Khadas VIM3 venti-rad parts)
  • 2x M2x4 (DIY-Case parts)

WASHERS :

  • 2x M2 or M3 (recycling)

COSTS :
without boards and case = $8.43


I therefore give you an appointment for the following phase :

  • DIY-Case tuned housing VIM3 + Modified TONE2 Pro (PHASE 3)
    The tests and operational problems of the finished assembly.
    See you soon !

DerFu

7 Likes

Hello DerFu,

First of all, I know this is an old thread of yours. I enjoyed very much reading through your experiences with Phase 1 and Phase 2. It’s obvious you spent a lot of time on this project. Very well done sir. I went looking for Phase 3, but it appears you never posted it - yet! Are there plans to do so? I really liked how yours turned out and the clever way you solved some minor road blocks.

I’m in the process of resurrecting an old project of mine, where I will be doing as similar build using the VIM 3 and a DIY Maker version of the Tone2 only on a different scale, but still on a smaller scale than my previous project. Yours turn out super small and ideal for any environment.

My question is… Maybe I overlooked it, but I assume you are simply powering the Tone2 board through the GPIO pins of the VIM? (makes sense) Is that a correct assumption, or are you applying additional power to the Tone2 board externally via the I2S port? Maybe the final details like this are planned for Phase 3.

Anyway, a great little project, with excellent results.

1 Like

Hello RedJR,…

Sorry for this very late answer, I no longer receive notifications from the forum, I will have to take a closer look to see what is wrong…

But that is not the purpose of my answer, let’s come back to your question…

That’s right, there is no part 3, due to lack of time, that’s for sure and also because the tests I was able to carry out on my edit were not conclusive…

Fortunately, I recorded all my tests in a “Chrono” file, in French of course, I would have to take the time to translate it into English to finalize the explanation of this project with its part 3.

GPIO/MQA:
Anyway, the project works in theory, unfortunately, in practice, it is quite different. Indeed, the Tone2 Pro firmware does not allow GPIO (I2S) to be selected as the input port for the audio signal to be decoded, this is undoubtedly due to the MQA license.
Indeed, the MQA decoding license requires, for its operation, to be implemented in a closed autonomous audio system.

If we look at the Tone2 and Tone2 Pro user manuals, we see that signal input via the GPIO is not allowed on the classic Tone2 and Tone2 Pro. On the other hand, where your choice is judicious is that the Tone2 Maker Kit allows this use!

FIRMWARE:
I advise you to do as I do and keep all versions of Tone firmware upgrades in order to compensate for an update that will deprive you of certain features in your editing.

MOD:
Aesthetically speaking, if you are lucky enough to have the Tone2, Tone2 Pro and Tone2 Maker Kit available, the Tone2 MK is a priori compatible with the Tone2 case, it should be possible to place it there and thus create a module complete VIM+Tone2 MK assembled as I did. This is actually one of my future projects since the VIM+Tone2 Pro marriage did not give me satisfaction.

Good luck in carrying out your project, don’t hesitate to post it on the forum, tag me when it’s done, it’s always a great pleasure to follow DIY projects :wink:

1 Like

Hello DerFu,

Thanks for your reply. I’m not even sure what Part three would be, but no worries, I think I know where you were headed. Maybe you could post it in French anyway, and let Google translate it. Either way I’m good.

Hardware-wise my project turned out great. I had the older TB1, and attached a 40-pin header so it would mate properly with the VIM 3. I then attached 5V to the underside of the VIM3. This powered the VIM3 directly, and the TB1 through the GPIO. In that respect, the hardware was working as intended.

Since I was ultimately going to use this project as an endpoint(remote) in roon, my next challenge was to take the VIM3, Unbuntu image I had, and install the roon-bridge, and the other software necessary to use it with my attached 5" display, by using Chromium in kiosk mode to take advantage of the roon-web-controller running on a special roon server.

I would have liked to use the Tone2 MK board because of some of the hardware upgrades made to PCB, and I still may do that, to get better/cleaner analog out to the RCA connectors. I see Amazon has the MK for $120USD. An excellent price for the Tone2 MK.

I published my project over on the roon community forum with a short description. You can find it here.

Anyway, thanks for your inspiration to my project. :slight_smile:

Edit: I forgot to mention, I’m using I2S on the GPIO bus to go from VIM3 (network), to the TB1 and then out the RCA jacks. So I2S definitely works in this use case.

I’m now in the process of playing/working with the Tone2 MK. I popped for one on Amazon when it was $119. So far everything seems to be working as it should on my Win 10 machine. However, I’m having trouble with Win 11 on a Ryzen machine. I’m trying to get it going using roon, since that my digital playback environment. I’ve try different drivers, but nothing seems to work. Even re-installed roon without success. There’s not a lot info out in the wild about Tone2 MK. I just assumed it was very close to the Tone2 Pro, sans MQA. At the moment, I’m waiting for another VIM3 to show up in the mail. So, far I’ve only been able to test I2S on the Win 10 machine.

Hello @redjr redjr,…

Glad to hear you found a Tone2 MK :wink:

KHADAS SHOP vs AMAZON: Personally, I prefer to deal directly with Khadas, who has already been very accommodating in the past with some of my orders. The Tone2 MK is currently $116 on the Khadas shop :wink:
On the other hand, on Amazon, in the event of a problem, it is Amazon that handles the return, your choice may not be bad either :wink:

W10/W11: I am also on W10 and no W11 yet so it is not possible for me to test the drivers to confirm the problem you are talking about. You can try to contact a Khadas Team technician directly by PM, again they have always been there to listen to me when I encountered problems.

ROON: I don’t use ROON, for the moment I still use my old one (DIY Case tuned Housing VIM2 + VTV + TONE-BOARD) with SPOTIFY or TIDAL in 320Kbps, it’s more than sufficient considering the acoustics of the rooms in which I listen to music :wink:

SERVIIO: If I had to install a stream server, I think I would turn to SERVIIO, it will be more than sufficient for me given the use I will make of it, plus it exists on Linux, Windows, Mac, QNAP and SYNOLOGY, 3 more reasons out of the 5 to guide me than SERVIIO.

TONE2 MK = TONE2 Pro: Perhaps, especially since we can read on (https://www.khadas.com/tone2) in the paragraph “Versatile Expansion” apart from the fact that we can power the TONE2 MK through the VIN port, the following:
…, and OEM clients will have more options such as customized MQA decoding functions.
What do you think of this sentence anyway? :wink:

TONE2Pro and TONE2 MK FIRMWARES:
On the other hand, I don’t think that the firmwares are compatible, because the TONE2 Pro firmware does not allow the GPIO to be used as input!
That of TONE2 and TONE2 MK (see paragraph “input selection” of the TONE2, TONE2 MK and TONE2 Pro manuals).
Due to lack of time, I didn’t dig deeper…

Thanks for the reply. I’m still messing around with the Tone2 MK. I’ve found that it works well as a USB DAC, but beyond that I’ve had no success with I2S.

At the moment I’m trying to undo a stupid mistake. I had a new little system I had built around the VIM 3 and a TB1. More importantly, a couple years back during Covid, I had finally got the TS050 screen working with the VIM 3, the LCD, and roon all over I2S. However, I don’t have any idea how all the software mods came together and my notes are sketchy at best. Then I went and ruin the VIM 3. Here’s where it get interesting. While the version of my VIM 3 was V12 1907 3113, it was based on the Amlogic A311D. The replacement VIM 3 I received from a friend, was based on the Amlogic S905D3. And, apparently, they are different! I just assumed the S905D one would simply boot up using my microSD card from my original A311D. That was not going to happen. Khadas uses the model VIM3s as if they are interchangeable. Well, there must be some code buried, such that the pieces I need to work, won’t. :frowning: And, it seems I can’t even get Krescue to ‘rescue’ me! The splash menu is displayed, but all mouse and keyboards are dead. I’ve tried numerous versions, on the new VIM3 (S905D3) with the same results.

So, I’m on the lookout for one of the original VIM3s using the A311D SoC. I read on the forum somewhere that VIM3 is/has been phased out. You don’t happen to have an unused and working VIM 3 base on the A311D SoC? Amazon shows them for sale, but for an outrageous price. I’m not sure if the forum allows ‘wanted to buy’ posts, so left a post asking. Mods haven’t responded yet.

Here’s a pic of my little roon endpoint I’m trying to resurrect.

Rick

@redjr that device is the VIM3L, it is different from the regular VIM3 of course.

What firmware are you trying to run ?

VIM3 is not phased out.

Its available here:

Hello everyone,…

@redjr

[quote=“redjr, post:7, topic:13883”]
… And, it seems I can’t even get Krescue to ‘rescue’ me! The splash menu is displayed, but all mouse and keyboards are dead…[/quote]

Before Krescue there were other methods to install OSes on Khadas’s boards, maybe you could try erasing eMMC to wake-up your problematic VIM3L…

In my “old” files I got an old link called Howto Erase the EMMC Storage but, as you could see, it don’t work anymore!

Fortunately, if you clic back to [Home] and on the lowest link on this home page called Old Documentation you’ll be abble to find this other link Erase eMMC.

But before one of these 3 methods I’ll try this “old” one :
VIM BUTTONS :
FRONT (DEL side) <-| [(P)ower] [(F)onctions] [(R)eset] |-> BACK (connectics side)

    • Power up the VIM (Once VIM is powered up…)
    • long press [Power]+[Function] … without releasing [Power]+[Function]
    • short press [Reset]
    • System erases the eMMC … 10’’ … Black screen … eMMC is blank…

Krescue finally stopped being so stubborn. Tried it on a new VIM3L and if worked. At least now I have more booting and install options. I wish Khadas wouldn’t install ChromeOS as the default. Does anyone use that silly OS? Every time it boots up I think of being back in kindergarten. All SBCs, from any vendor, should boot from the microSD first. Period. If, the the boot loader doesn’t see it, than look at emmc next. Those are the most likely place to find the OS. Software, even firmware, can be written a lot smarter, so why do we have to go through the button pressing gyrations to get it to load? After all, it is 2023!

Hello @redjr,…

I started with a VIM2 Pro v1.2, at that time Krescue and OOWOO did not exist and there were only a few different distributions that could run on VIMs. as VIMs and Khadas evolved, the offer expanded and left a wide choice of OS to users, then Krescue arrived, what a pleasure to be able to do a backup/restore in a few minutes, it was a big step forward and a significant time saving (as you say, no longer having to go through complex key combinations), today, OOWOO is there, I don’t have it still experimenting, it will perhaps be on my VIM4 or on my Edge2 ARM PC.

All potential VIM or Edge users have the option of having a pre-installed OS. I think it’s a good thing for those who are starting out with Khadas products, it allows them to try without taking the hassle before digging deeper… Afterwards, everyone is free to make a reset and slide in what he wants to run there, or not :wink:

An empty eMMC VIMs all boot on SD card, it is only when the eMMC is populated with a valid OS that the VIM no longer boots on SD, fortunately Krescue is there, otherwise there are the Old School methods like I t I described in my previous message. Personnaly I think that booting on µSD first is a security hole, I prefers the way VIMs actually boots. Who want to boot on SD, uses the buttons combination, if he dont know that combination, he cant force boot, it’s secure, so that nobody could ruin my work :wink:

Krescue does not launch in the same way on VIM2 v1.2, and VIM v1.4/VIM3 (I have not tested on VIM4, I suppose it must be like for VIM3)
KRESCUE VIM2 Pro v1.2 BOOT
===> [POWER] + 1x click [RESET] + WAIT 5" + release [POWER] ===> /!\ WAIT + 5" = eMMC ERASE!!!
KRESCUE VIM2 MAX v1.4 (VIM3/VIM4?) BOOT
===> 3x [FUNCTION]

By the way, Have you tried to reset the eMMC on your old VIM3L?