Hello, is the support of HA is still a work in progress ?
I ran into the same thing. I fixed it by running:
sudo nano /boot/uEnv.txt
Add systemd.unified_cgroup_hierarchy=0 apparmor=1 security=apparmor to the boot_user_args= section and reboot. So once added, you should have:
boot_user_args=systemd.unified_cgroup_hierarchy=0 apparmor=1 security=apparmor
This is the old installation guide and is not necessary anymore. You no longer need a USB and the image is accessible on the device itself with OOWOW. See replies below for more info on the updated guide.
For other newbies like myself, here’s an updated version of @pappicio’s image with the language set to English and the “AppArmor” and “CGroup” issues fixed.
There are 2 images to choose from. The first image will keep the LED on the device at default (on). The second image will instead set the LED light to ‘off’ after every boot. Choose whichever one you prefer.
- https://drive.google.com/file/d/1dsJATOTcAwlERVs82tYXB35TpHFs5vRE/view?usp=share_link
- https://drive.google.com/file/d/1E3gyPWhYxjkJY2mX9Q-SGAyl6gvJ8RJy/view?usp=share_link
Instructions:

Note: Use a USB drive as using an SD card did not work for me, unless using a USB SD card reader.
Put .zst file (no need to extract) onto a USB drive and insert into the device
Open OOWOW by holding the ‘function’ (middle) and pressing the ‘reset’ (right) button
When OOWOW starts, select ‘Exit’ as we’ll connect ethernet/wi-fi later
Select ‘Write image to eMMC’
Hit ‘Enter’ to select ‘…/’
Select your USB drive
Select the image .zst
Hit ‘Enter’ to select ‘Write’
Once completed, reboot the system
There are two logins (make sure to change these):
root with password root and
pi with password pi
Once logged in, connect your ethernet cable or set up Wi-Fi by running:
nmcli dev wifi rescan
nmcli dev wifi list
nmcli dev wifi connect "your network name" password "your network password"
ip addr show
Take note of your host IP address under your network adapter (eg. wlan0) and open HOSTIP:8123 (eg. 192.168.0.100:8123) in your browser. It might take a few minutes to appear.
PLEASE NOTE: Make sure to update Home Assistant immediately after setup, enable 2FA on Home Assistant (for good measure) and change the default logins on the VIM1S.
2 Likes
Nice to see this progress with vim1s, is there a way to turn the led off if we used the first image of @pappicio ?
Yes, you can do this by running:
sudo nano /etc/rc.local
Halfway down, you should see:
# Setup LED: heartbeat if bootup completed
with something like this underneath:
echo heartbeat | sudo tee /sys/class/leds/pwmled/trigger
Replace this with:
echo none | sudo tee /sys/class/leds/pwmled/trigger
2 Likes
Oh great thanks so much. Now i think we have the perfect image and the perfect apparel to run home assistant.
I tried your /etc/rc.local modification. It helps. Thanks!
I installed this image, updated Home Assistant after but I have this error/warning. Already tried the solutions in the article but no luck.
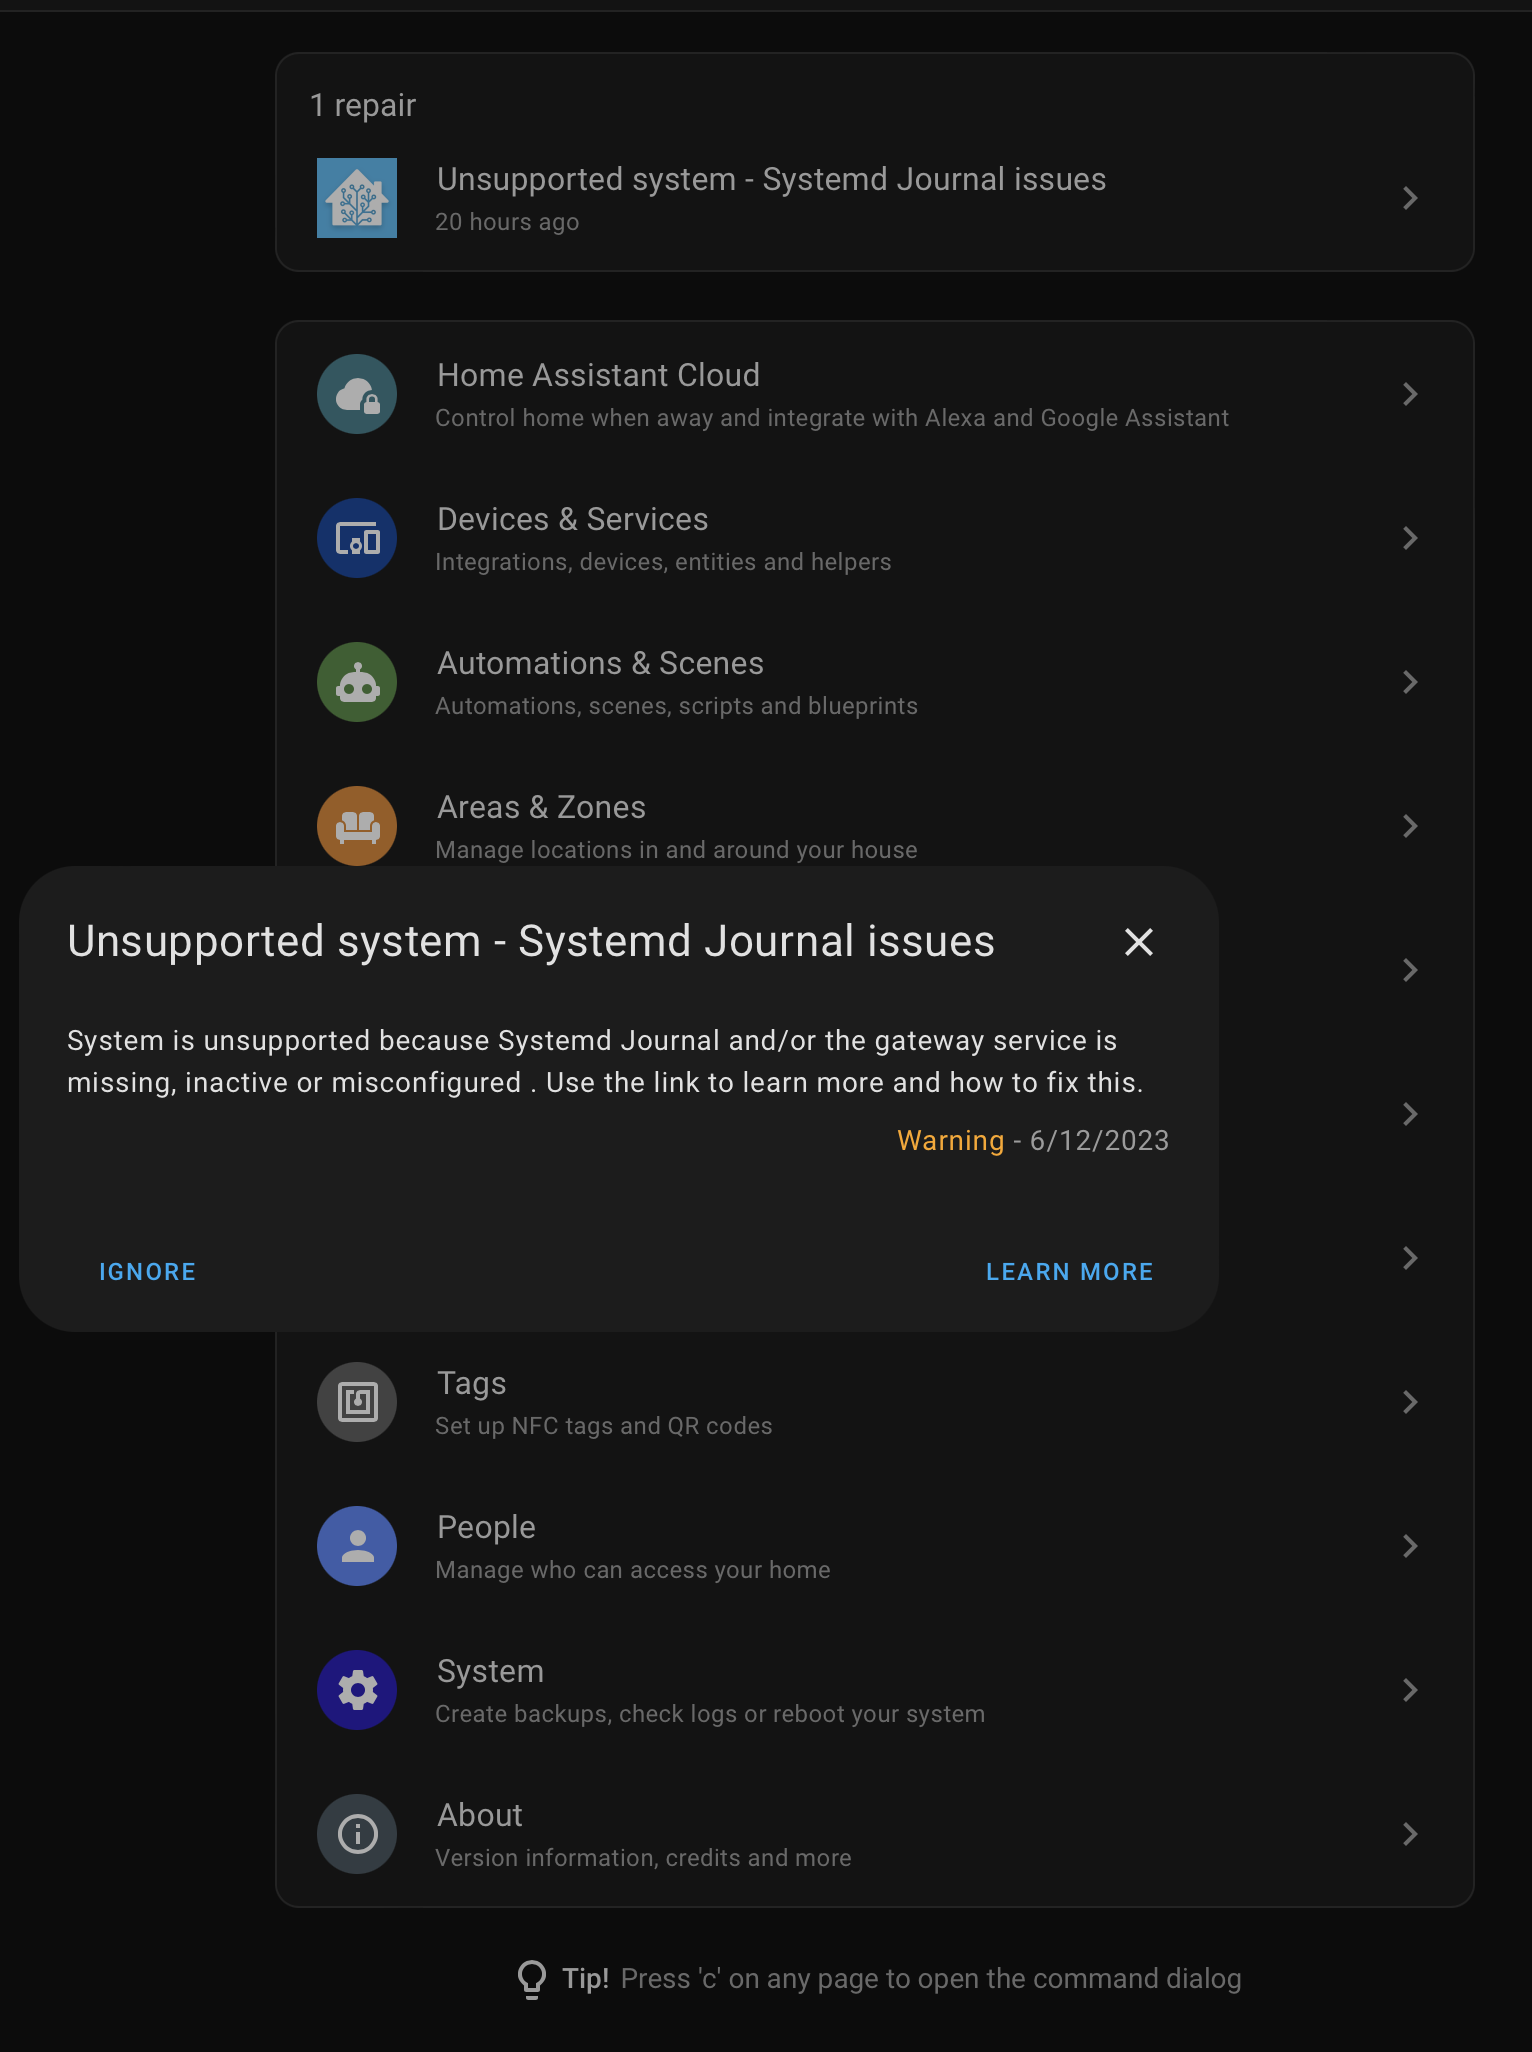
I came across this before but forgotten how I fixed it. I tried replicating the issue again but couldn’t, though if I do I’ll be sure to give an update.
As far as I am aware, this will only affect access the Host logs from within Home Assistant
An update regarding this…
The old images I provided ran on an older version of Home Assistant and Hass OS in order to work, as I struggled to get it working otherwise, hence why I mentioned to update HA immediately.
This image uses the latest version of the HA installer and Hass OS, so no update required and has all issues resolved (at least on my device). I remembered how to fix the “Systemd Journal” issue, thankfully!
I also have it working for eMMC and SD card so you don’t have to rely on the 16GB eMMC.
If anybody has the time to try this image (this is for eMMC, same install process as my video) to confirm that it works also, please let me know ![]()
Default login is:
User: khadas
Pass: khadas
Many thanks
This image is now accessible through OOWOW Wizard, see below for more info
1 Like
Hello dxnnelly,
I tried your image of above ‘vim1s-ha-supervised-debian-11-minimal-linux-5.4-fenix-1.5.1-230623.img.zst’, successfuly written to internal eMMC from USB stick memory which process I failed yesterday. It seems work well except ‘dpkg-reconfigure keyboard-configuration’ which I need. Any way, I have just installed, then this reply is very very initial result.
Regards,
In case anyone else has this issue, and is possibly using a non-US keyboard, @C_B11 resolved this by running:
sudo dpkg-reconfigure keyboard-configuration
You may need to try re-write via OOWOW again if running that does not work
Good morning,
First test with the last image (
vim1s-ha-supervised-debian-11-minimal-linux-5.4-fenix-1.5.1-230623.img.zst 2) everything works fine. But I can’t install the Bluetooth and zigbee dongles on the usb ports. Looks like HA is not detecting them.
Hello @Dlteck2000 @dxnnelly
I have uploaded vim1s-ha-supervised-debian-11-minimal-linux-5.4-fenix-1.5.1-230623.img.zst to oowow, you can install it with oowow online from now.
1 Like
Hi numbqq,
I see the HA image in oowow, but after install, it can’t boot correctly…
@dafra
Is it rebooting or is it stopping somewhere,the beta version will not automatically jump out of the login line, you need to hit the enter key.
Thank you for the reaction.
The boot work up the moment where I have this message :
proc: Bad value for ‘hidepid’
proc: Bad value for ‘hidepid’
nf_conntrack: default automatic helper assigment has been turned off for security reasons and CT-based firewall rule not found. Use the iptables CT target to attach helpers instead
After, no reaction
The USB power supply is a Apple 30W
Hello @dafra
Please follow the official documentation to setup: Onboarding Home Assistant - Home Assistant
Thank you @hyphop and @numbqq for getting it up and working with OOWOW. It’ll hopefully make installation and updating a lot easier ![]()
Here’s an updated guide:

I won’t post the instructions here as to not take up so much space and it’s probably best to follow along with the video and timestamps, or I also have the full instructions in the description. This is for eMMC installation only. I was wondering if anybody is looking to have this installed onto an SD card? Would, and does, a video guide help?
2 Likes
We resolved this issue in PM but will post the fix in case anyone else is looking to setup the bluetooth adapter in HA (soon I will try make another updated image with this fixed, so this won’t be necessary for long). Zigbee dongle was fine, but needed to run the following to set up the bluetooth:
sudo apt install bluetooth blueman bluez rfkill
then this:
sudo rfkill unblock bluetooth
sudo hciconfig hci0 up
and reboot
2 Likes