Project - Robot Girl Submission

Hello Everyone at Khadas

For this post, I would like to give the full details of the robot cat girl project which was built with the Vim3 as the brain. I plan to make quite a few long posts here to highlight the process of building the robot:

  1. Introduction
  2. Android V7
  3. Mechanical Design
  4. Casting
  5. Electronics
  6. Software
  7. Conclusion
  8. Future Work.
5 Likes

1) Introduction

I started working on the general idea for a robot girl during 2020 and in the middle of a masters degree in biomedical engineering. Initially, I thought it would be quite interesting to build a robotic body, and that it can be given a decent brain with modern machine learning (ML) technology. I also wanted to make the robot help humanity. It can help people on a personal level by being their girlfriend / partner. It can be used commercially as a service robot. Thus, I started developing prototypes and improving my own skills.


Fig1. Pictures of all the prototypes made the first 2 years after the project started.

As you can see from the pictures, it took some time to reach the current prototype, which is prototype 7. I will not mention too much details about each robot, but they do have interesting side points.

  • The first prototype is actually super light weight, and the whole robot weighs only 1kg. It is a full body with over 20+ motors. I mostly used micro geared motors which have good torque density. Each motors has a potentiometer to determine it’s position. However, this robot failed as it was difficult to read all 20+ signals using a multiplexer pcb I built. Plus, it was too weak to really do anything. However it might be interesting for space applications.
  • The second, and third prototype experimented with transmitting the motor’s force over cables, and this allowed the weight to be shifted to the core. The ideas was that the arms can be slim with the cables and this would allow a really nice outer body with lots of soft skin. Otherwise, the motors would be large in the arm and legs and it would have to be hard plastic. These robots actually did work, but they were very difficult to fabricate, and repair.
  • The prototypes 3, 4 utilized standard servo motors, and a hard plastic panel outer shell. Initially, I made my own custom servo controllers, for each motor, but I could only link 5 of them together due to limits in communication protocol.
  • Prototype 6 started to look quite good, and I was experimenting with casting silicone skin. This is where i first implemented the Khadas vim3 as the brain and spent a few months developing software for it. This prototype looks good, but the skin was too hard, and the rotational joints where not durable.
  • Prototype 7 is optimized for durability, manufacturing, and assembly. It has a similar look to the 6th one.


Fig 2. Protoype 7 of the cat girl robot.

Mostly, I was working on prototype 7 during the time of the khadas competition, but started using the platform during prototype 6. Thus, I will focus on these two. The project has come a long ways, and now I do have a functional body. I have written a bunch of code to give it many functions, but I feel like the software will need to grow much more in the future for it to fully become a real cat girl. (and have its own mind)

2 Likes

3) Mechanical Design


Fig4. The body during assembly stage

The design of Humanoid robotics is a combination of both Engineering and Art. All of the parts have to be very lightweight, durable, and easy to manufacture. Furthermore, the final appearance has to look beautiful, and function together as a whole. I was able to craft this body to fit many requirements, and it represents a personal masterpiece of mechanical engineering.

It would be rather simple to make a robot by connecting a bunch of motors together. However, what is difficult is making sure that the robot:
Requirements List

  • Has a beautiful outer body that also feels good to hold: The body shape is modeled after an average human female, and most of the body is nice to hold with your hands.
  • Has the right strength balance: The torso motors needs to be quite strong, but the motors get weaker as you go to the end of the arm or leg.
  • Is fairly low cost: Some gears are used so that 90% of the motors can be fairly low cost motors. Using expensive servo motors everywhere would make it too expensive to sell.
  • Has no exposed wiring: Hiding all the wiring is actually quite tricky, as the wire has to hide inside rotation joints.
  • Has durable rotation joints: The rotation joints are locked into each other by the plastic shell. The rotation angles also need to be limited to protect from over-rotation.
  • Is lightweight but also strong: Any self propelling vehicle has to strike a balance between weight and power in order to work. The robot is quite lightweight at 5kg total given all of its parts/ ability. It’s strength to weight ratio would allow it to walk and crawl, but walking would need a different hips design.
  • Is able to be manufactured: The design is able to be 3D printed reliably, but also can be transitioned to injection molding when needed.
  • Has simple assembly: The minimum amount of screws are used, and most motors actually just slide into the plastic panels.
  • All parts are replaceable: If a part breaks, it can be replaced. Not parts are permanently glued together.
  • Does not pinch / hurt the user: All the gears are covered, and all pinch spots are minimized
  • Combines soft silicone materials: The soft skin parts have plastic parts inside them to allow attachment to the plastic body.

Here is an overview of the different sections. I will be going over the head sections in more detail as that is where the Khadas Vim3 lives:

Head


Fig 5. Head of Prototype 6.

In the picture above, we can see the prototype 6 head with the Vim3 mounted to the back. This was my first attempt at mounting the vim3 inside the head. It functions alright, but the fan has trouble cooling the Vim3 because it is inside the hair. Thus, it will thermal throttle after some time. Also, the vim3 fan is loud and this disturbed me. The vim3 is connected to USB sound out, sound in, and USB cameras for both eyes. the serial GPIO of the vim3 is used to control the servo motors, which take custom serial commands.


Fig 6. Head of Prototype 7

The head design for prototype 7 is actually my most advanced design. It includes many features such as:

The Khadas vim3 actually lives on a platform in the middle of the head. The top of the head has a cooling system that puts a silent Nocuta 5V fan right on the heatsink of the vim3 and pumps the hot air out of the head using a fan duct. (see fig 9). Below the vim3 lives the rest of the electronics which will we explained more in the electronics section. This head design is quite nice, and it is able to cool the vim3 even under cpu load.

Torso
The torso is divided into two sections, and are able to move in 2 degrees of freedom (DOF). The top section has the arms, neck and breast attachment points. The bottom section has attachment for the legs, and the sex insert.

Arms
The arms are 6 DOF robotic arms that are capable of lifting a 500g payload. They have good movement range, and can reach to the top, and behind the body. The hands are based on the Flexi-hand design which is an open source prosthetic hand design. I have modified it so that it is smaller, and can work with much less force.

Legs

The legs are 4 DOF and are designed for crawling in mind. They have a decent range of motion and the robot can do the splits easily. However, the current hips do not support walking due to a limitation in movement when the legs are fully extended. A different hips design would support walking, but then it would be difficult to make that design look good. Indeed, it is actually very difficult to make the hips functional and also attractive. You need to pack in two strong motors for each leg, and it also needs to move in a wide range of motion, but also look good

Overall
The mechanical design is quite good. The khadas Vim3 is mounted nice and secure in the head and completely silent in operation. The body is tested and functions well. It represents some of the best engineering that I have every done, and I think it is also world class in terms of humanoid robotics. Compared to other humanoid robots, this one fits a unique spot in terms of size, weight, durability, function, attractive appearance, and low cost.

Lilium Robot Cat Girl - Body Demo 1 - YouTube
Also, Here is a youtube video I posted recently demonstrating the movement range of the body.

3 Likes

Electronics

So for the electronics, there were a bunch of things that I wanted to implement:

  • Powerful computer for the robot brain
  • Wireless connection
  • Good dual cameras for depth vision
  • Motor connection
  • Sound out with good speakers
  • sound in with microphone
  • power in at 7V for max motor power
  • gyroscope / accelerometer
  • battery pack
  • can fit all electronics in head
  • simple to assemble
  • cost less than 200$

Given these initial requirements, i managed to satisfy all of them in the final design except for the battery pack. I first started by working out what parts are needed to make everything work. The Khadas Vim3 has excellent price to performance, but more importantly it is a very small computer, and also has good power efficiency. It also can take input voltage from 5V to 12V so that means i did not need a voltage step down converter. This computer is the star of the electronics, but it needed many other parts to get all the functions i wanted.

As for the rest of the components, it was much harder to judge. I wanted everyting to be easy to assemble, and if it could be on 1 pcb that would be best. This was during the middle of the chip shortage crisis, and most chips where quite expensive. The better solution was to actually just use USB devices and take them apart to get their PCB+chips. This method would cost half as much, and I did not need to make/debug a PCB with many chips. However, i still need a custom PBC to make power management between boards much cleaner.


Fig … Original Plan with the electronics

Fig… Custom PCB ( right ) . Custom PCB with all the components on it ( middle ). Khadas Vim3 ( left)

From the pictures, you can see the custom PCB that was made to house all of the parts. The design has the Khadas connect to the board via usb to an audio adapter. This allows output to speaker and microphone. The speaker output needs an amplifier after it. The board also handles power management, and a microcontroller is in place to turn on/off power to the computer to allow safe power down with a press of a button. The motors are controlled via serial from the VM3 GPIO, and the camera is from USB:

Software


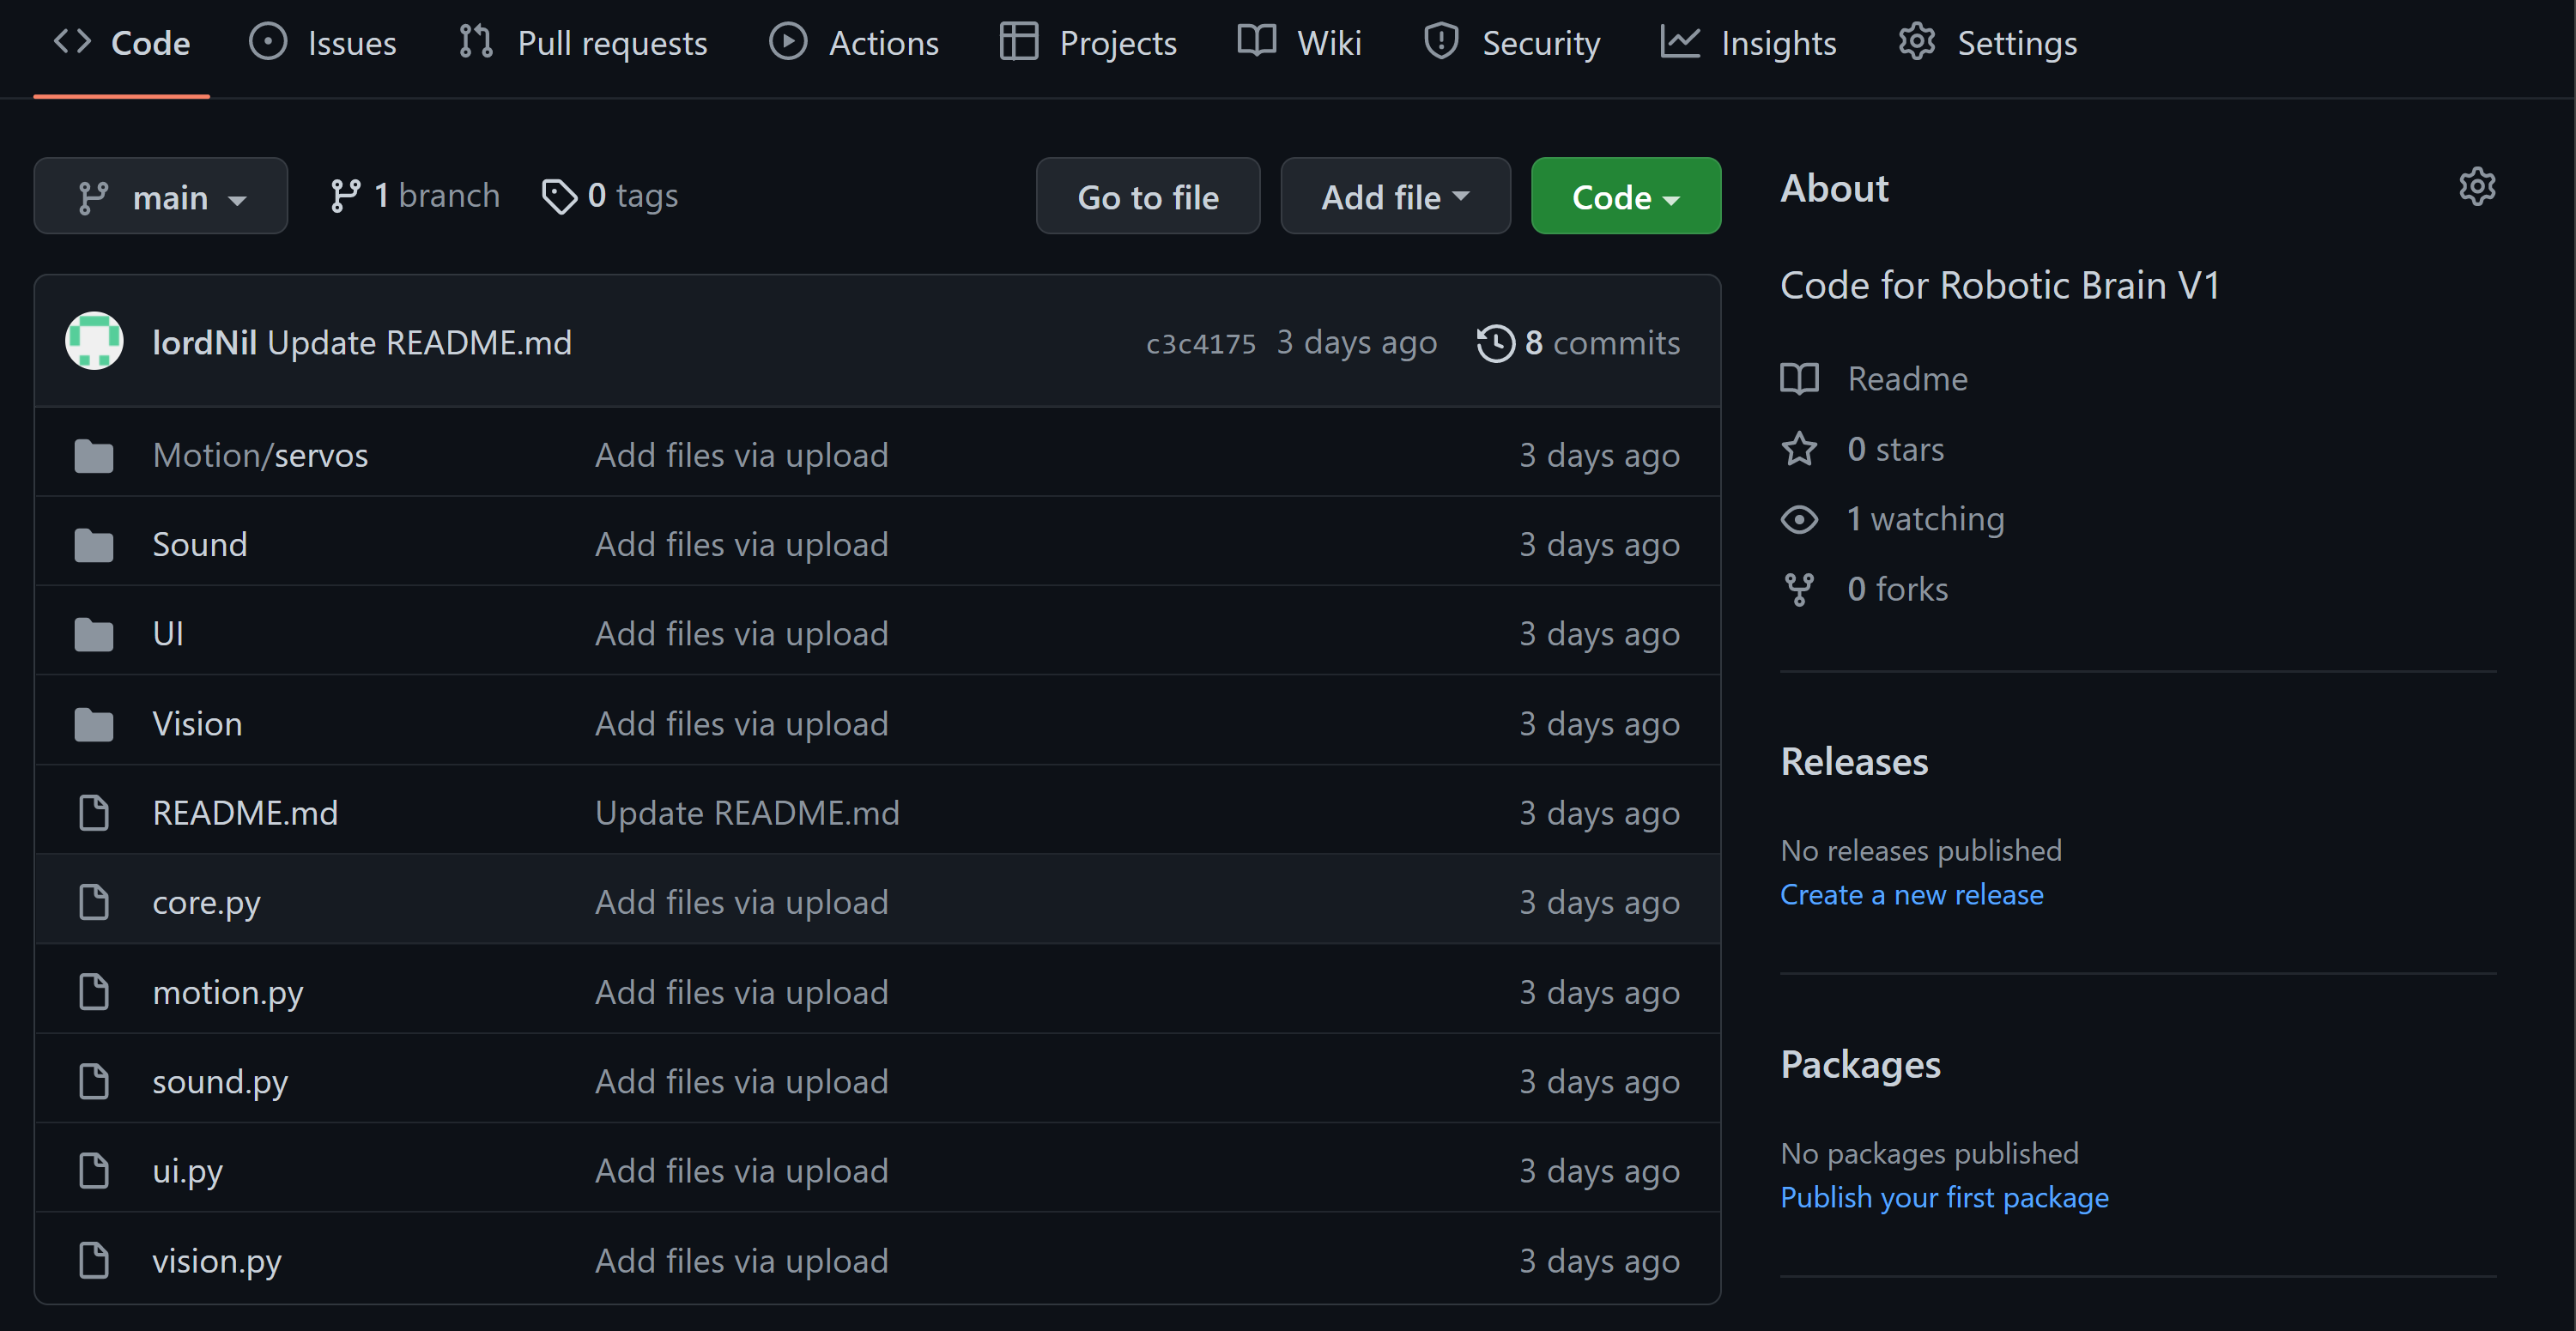
Fig… The Github Page for the Software

So for the software, I wanted to build something that was modular and that other people can add functions in the future. I would say that I am just an average programmer, and most of my experience is in Python, but I have worked in java, C+, and linux.

You can see the very basic version of the software at this github link: lordNil/lilium: Code for Robotic Brain V1 (github.com). This code is just the foundation structure, and has very few functions implemented. I plan to release different robot brains as a fork to this project, and you can also build your own brain as a fork to the project.

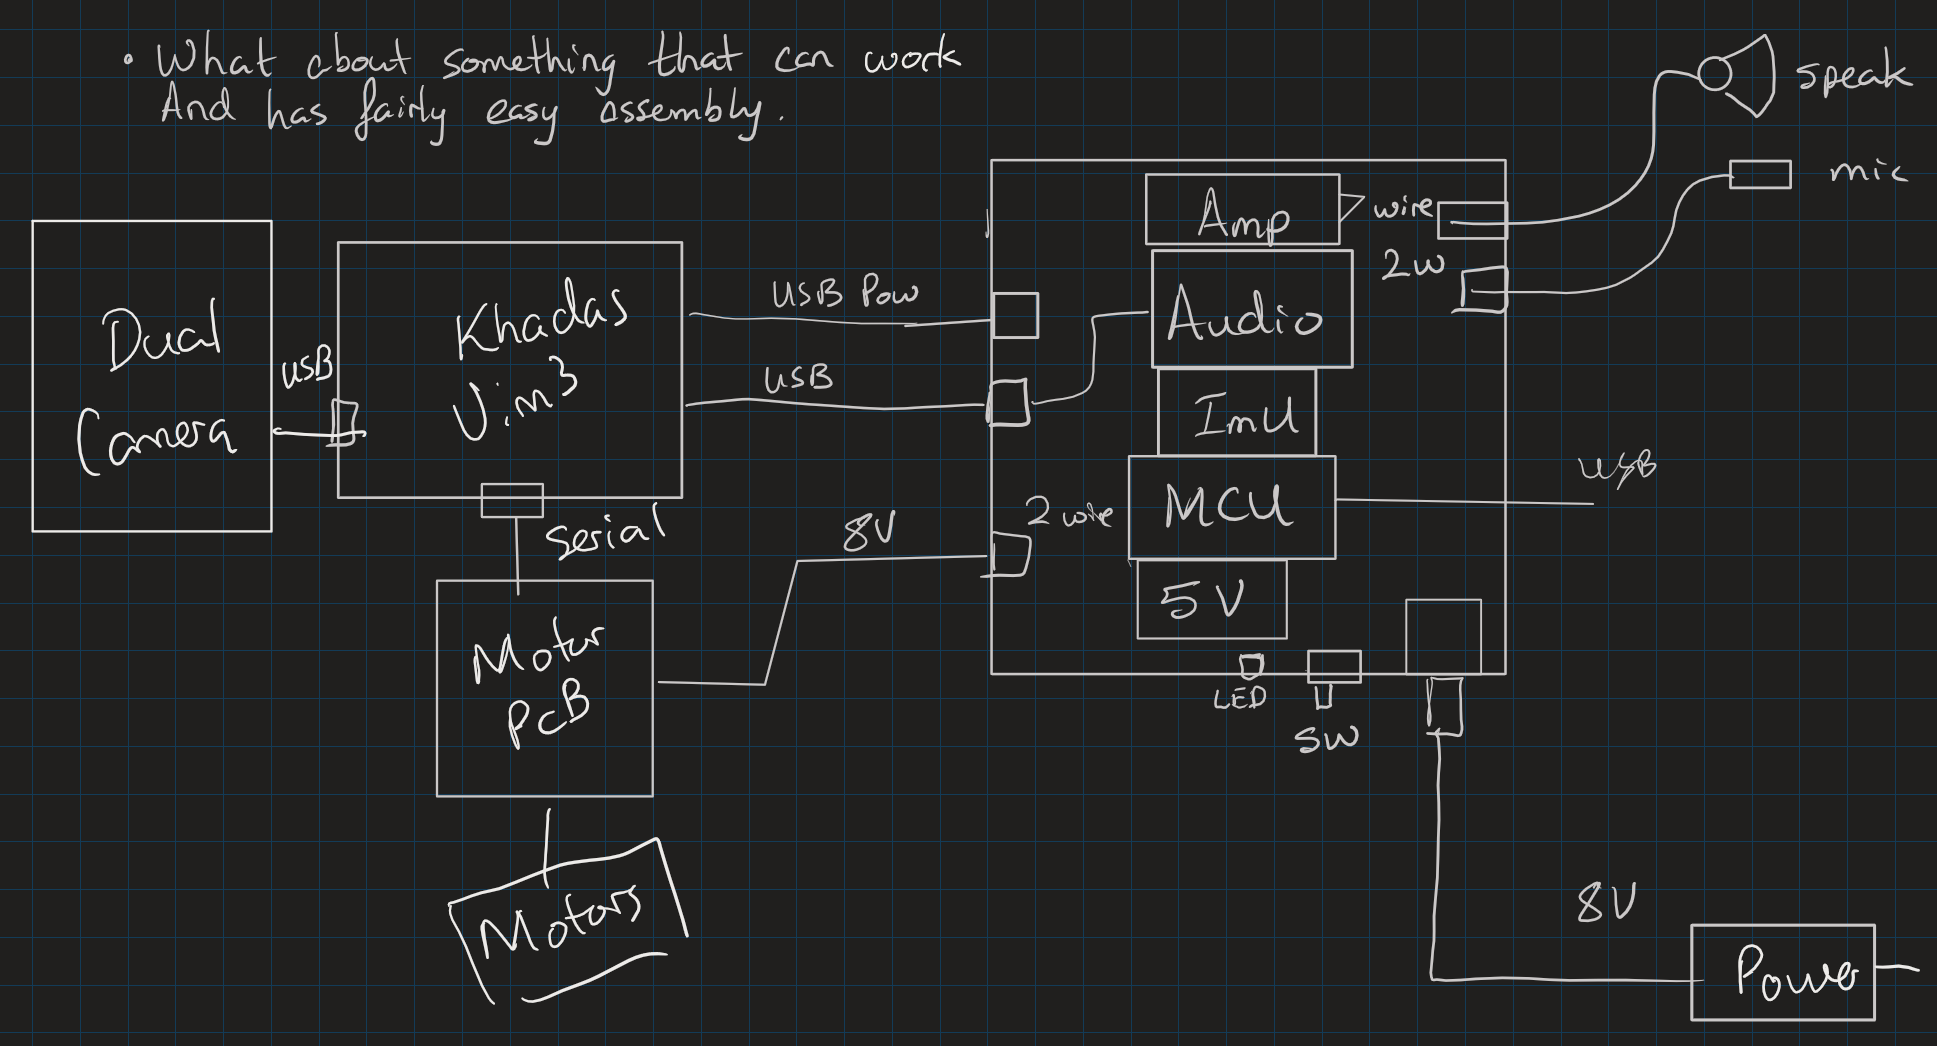
The main file that is run using python is Core.py. This file actually starts python - multiprocessing, and starts the following processes: Sound, Motion, UI, and Vision

The reason for this is that each of these processes can run CPU, IO, or NPU tasks at the same time and not stall the entire program. Each of these processes are split into their own file: Sound.py, Motion.py, ect…
The core also manages a shared data object that is synchronized between all the different processes in real time.

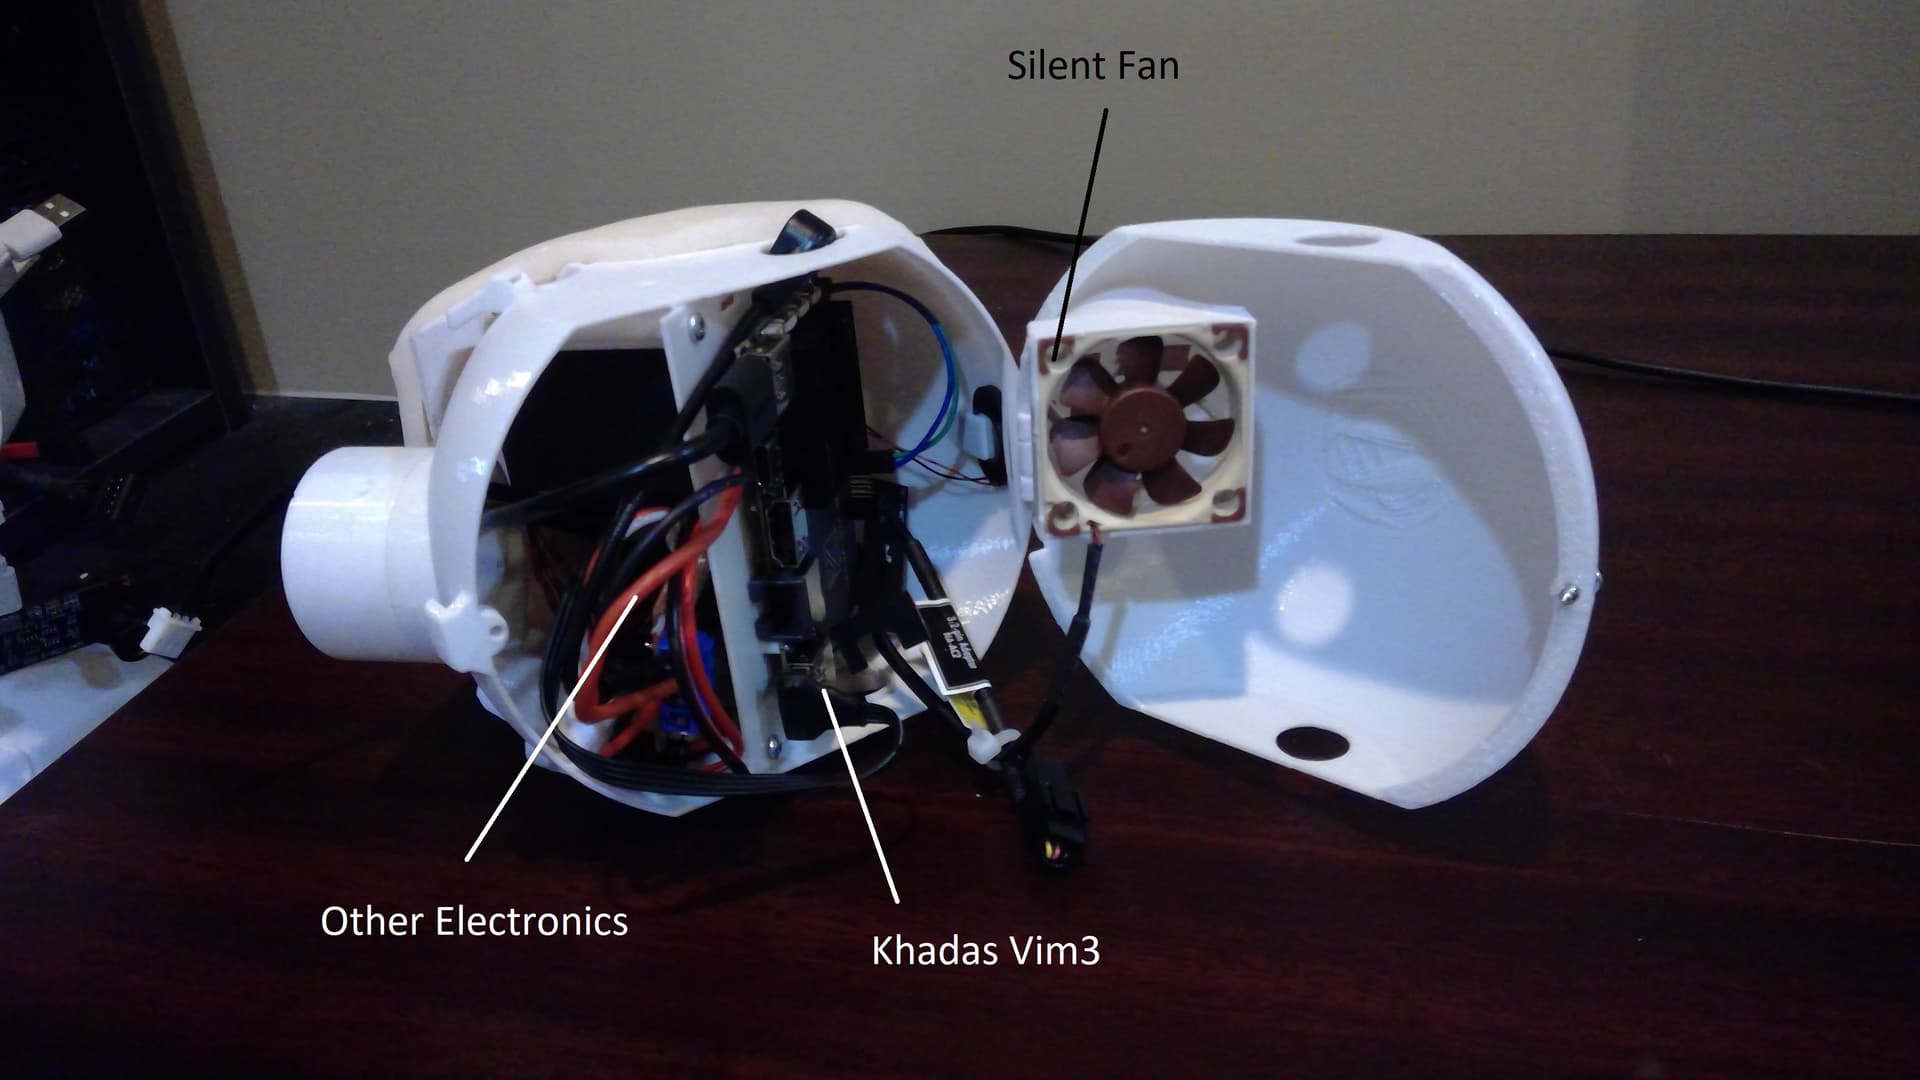
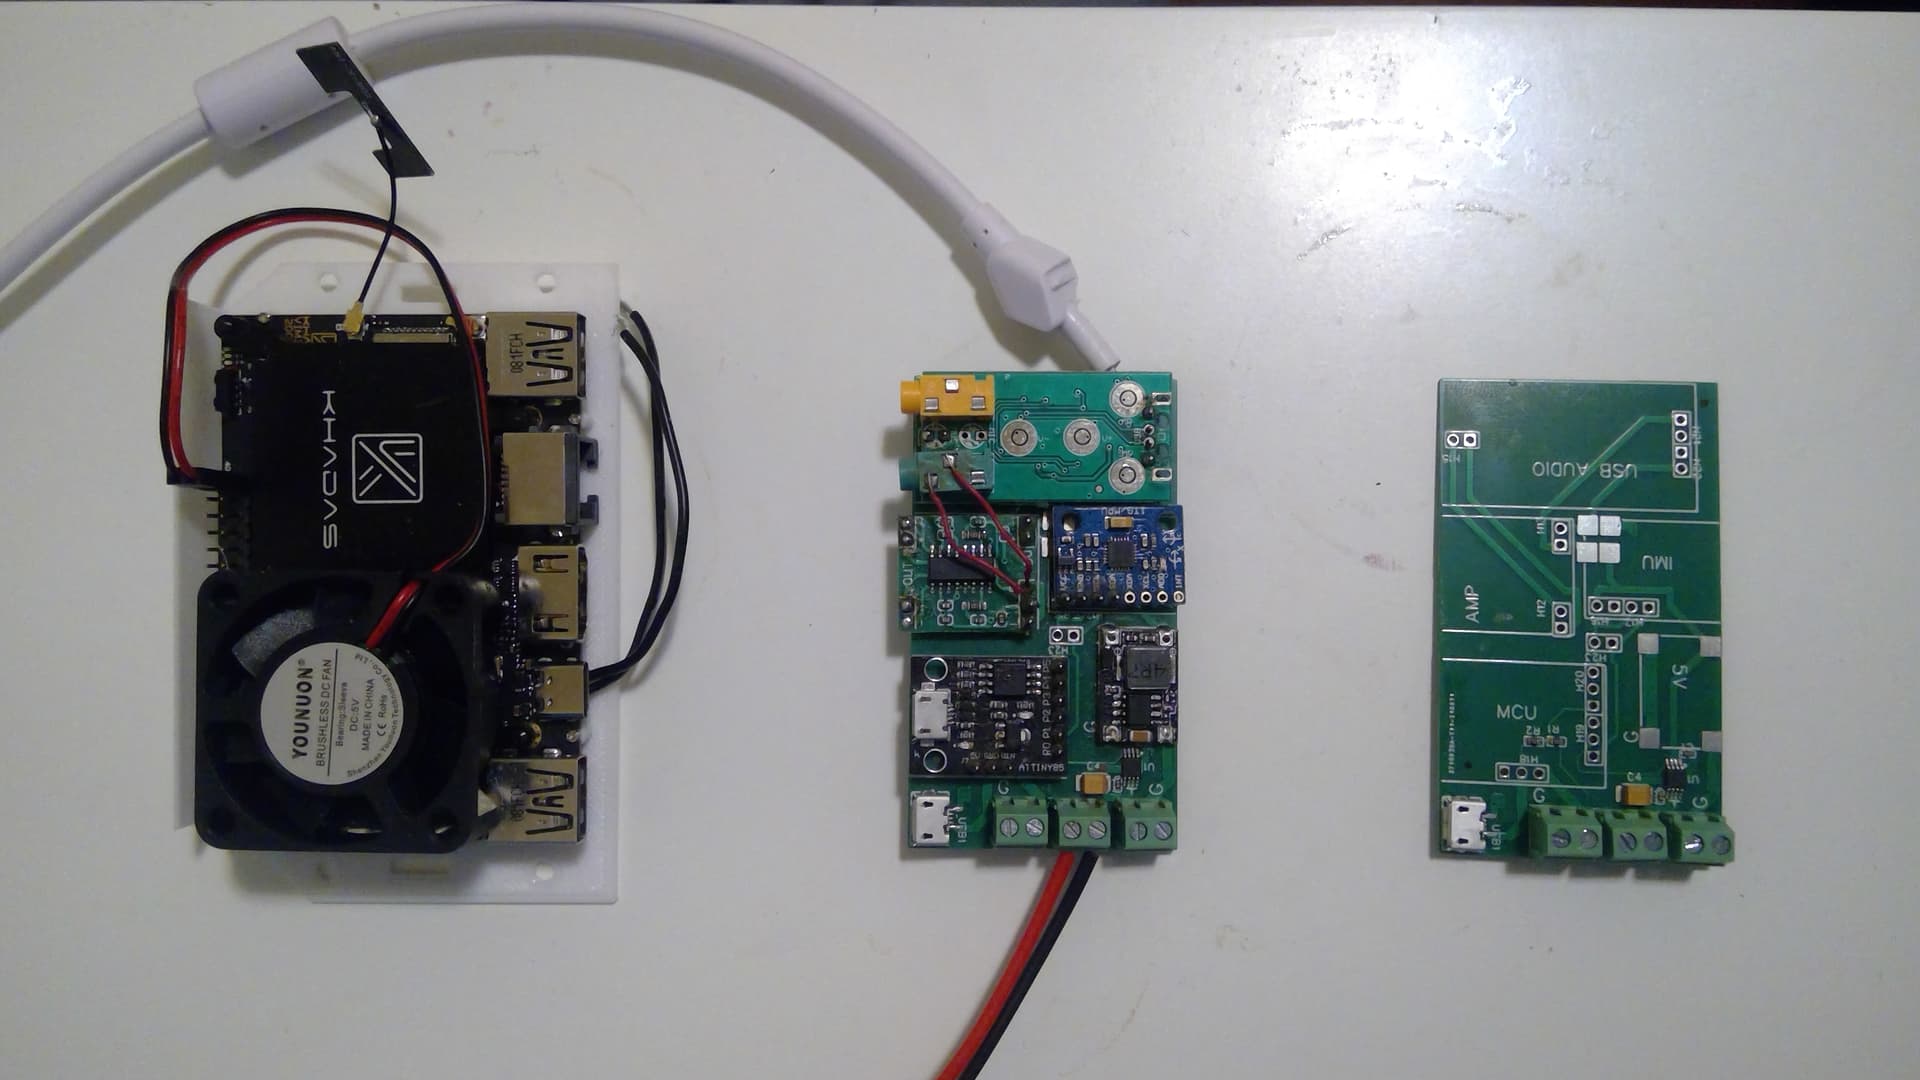
Code Details for Vim3
The following section will talk in detail about the actual code running on the vim3. You can see a version of this code here: lordNil/lilium-Khadas-Vim3 (github.com)

Motion
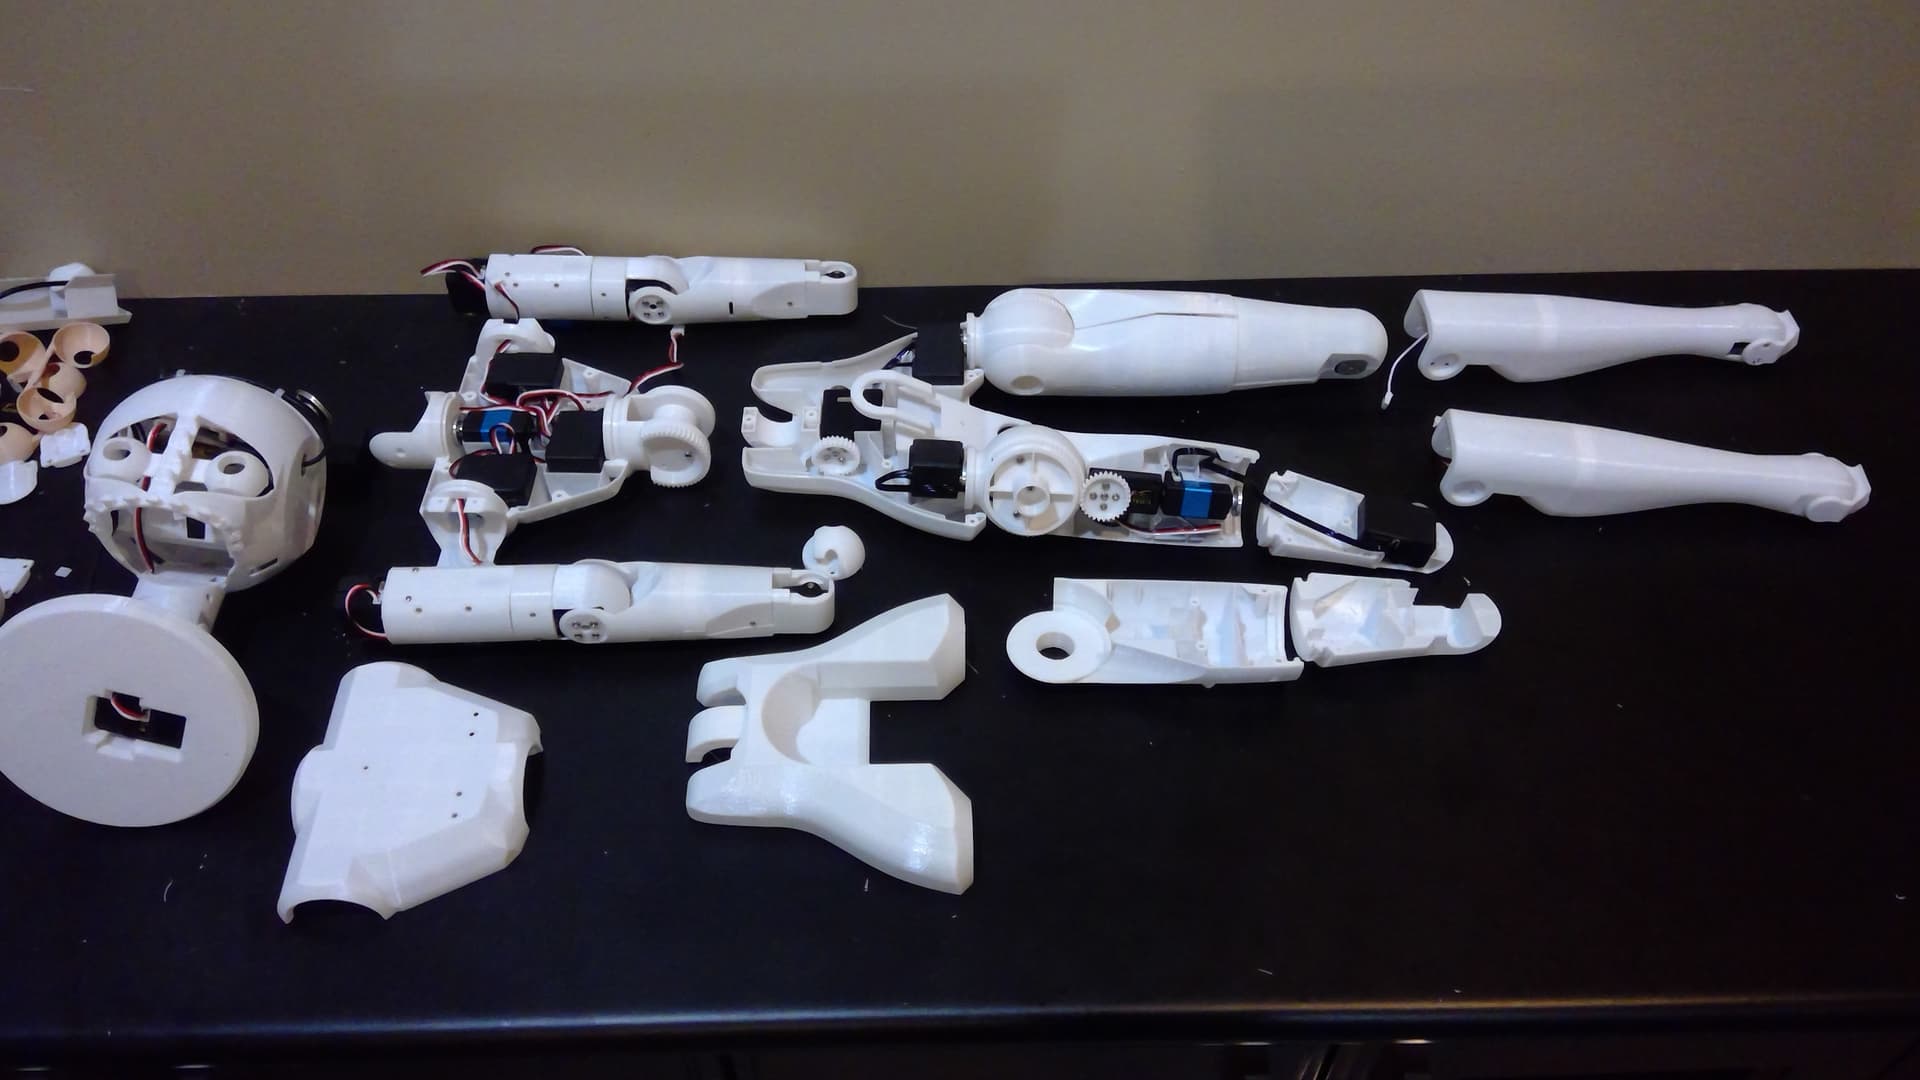
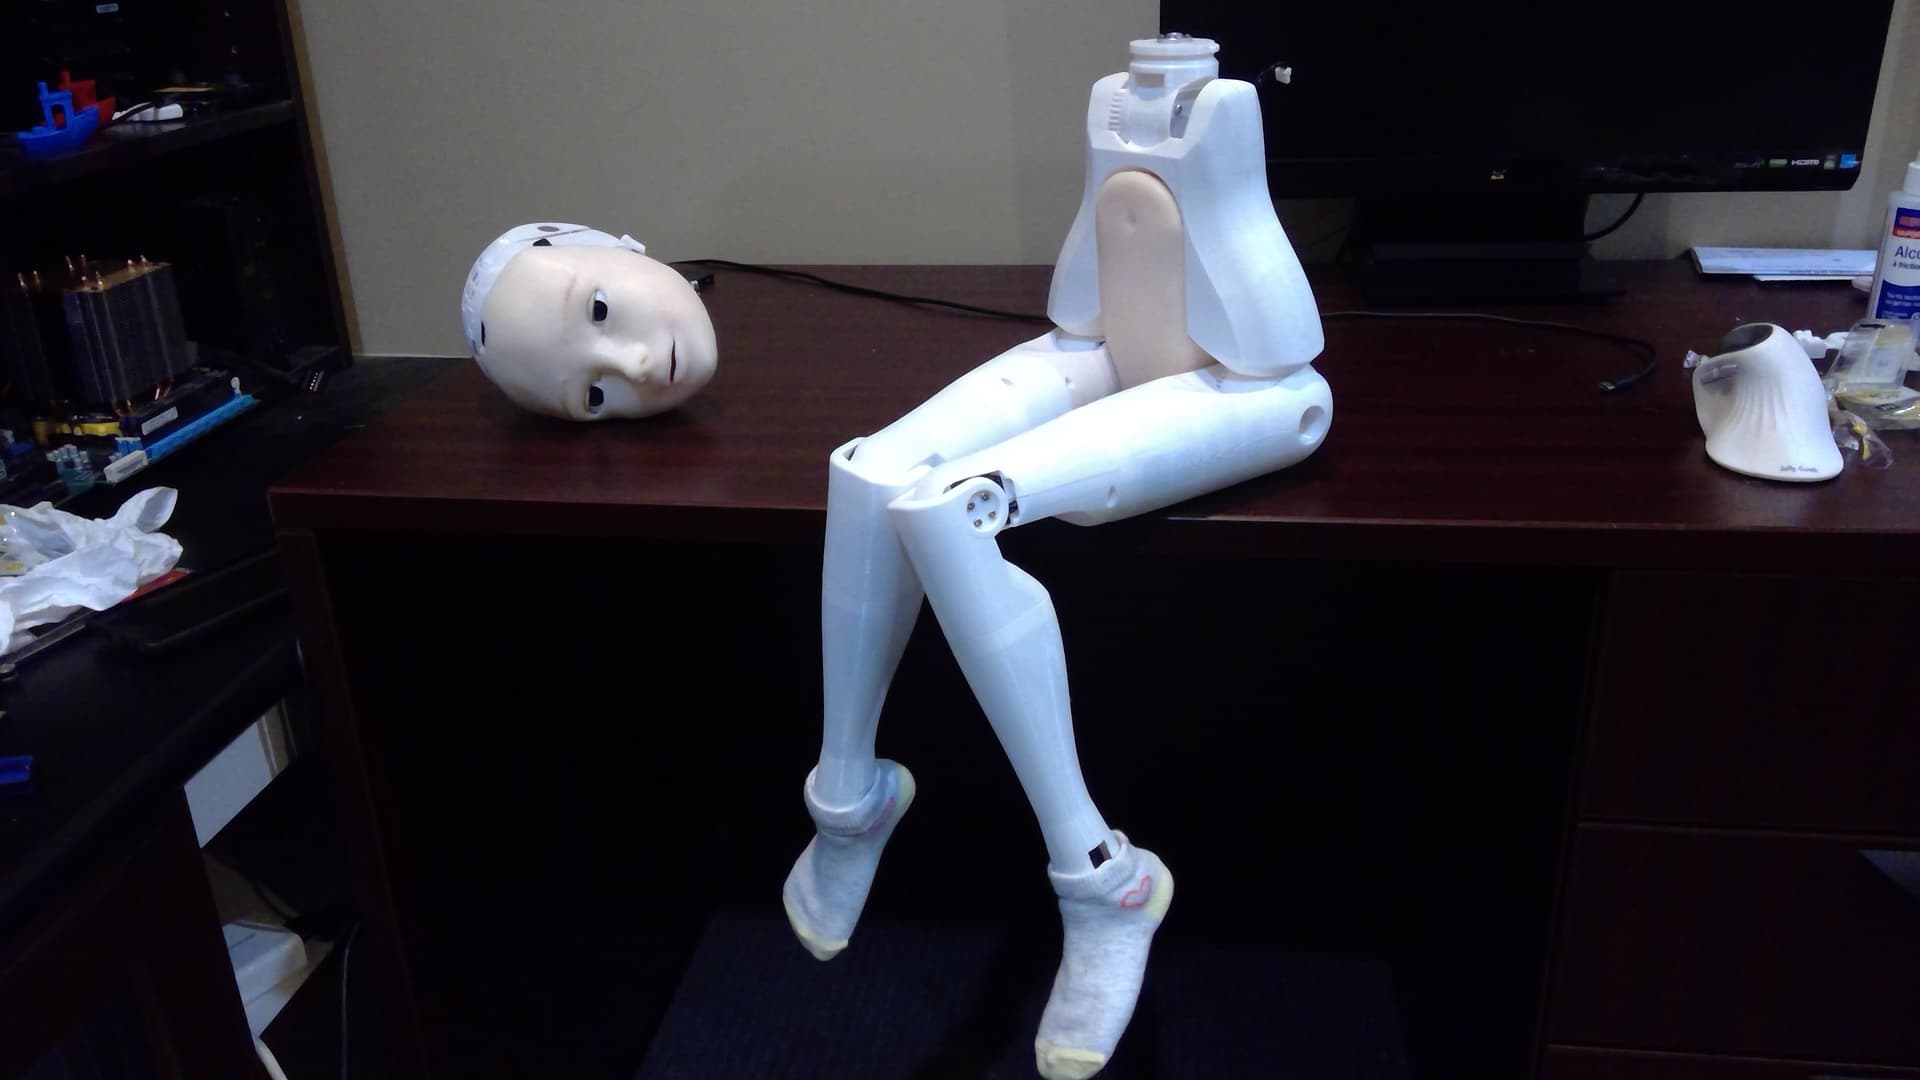
This section includes the motion.py files and the motion folder which is used to store data. This section mainly contains all of the functions needed to control the servo motors, and also manages all of the data for all 28 motors. Each of the motors are smart servos, and you can control the speed, motion, acceleration, torque, and position of the motors. You can even reset the zero position of the motors which is very convenient for calibration. Each motor has an ID number, and to control it, you simply read / write data to it’s registers. (using the read or write function). The motor bus operates at 1Mhz, and communicating to all motors takes around 100ms which is not too bad.

A bunch of other basic functions are written such as:

  • function to mimic breathing
  • random head/ mouth/body movement
  • head movement to locate object
  • recording animations and saving them
  • playing animations
    If you run the motion.py file by itself, it enter into a command mode where you can give commands to the motors like ping certain motors and record animations.

To be honest, this motion system is fairly basic for now, but allows me to make make a bunch of idle animations for the robot, and code some simple abilities.

I actually experimented with implementing Deepmimic for this robot before, which utilizes supervised machine learning to allow the robot to lean how to walk based off of human examples of walking. This was partially successful in simulation, but it was rather tricky to get working right. In theory, this can be used to train for different gaits and also allow transition between different modes of motion.

It would also be nice to make animations in a program like blender, and then convert it to robotic animations. Another possible upgrade is to incorporate software for machine arms into the the robot. This would first require some decent vision object recognition and depth perception. Then some sort of reverse kinematic algorithm to control the arms and manipulate the objects. Or one can go with a machine learning approach and train neural networks based on object grabbing examples to allow it to learn manipulation itself. Anyways, i dont really have the time to investigate this further right now.

Sound

For the sound, a bunch of things where implemented to get a few chatbots working. Basically, there are some basic sound functions implemented such as playing sound files, and also modifying their pitch.

The chatbot pipeline is composed of a Speech to text (STT) module, then a chatbot module, then a Text to Speech module. The STT and TTS modules from google seem to work the best for now, but I really do want a TTS system that is able to product a more attractive female voice. Google’s voice is a bit robotic. Luckly, many people are developing more advanced TTS systems using the latest ML methods, and I hope to use their work in the future.

For the first chatbot, it is an AIML chatbot and is actually completely pre-scripted. It was made a while ago (2008?) and was first online as the Mitsuki Chatbot. I customized the script for my AIML chatbot and it works alright. It runs quite fast on CPU, but the only downside is that it does not really have the power to use synonyms. Thus, your sentence has to contain specific words in order for the chatbot to understand what you said.

The other chatbot used is GTP-3 which is built and run by OpenAI (Elon Musk’s company). This chatbot is quite interesting because it is one of the latest AI chatbots. It uses the transformer architecture, and what researchers found is that if you make the model bigger and bigger, then the results get better and better linearly. So after GTP 1 was big, GTP 2 was huge, and GTP 3 is massive. The entire model should be around 175 GB in size or larger and is trained on 45 TB of text data. The training itself took months and cost +10million. The end result is a very nice model that mainly does text completion. This is basically taking some existing text, and then GTP 3 will generate new text to expand upon the existing text. Thus, for chatbot applications, we typically feed it an introduction like: this is a talk between X and B, and then the conversation history, and GTP3 will generate future responses to try and continue the story.
Sadly, it is not exactly a self embodied AI entity, but it is able to generate very smooth text, and is able to have conversations about all sorts of complex topics. The main drawback is the lack of local memory - such as what knowledge about itself and it’s conversation partner.

I also implemented some things in the sound such as a e-book reader so that the robot can read you books.
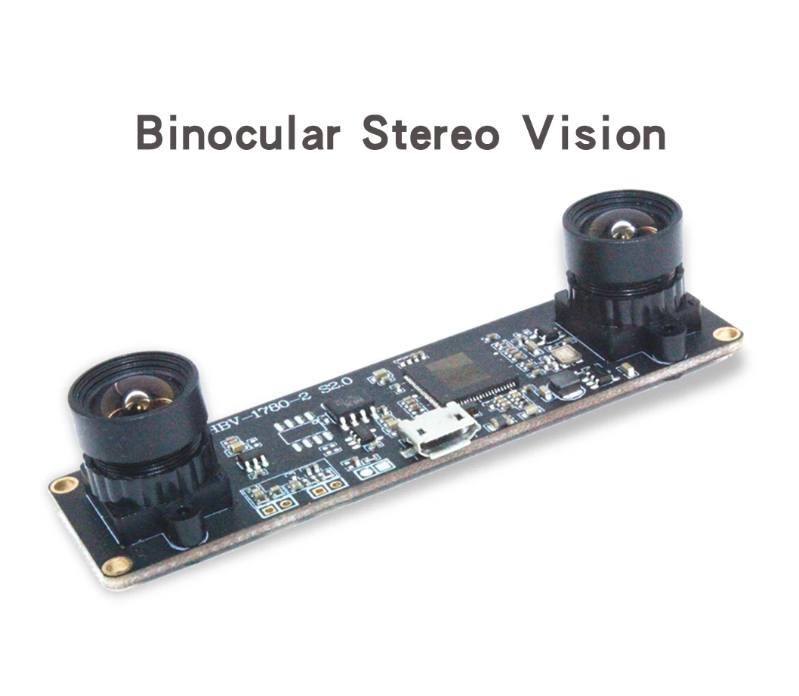
Vision
For the vision system, a few things where implemented. Using the Khadas ksnn modules, I was able to implement Yolo3 face detection and also Yolo3 object detection. Yolo algorithms are nice as they both find the object name, and also locate where it is in the image. However, the main drawback is that it only knows about 80 objects ( it is trained on coco dataset) where as some other models such as imagenet can recognize 1000 objects.

Some other ML models where implemented in another version of the brain . There is a nice stereo depth map model that generated 3D depth from both of the images from each eye. a Human Keyframe model was also implemented to recognize human limbs.

UI
Finnaly, for the UI, some code was implemented so that python starts its own web server, and hosts it’s own website on your network. This website contains all the robotic control functions, and you can access it from any browser on your network.

While this is cool, there are some major drawbacks - The user needs to access the vim3 via HDMI and enter their wifi password. Furthermore, they actually need to set a static IP address ( i was not about to get linux to set a static IP address by default )

Initially, I actually just wanted the UI to be an app that you can run on your phone, and then connect to the vim3 via bluetooth. I actually did write the app in the FLutter language, and it does work. The main issue is that I could not get bluetooth to auto accept connection on the Vim3. I tried quite a few things using the installed linux bluetooth controllers, but they did not work. I could also buy a bluetooth module and connect that to the serial port, but i needed the serial port for motor control. Anyways, I sort of gave up on this plan.

Another UI was made which is a simple GUI . This is just a basic pop-up window that shows the commands.

Conclusion

Some decent software was written for the robot, and I think all of the basic functions are implemented. I am not a trained software architect, and perhaps someone can comment and improve the main parts of the code. I am sure that it would be fairly easy to add extra functions to one section.

Finally, I have made a youtube video to demonstrate the software functions. you can see it here:
Lilium Robot Cat Girl - Chatbot and Software - YouTube

2 Likes

Yes, it does. :wink: :blush:

You are a genius and have most certainly impressed this old man.

3 Likes

Conclusion

Thank you for reading my long post about this robot girl that I have created. I am interested in what other people think about this robot. The goal of this technology is to provide value to people’s lives - perhaps as a partner to lonely guys. Also, If I do manage to win the 1st prize, I can offer to gift one of these robots to the Khadas company, (if you guys want).

I think that the Lily Delta Android is quite unique, and looks fairly elegant. I am happy with the mechanical design, and just satisfied with the software so far. As her creator, I always have mixed feelings looking at her. On one hand, I can see all the small flaws, limitations, and possible improvements. On the other hand, I am amazed at the excellent engineering and many hours of work in this personal masterpiece.

Please feel free to post your opinions about her, and possible ways of making the Android more complete.

3 Likes

Future Work

So currently, the Prototype 7 is mostly finished for now at the current stage that I have outlined in this post. This project is on pause, and I am working on something more simple.

I was playing around with just making the Head into something nice, and this would be a much cheaper product. When more advanced AI technology comes out, I may take a look at the software again to try and build a cohesive brain. I may make a few more humanoid robots in the future, after all Henry Ford did not really have a successful car until his 17th model.

3 Likes

Hello

Here is a short video showing off the head and Khadas computer:
Lilium - Robot Head with Khadas Vim3 Computer - YouTube

Here is a much longer video talking about the code.
Lilium - Software Explanation - Khadas Version - YouTube

Thanks

4 Likes