What AndroidTool are you using, v2.69?
You can hold the middle button then press the one left to it once and after 3 seconds release or triple press the middle button to enter Loader/MaskROM Mode to flash again.
I’m also working on a micro-sd bootable/upgradable firmware.
1 Like
Thank you for your reply.
I’m using AndroidTool 2.65 and I have tried all methods and it was not recognizing the Edge.
However, I managed that after booting into recovery and doing a wipe data/factory reset and then the AndroidTool kit recognized the Edge board.
Thank you again.
I remember, at one time, there was a good bunch for firmware, Rockchip_DriverAssitant_v4.4 and FactoryTool-v1.45e
All the latest Rockchip tools can be downloaded from their Github
All their latest kernels and Linux work also gets posted daily on their Github account.
It is always recommended to use the latest tools especially for Android Pie since older tools might only work well on Nougat or Oreo firmware.
The latest tools are:
AndroidTool v2.69
FactoryTool v1.66
DriverAssistant v4.8
SDDiskTool v1.57(posted on Khadas forum)
1 Like
I wanted to say that the most correct version was exactly, FactoryTool- v1.45e,maybe yes, only for Nougat🙂
New v1.4 firmware released.
3 Likes
Thank you for the great effort and work.
I’m having a problem with 4K playback in Kodi with Pie firmware (not this firmware specifically, all other Pie firmwares also have this problem) so is there a problem with 4K in Kodi when using Pie with Rockchip? because 4K plays well under Nougat 7.1
I have 4K@60hz working well on Android Pie on RK3399.
But Khadas source code is a bit old especially the kernel, u-boot, hardware/rockchip folders, it needs updating to improve 4K playback.
So I need to test it a bit further to improve it.
When using Kodi also make sure you enable frame-rate switching for smoother playback.
I will try to release a LibreELEC image too for Khadas Edge with 1080p Netflix support, it has very smooth 4K playback.
Last time I tried my image didn’t want to boot but will do more tests.
2 Likes
This version (1.4) is working great my friend and 4K playback is good till now.
Great work and effort.
Keep up the good work.
1 Like
hello
@mo123
I do not understand how to install magisk manager.
video or photos to see the manipulation.
on v1.3 it was simple.
why netflix apk does not work then what is in v1.4.
edge v turns back on after 10 minutes, while I was it.
thank you fred21
Hi
For Netflix, you can use APKPure Store in the firmware to download it(Netflix with red logo and black background). I didn’t include the Netflix app this time.
https://apkpure.com/netflix/com.netflix.mediaclient
The Netflix app included is only to show the banner icon on the homescreen since phone apps only show in the AppDrawer on AndroidTV.
With LibreELEC, you can also play 1080p Netflix and it works well, but I need to find a way to integrate the fan support since software decoding makes the device run a lot hotter. Should be finished in a day or two. I’m also trying to find out from Rockchip if they can make a simple dual-boot so it auto boots LibreELEC so that in LibreELEC you can boot to Android without removing the micro-sd card.
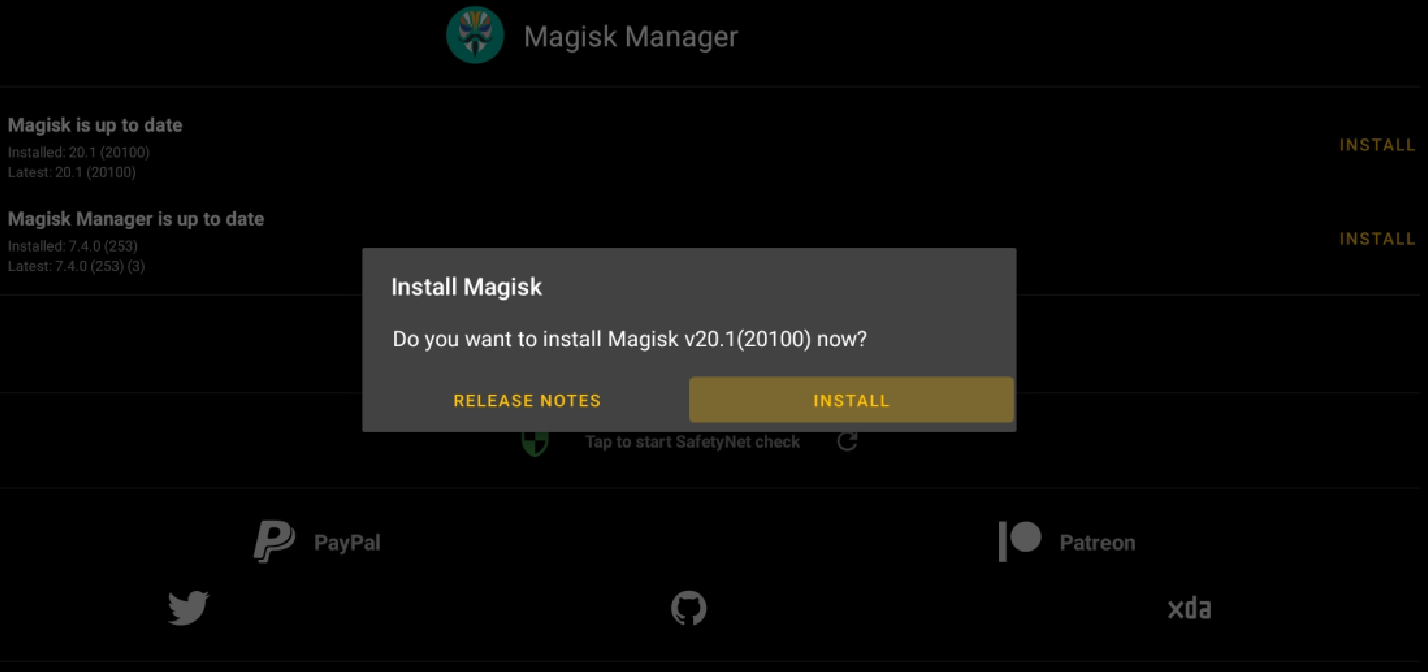
For Magisk Manager it is easy.
-
You can install the latest Magisk Manager
https://github.com/topjohnwu/Magisk/releases/download/manager-v7.4.0/MagiskManager-v7.4.0.apk -
Copy the boot.img to a USB drive and connect to the Khadas Edge or download it directly with a web browser(Lightning or Chrome) on the Khadas Edge.
https://mega.nz/#!RUsGEIia!Y-4l1OJsrOh1-WlsVJJvuy670GzX7GSXVLwgFCEiDmc -
Use Magisk Manager to patch this boot.img
-
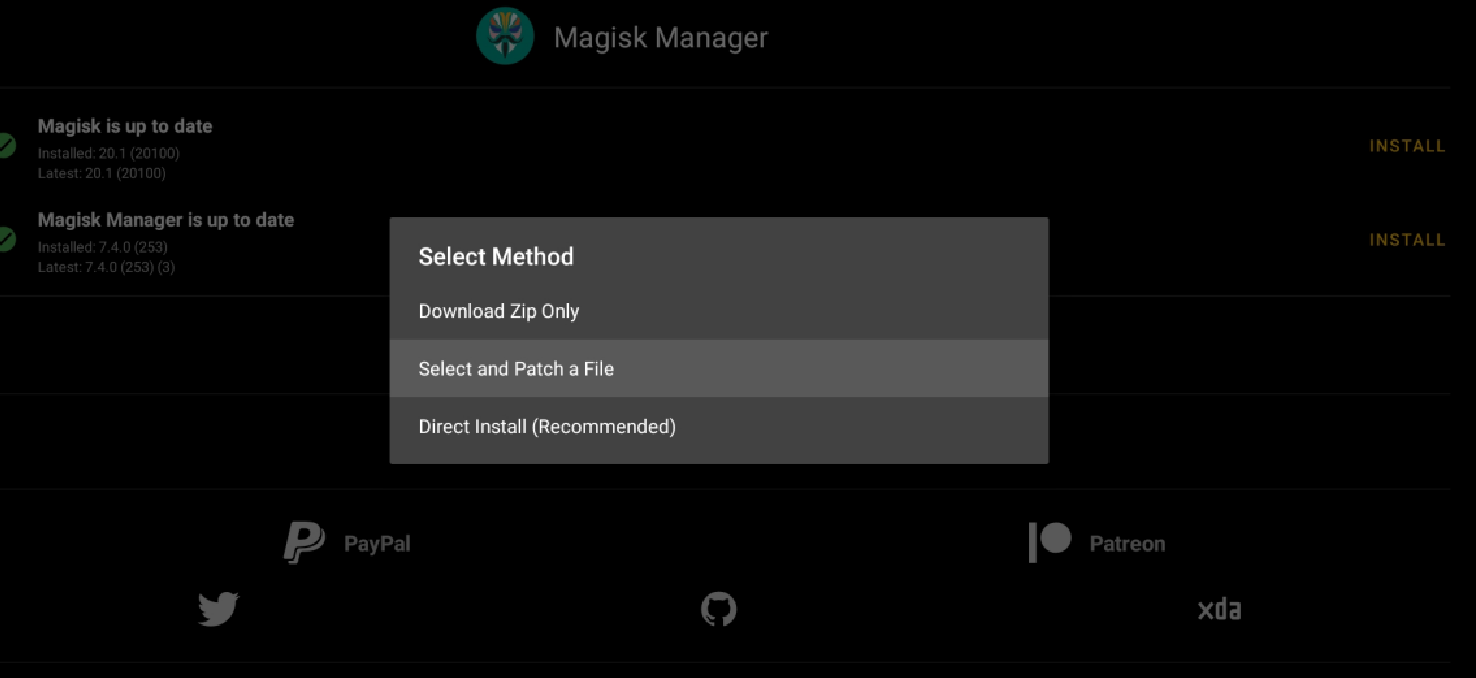
Flash the patched_magisk.img either by PC AndroidTool v2.67 which is complicated or the new easy way I added on the Khadas Edge itself.
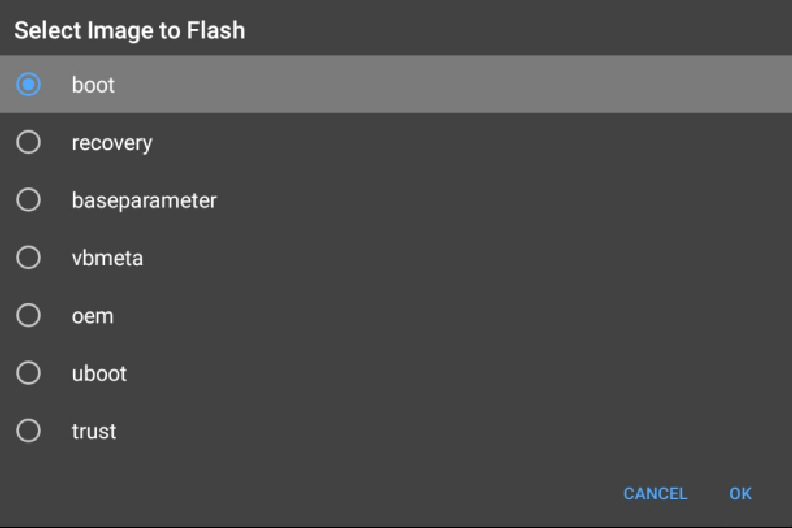
Go to About - Click 7 times on build info to enable Developer Options

Inside Developer Options - Choose Flash image
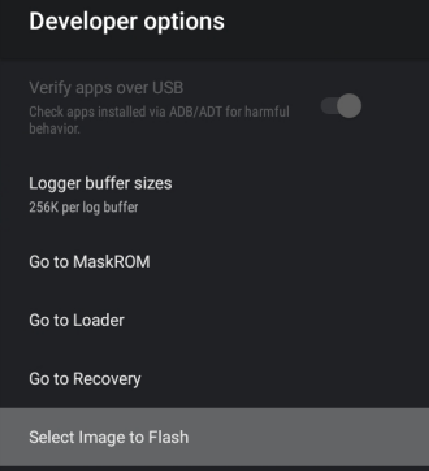
Then select the patched_magisk.boot.img - Works well if you use MiXplorer interface

Then select boot partition and OK.
In a few seconds it will be flashed and you can restart your device and will have Magisk root.
4 Likes
OK, thanks.
there is no need for props anymore et mecool
1 Like
The prop change is only needed if you are using apps that need a Google Certified device eg. some banking apps or local subscription based streaming apps with strict security requirements that give you are warning message that they can’t run on the device when you open them.
If you just use normal apps or some apps requiring root access then you can just use Magisk normally without the prop change.
Guide for the prop change in Magisk if needed:
1 Like
I’ll work on a big update this weekend.
There are some things I want to improve.
The Play Store also updates to a new layout which currently doesn’t work with the ir remote or any keyboard, which I found a solution for after lots of testing.
When everything is finished, it will work as a great little media centre.
7 Likes
Good effort my friend.
I’ll be waiting anxiously for your new update as your firmware is the best (in my opinion) till now.
Keep up the good work and thank you for your efforts.
2 Likes
New firmware uploaded v1.5.
Hope everyone enjoys it.
Kodi fractional frame-rates works well now.
Android UI is snappy.
It’s now also possible to use SDDiskTool to make a bootable ‘upgrade’ micro-sd card.
Then you can just insert it and boot with it.
It will then update the firmware and later ask you to remove the micro-sd card.
Please check the guide to set up Kodi for HD Audio or frame-rate switching or how to use the RefreshRate app to switch frame-rate in any app manually.
5 Likes
Magisk manager is showing “Magisk not installed”, how can I install magisk?
It is not showing the option for direct install, only showing “download zip” or “select file and patch”
Edit:
I managed to install magisk by patching the boot image and flashing it.
However, I liked the interface of v1.4 more than this one.
How can I change the DPI to the one previously used in v1.4?
Is there a way to add 4K resolution to display settings? the maximum now is 1080P
Thank you for the great efforts.
Hi
I added a separate boot.img file for people to use with Magisk Manager.
After you patch it, Click 7 times on build Info in the About menu then use Developer Options - Flash Image then boot and choose your patched_boot.img and restart.
Here are some pictures
To change the DPI
Go to TvSettings - Device - More Settings to open the white Settings app.
Under Display Options there should be a menu to change the Size with a slider from left to right.
320DPI is required by a lot of Google AndroidTV apps and works better for compatibility.
I will test on a 4K tv, seems there is still some 1080p default boot setting enabled I added when I was still testing the firmware. Will reupload later.
3 Likes
Please check if 4K is working now
https://mega.nz/#!dNUw2AqS!kltV8Jd73tPIXjLN7orPcFYjQEjPj4sIpSmLWCoR8QI
2 Likes
Unfortunately, no it’s not working.
Still the max is 1080P