Do VIM has gapps and root on source?
Yes, will write a article with details and publish at Khadas Docs.
I don’t see it.
Khadas Docs
Please give the link )))
Hi, Davemf:
Following guidance is write by our other colleague, as he is not quite good at English, so we haven’t publish it on Khdas Docs yet, but we will finish that asap.
So for your reference first:
How to root use SYSTEM install
The article will describe more about how to root use SYSTEM install on android6.0
Most pepole know the famous SuperSu, now let’s step by step to config the root file
NOTICE: Make sure the selinux has been disabled
At first, we need to download the SuperSu file from their official website
Second, extract the file SuperSU-v2.78-201609011115.zip
$ mkdir root
$ unzip SuperSU-v2.78-201609011115.zip -d root/
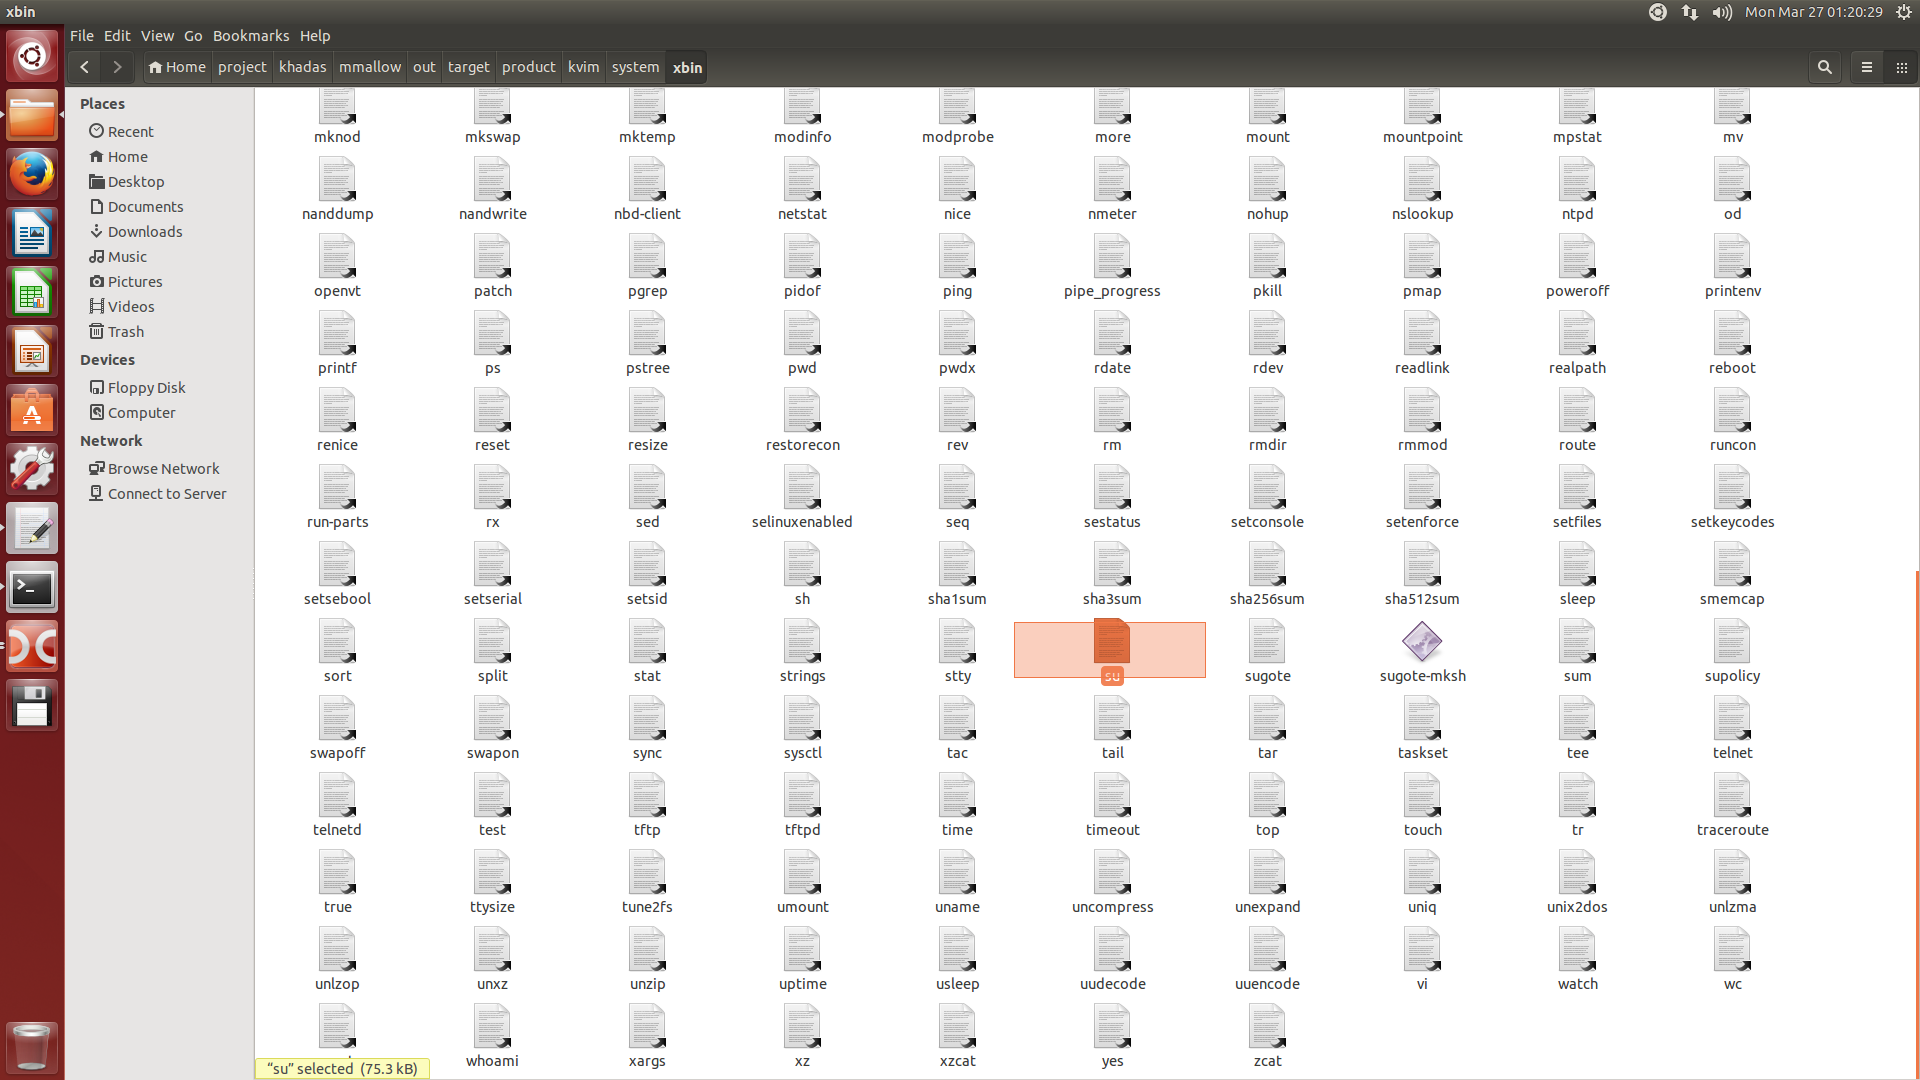
The path root included the below list path:
arm arm64 armv7 common META-INF mips mips64 x64 x86
We will use the path armv7 and common
Why did we use the armv7 and not the arm64 ?
You can check the system property file build.prop , the value ro.product.cpu.abi is armeabi-v7a
Now you can look for the file META-INF/com/google/android/update-binary
You can see the instructions:
# ----- "SYSTEM" INSTALL -----
#
# "System" install puts all the files needed in /system and does not need
# any boot image modifications. Default install method pre-Android-6.0
# (excluding Samsung-5.1).
#
# Even on Android-6.0+, the script attempts to detect if the current
# firmware is compatible with a system-only installation (see the
# "detect_systemless_required" function), and will prefer that
# (unless the SYSTEMLESS variable is set) if so. This will catch the
# case of several custom ROMs that users like to use custom boot images
# with - SuperSU will not need to patch these. It can also catch some
# locked bootloader cases that do allow security policy updates.
#
# To install SuperSU properly, aside from cleaning old versions and
# other superuser-type apps from the system, the following files need to
# be installed:
#
# API   source                        target                              chmod   chcon                       required
#
# 7-19  common/Superuser.apk          /system/app/Superuser.apk           0644    u:object_r:system_file:s0   gui
# 20+   common/Superuser.apk          /system/app/SuperSU/SuperSU.apk     0644    u:object_r:system_file:s0   gui
#
# 17+   common/install-recovery.sh    /system/etc/install-recovery.sh     0755    *1                          required
# 17+                                 /system/bin/install-recovery.sh     (symlink to /system/etc/...)        required
# *1: same as /system/bin/toolbox: u:object_r:system_file:s0 if API < 20, u:object_r:toolbox_exec:s0 if API >= 20
#
# 7+    ARCH/su *2                    /system/xbin/su                     *3      u:object_r:system_file:s0   required
# 7+                                  /system/bin/.ext/.su                *3      u:object_r:system_file:s0   gui
# 17+                                 /system/xbin/daemonsu               0755    u:object_r:system_file:s0   required
# 17-21                               /system/xbin/sugote                 0755    u:object_r:zygote_exec:s0   required
# *2: su.pie for 17+ x86(_32) only
# *3: 06755 if API < 18, 0755 if API >= 18
# 19+   ARCH/supolicy                 /system/xbin/supolicy               0755    u:object_r:system_file:s0   required
# 19+   ARCH/libsupol.so              /system/lib(64)/libsupol.so         0644    u:object_r:system_file:s0   required
#
# 17-21 /system/bin/sh or mksh *4     /system/xbin/sugote-mksh            0755    u:object_r:system_file:s0   required
# *4: which one (or both) are available depends on API
#
# 21+   /system/bin/app_process32 *5  /system/bin/app_process32_original  0755    u:object_r:zygote_exec:s0   required
# 21+   /system/bin/app_process64 *5  /system/bin/app_process64_original  0755    u:object_r:zygote_exec:s0   required
# 21+   /system/bin/app_processXX *5  /system/bin/app_process_init        0755    u:object_r:system_file:s0   required
# 21+                                 /system/bin/app_process             (symlink to /system/xbin/daemonsu)  required
# 21+                             *5  /system/bin/app_process32           (symlink to /system/xbin/daemonsu)  required
# 21+                             *5  /system/bin/app_process64           (symlink to /system/xbin/daemonsu)  required
# *5: Only do this for the relevant bits. On a 64 bits system, leave the 32 bits files alone, or dynamic linker errors
#     will prevent the system from fully working in subtle ways. The bits of the su binary must also match!
#
# 17+   common/99SuperSUDaemon *6     /system/etc/init.d/99SuperSUDaemon  0755    u:object_r:system_file:s0   optional
# *6: only place this file if /system/etc/init.d is present
#
# 17+   'echo 1 >' or 'touch' *7      /system/etc/.installed_su_daemon    0644    u:object_r:system_file:s0   optional
# *7: the file just needs to exist or some recoveries will nag you. Even with it there, it may still happen.
About the instructions,We need to organize directory again.
$ cd root
$ rm -rf arm arm64 mips mips64 x64 x86
$ mkdir SuperSU
$ mv common/install-recovery.sh
$ mv common/99SuperSUDaemon .
$ mv common/Superuser.apk SuperSu/SuperSU.apk
$ mv armv7/su .
$ mv armv7/libsupol.so .
$ mv armv7/supolicy .
$ touch .installed_su_daemon
$ copy ~/project/khadas/mmallow/out/target/product/kvim/system/bin/sh sugote-mksh
$ rm -rf common armv7
After doing that, we need to create a file root.mk that copy some file to system and build the SuperSu application.
The contents of the file root.mk as below
PRODUCT_PACKAGES += \
                SuperSU
PRODUCT_COPY_FILES += \
                root/install-recovery.sh:system/etc/install-recovery.sh  \
                root/install-recovery.sh:system/bin/install-recovery.sh  \
                root/su:system/xbin/su \
                root/su:system/bin/.ext/.su \
                root/su:system/xbin/daemonsu \
                root/su:system/xbin/sugote \
                root/supolicy:system/xbin/supolicy \
                root/libsupol.so:system/lib/libsupol.so \
                root/sugote-mksh:system/xbin/sugote-mksh \
                root/99SuperSUDaemon:system/etc/init.d/99SuperSUDaemon \
                root/.installed_su_daemon:system/etc/.installed_su_daemon
Finally, we need to create a file Android.mk in the path SuperSU
LOCAL_PATH := $(call my-dir)
include $(CLEAR_VARS)
LOCAL_MODULE := SuperSU
LOCAL_MODULE_CLASS := APPS
LOCAL_MODULE_TAGS := optional
LOCAL_BUILT_MODULE_STEM := package.apk
LOCAL_MODULE_SUFFIX := $(COMMON_ANDROID_PACKAGE_SUFFIX)
LOCAL_PRIVILEGED_MODULE := true
LOCAL_CERTIFICATE := PRESIGNED
LOCAL_SRC_FILES := $(LOCAL_MODULE).apk
include $(BUILD_PREBUILT)
3 Likes
Ok. Nice!
Will wait for the gapps installation instructions.
Or we need TWRP for VIM, and then we will be able to install su and gapps themselves…
Where do I do it? On ~/project/khadas/mmallow/out/target/product/kvim/ or ~/
Hi,davemf:
If you only root for vim,you can look the below steps:
Steps
-
Make sure the selinux has been disabled
check the file
uboot/board/khadas/configs/kvim.hmake sure the value of
EnableSelinuxis disabled and not enforcing -
Download the root file from github
$ cd <path-to-your-project>
$ cd vendor/amlogic
$ git clone https://github.com/khadas/supersu "root"
- Enable Root by edit ‘device/khadas/kvim/kvim.mk’:
BUILD_WITH_ROOT_CONFIG :=true
- Build your rom again
$ cd  <path-to-your-project>
$ make  installclean
$ make  -jN otapackage
3 Likes
Hi, terry!
Very nice, thanks!!!
Do you have the instruction for gapps?
1 Like
Hi,davemf:
I’m uploading the gapps to myself github.
Also I will describe the steps for build gapps later.
2 Likes
Hi,davemf:
You can follow below steps to build gapps.
###Steps
- Download the gapps file from github
$ cd <path-to-your-project>
$ cd vendor/amlogic
$ git clone https://github.com/terry2droid/google
- Enable GAPPS by edit ‘device/khadas/kvim/kvim.mk’:
BUILD_WITH_GAPPS_CONFIG :=true
- Build your rom again
$ cd <path-to-your-project>
$ make  installclean
$ make  -jN otapackage
4 Likes
I did it and rebuild my update.img.
But supersu does not work.
What did I do wrong?
PS: gapps work is well.
1 Like
which version of android? nougat?
No, it is android M6
Can you tell me which I can view the below information ?
Please make sure the selinux has been disabled
shell@Vim:/ $ getenforce
Disabled
I can check it after 7 hours.
But I disabled it in the file “uboot/board/khadas/configs/kvim.h”.
I checked it:
“uboot/board/khadas/configs/kvim.h” file has “EnableSelinux=disabled\0”\
u0_a56@Vim:/ $ getenforce
Enforcing
How fix it?
Hi, Davemf:
Can you check again that you have got the u-boot binary with Selinux disabled one been downloaded to the eMMC?
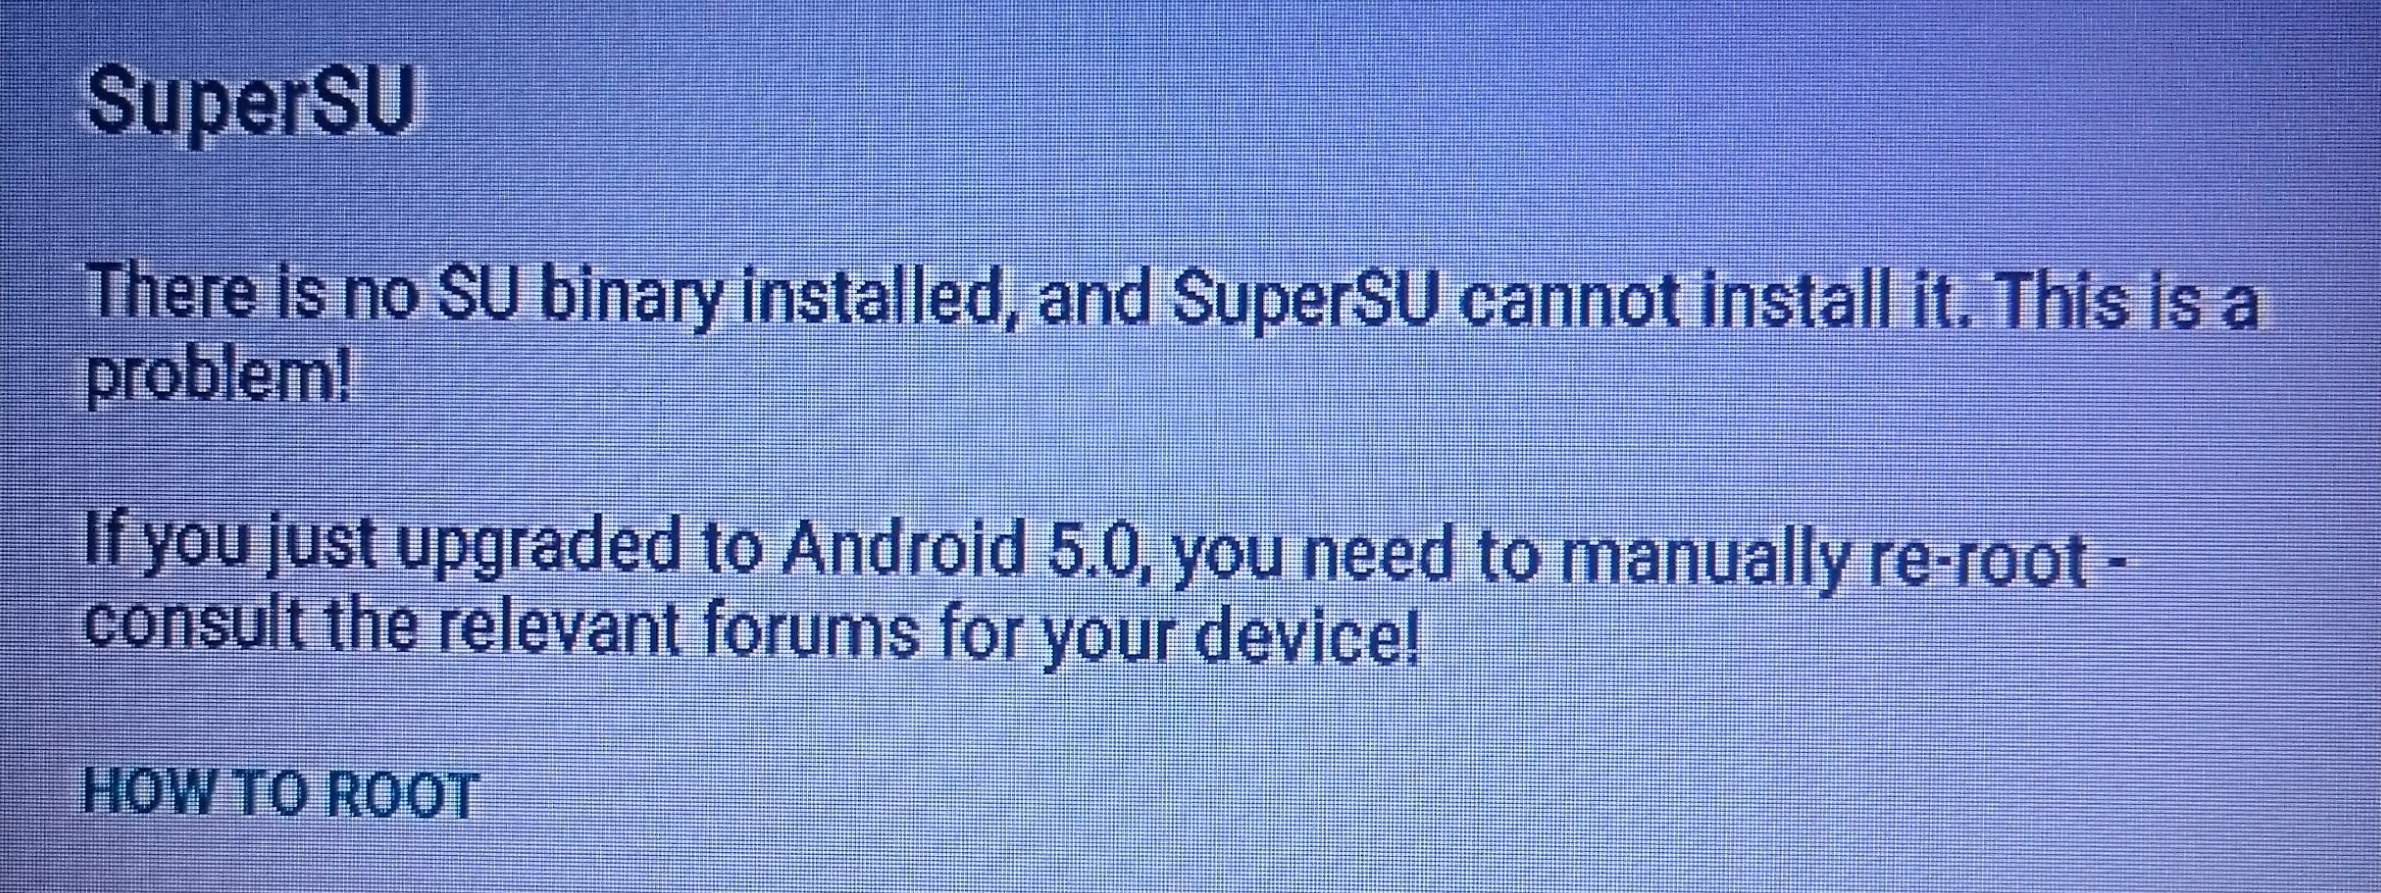
binary su file is in /system/xbin on khadas vim. But file of size 0!!!
You need to rebuild the u-boot when you modify the file ‘uboot/board/khadas/configs/kvim.h’
$ cd u-boot
$ make distclean
$ make kvim_defconfig
$ make -j8
About the file ‘out/target/product/kvim/system/xbin’
- You need to check the source 'vendor/amlogic/root
- Rebuild your project
$ make installclean -j8
$ make otapackage -j8
2 Likes