Preface:
All original documentation can be found from the PJ Reddie’s Darknet / Yolo Homepage. In this crash course, I will how you how to implement a simple demo from scratch; automatically identifying Curry and Durant in darknet-yolov3. This process is divided into the 4 steps: (1) data set construction, (2) model training, (3) model testing, and (4) model evaluation.
1. Data Set Construction:
1.1 Collect and Enumerate Pictures
The pictures shown here are those of Curry and Durant. In order to organize your data and reduce the possibility of error, first enumerate the names of your pictures, e.g. 0001 ~ 0999. Due to time constraints, I only downloaded 68 pictures. Please note that 68 pictures are insufficient to properly train a model.
1.2 Label Your Data
To properly label your data, please follow the Introduction to the Labelimg Annotation Tool for Windows
Once you have completed labelling your data, they should look like this:

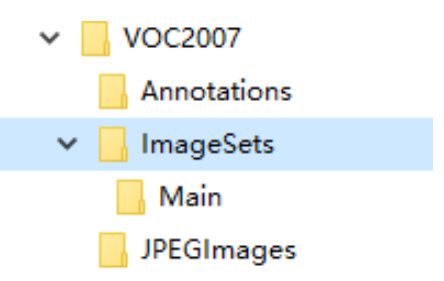
1.3 Make Your Own Data Set with VOC
Within your training directory, create a new folder called “VOC2007”. Within “VOC2007” create 3 additional folders: “Annotations”, “ImageSets” and “JPEGImages”. Within “ImageSets” create a new folder called “Main”. Once you’re done, your directory structure should look like this:
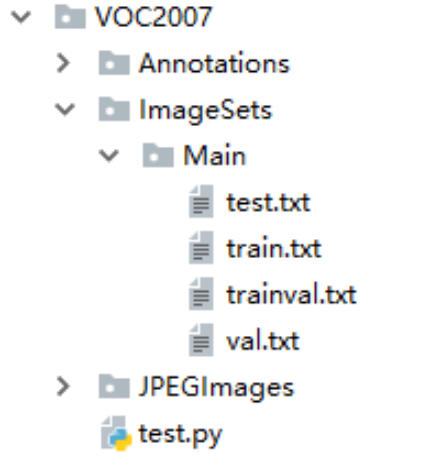
Copy your dataset (pictures) to the “JPEGImages” directory. Then copy the XML file of the dataset (label) to the “Annotations” directory. Create a new file with the name test.py within the folder “VOC2007”, and copy the following code into it and run it, and four files will be generated: train.txt, val.txt, "test.txt and trainval.txt.
import os
import random

trainval_percent = 0.1
train_percent = 0.9
xmlfilepath = 'Annotations'
txtsavepath = 'ImageSets\Main'
total_xml = os.listdir(xmlfilepath)

num = len(total_xml)
list = range(num)
tv = int(num * trainval_percent)
tr = int(tv * train_percent)
trainval = random.sample(list, tv)
train = random.sample(trainval, tr)

ftrainval = open('ImageSets/Main/trainval.txt', 'w')
ftest = open('ImageSets/Main/test.txt', 'w')
ftrain = open('ImageSets/Main/train.txt', 'w')
fval = open('ImageSets/Main/val.txt', 'w')

for i in list:
    name = total_xml[i][:-4] + '\n'
    if i in trainval:
        ftrainval.write(name)
        if i in train:
            ftest.write(name)
        else:
            fval.write(name)
    else:
        ftrain.write(name)

ftrainval.close()
ftrain.close()
fval.close()
ftest.close()
Your directory structure should now appear as follows:
2. Model Training
2.1 Download and Install the Darknet Framework
Download AlexeyAB’s Darknet Code:
git clone https://github.com/AlexeyAB/darknet.git
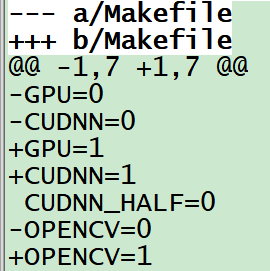
Yolo v3 uses an open source neural network framework, Darknet53, which uses C and CUDA, and has two modes: CPU and GPU. CPU mode training is not recommended as it will be deathly slow. Unfortunately the code uses CPU mode by default, and you must switch to GPU mode by modifying the file makefile.
2.2 GPU Mode makefile Configuration
Please note: cuda, cudnn, opencv need to be installed separately
2.3 Compile Code:
cd darknet
vim Makefile
make
After compilation is successful, you can download the pre-training model to test the effects.
wget https://pjreddie.com/media/files/yolov3.weights
./darknet detect cfg/yolov3.cfg yolov3.weights data/dog.jpg

In the picture above, you can see Yolo’s detection results (dog: 100%, truck: 92%, etc). At this point we have successfully built Yolo v3, and it’s time to add your own data and start training your model.
2.4 Add Your Own Dataset
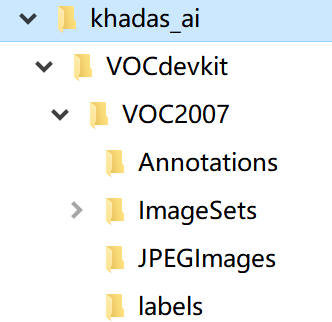
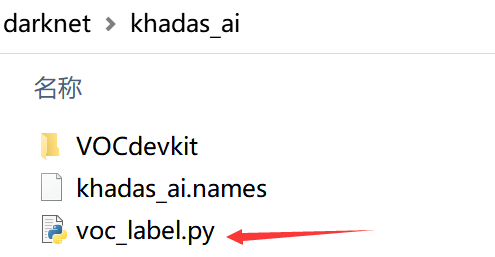
Create a new folder called “khadas_ai” within the “darknet” directory (convenient for managing the whole project in the future), enter this directory and create a new “VOCdevkit” folder, and then copy the previously made “VOC2007” folder into the “VOCdevkit” folder.
The five numbers in a row marked by the Yolo v3 label, respectively represent the category (numbering from 0), the center X coordinate of the bounding box, the center Y coordinate, width, and finally the height. These coordinates are all relative coordinates from 0 to 1. It is different from the label we previously marked, so we need the following file voc_label.py to help us convert the label.
cd khadas_ai/
wget https://pjreddie.com/media/files/voc_label.py
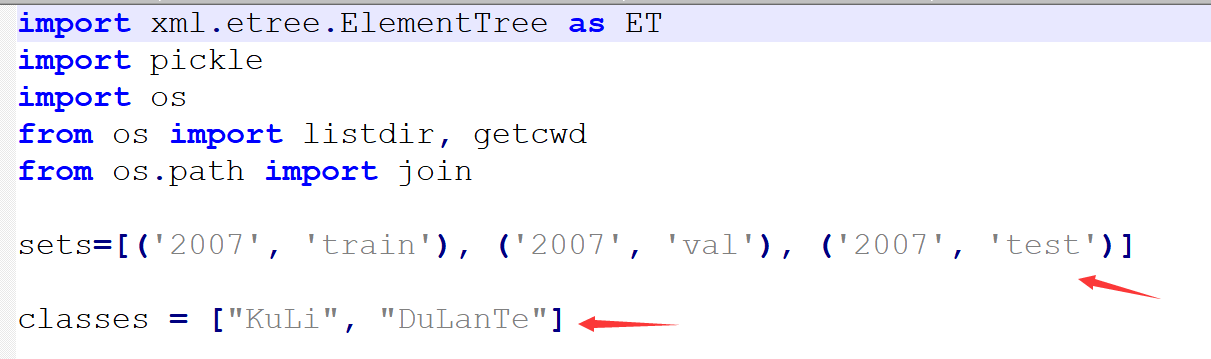
We will need to modify two places within the voc_label.py file; sets and classes. classes can be modified according to your needs.
Run the file, and three .txt files will be generated in the “khadas_ai” directory: 2007_train.txt, 2007_val.txt, and 2007_test.txt.
cd khadas_ai/
python voc_label.py
cat 2007_train.txt 2007_val.txt  > train.txt
The “VOC2007” directory under “VOCdevkit” will also generate an additional “labels” folder. Click the directory .txt file to see that it has been converted to the format required by Yolo v3. At this point, your data set is officially completed.
2.5. Create a .names File
This .names file will save all your categories, with one category per line, it can be given a custom name such as: data/coco.names or khadas_ai/khadas_ai.names. A file containing two categories KuLi and DuLanTe is shown below:
![]()
2.6 Create a .data File
A .data file can save a lot of configuration information, and can be given a custom name such as data/coco.data or khadas_ai/khadas_ai.names. The contents of a .data file is shown below:
classes= 2     #modify it to the number of types of your own training
train  = khadas_ai/train.txt    #change to your own path of train.txt
valid  = khadas_ai/2007_test.txt     #evaluation test image path, used for subsequent evaluation tests
names = khadas_ai/khadas_ai.names      #modify the path to your own class alias
backup = khadas_ai/      #training weight stored path
results = results     #evaluation test result storage path, or you can define it yourself
eval = coco     #select map calculation method
2.7 Modify the yolov3.cfg File
Copy the yolov3.cfg file in the “cfg” folder to the “khadas_ai” folder and rename it to yolov3-khadas_ai.cfg_train, and then make several modifications:
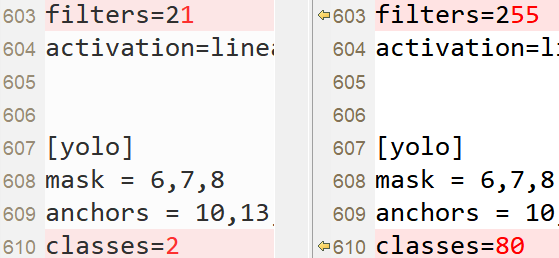
a) Search for the string yolo, and you will find it in three places within the yolov3.cfg file.
b) For each string that you find, you must make two changes, filters: 3 * (5 + len (classes)) and classes: len (classes), take our demo yolov3-khadas_ai.cfg_train file as an example:
After modification, copy your yolov3-khadas_ai.cfg_train file and rename it to yolov3-khadas_ai.cfg_test and make the following modifications to test your model.
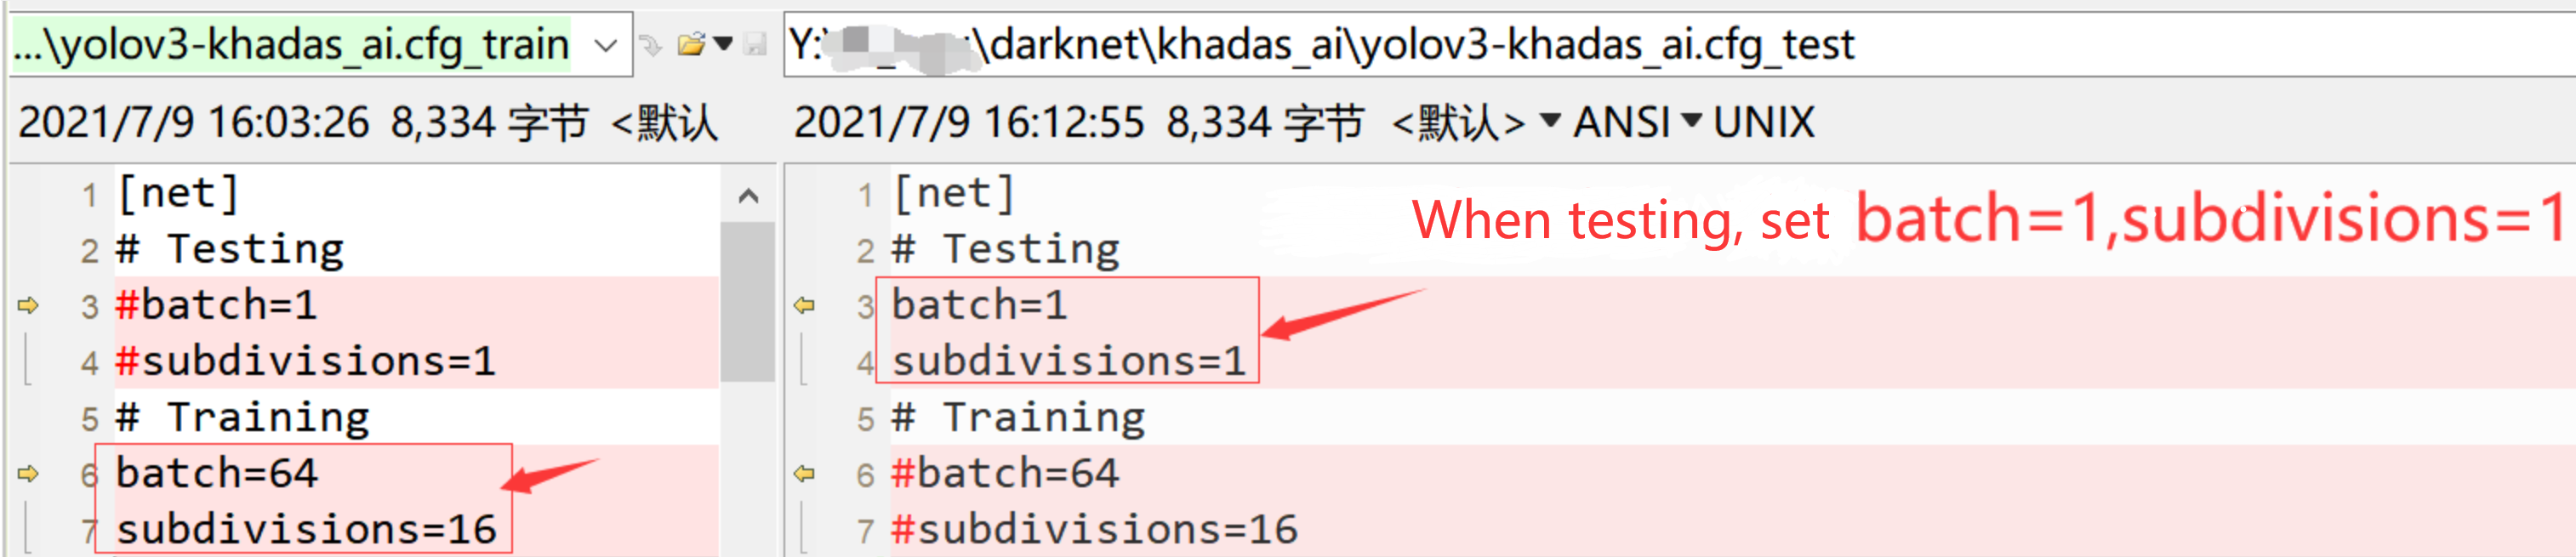
The subdivisions parameter is very interesting, it will divide each dataset into a smaller number of pieces corresponding to the number of subdivisions you have specified. After all the subdivisions have been processed by your neural network, they are packaged together to complete one iteration. This will reduce the strain on your video memory. If this parameter is set to 1, all pictures from your dataset are processed by the neural network at the same time. If it is set to 2, it means half your dataset pictures are processed first, followed by the subsequent half, before a full iteration is completed.
2.8 Start Training Your Model
If readers have patiently arrived here, being sure to follow each step carefully, they can breathe a sigh of relief, as you are only one step away from success.
Download the pre-training model of darknet53:
cd darknet
wget https://pjreddie.com/media/files/darknet53.conv.74
./darknet detector train khadas_ai/khadas_ai.data khadas_ai/yolov3-khadas_ai.cfg_train darknet53.conv.74 -dont_show
After one-night of training you will see the following results:
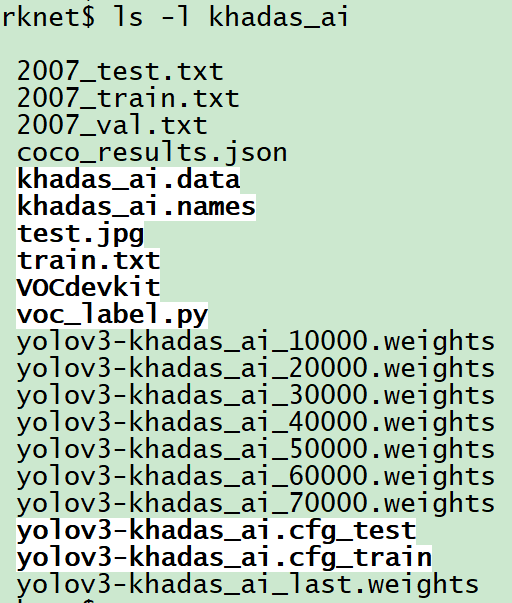
Every 10,000 iterations, a model weight is generated in the “khadas_ai” folder.
18797: 0.012223, 0.013508 avg loss, 0.001000 rate, 4.101127 seconds, 1203008 images, 362.918440 hours left
####Output parameter description:
18797: indicates the number of iterations of the current training
0.012223: overall loss
0.013508 avg loss: it is the average loss. The lower the value, the better. Generally speaking, once the value is lower than 0.060730 AVG, the training can be terminated.
0.0001000 rate: represents the current learning rate, which is defined in the. Cfg file.
4.101127 seconds: indicates the total time spent on training in the current batch.
1203008 images: the last value in this line is 75188 * 16, indicating the total number of pictures participating in the training so far.
3. Model Testing
Rename and place your test picture into khadas_ai/test.jpg, and then run:
./darknet detector test khadas_ai/voc.data khadas_ai/yolov3-khadas_ai.cfg_test khadas_ai/yolov3-khadas_ai_last.weights khadas_ai/test.jpg -thresh 0.5

khadas_ai/yolov3-khadas_ai.cfg_test:copy and rename yourcfg/yolov3-KD.cfg_trainfile tokhadas_ai/yolov3-khadas_ai.cfg_test, and set batch and subdivisions to 1khadas_ai/yolov3-khadas_ai_last.weights:the model weightskhadas_ai/test.jpg: the path to your test image-thresh 0.5: set the threshold, e.g0.1. If there is no dimension box, set a lower threshold. If there is still no dimension box with a very low threshold, there may be a problem with a certain step. Go back and check each step carefully.
4. Model Evaluation
To properly evaluate the performance of your trained model, please refer to this document Darknet Evaluates the Performance of a Trained Network.
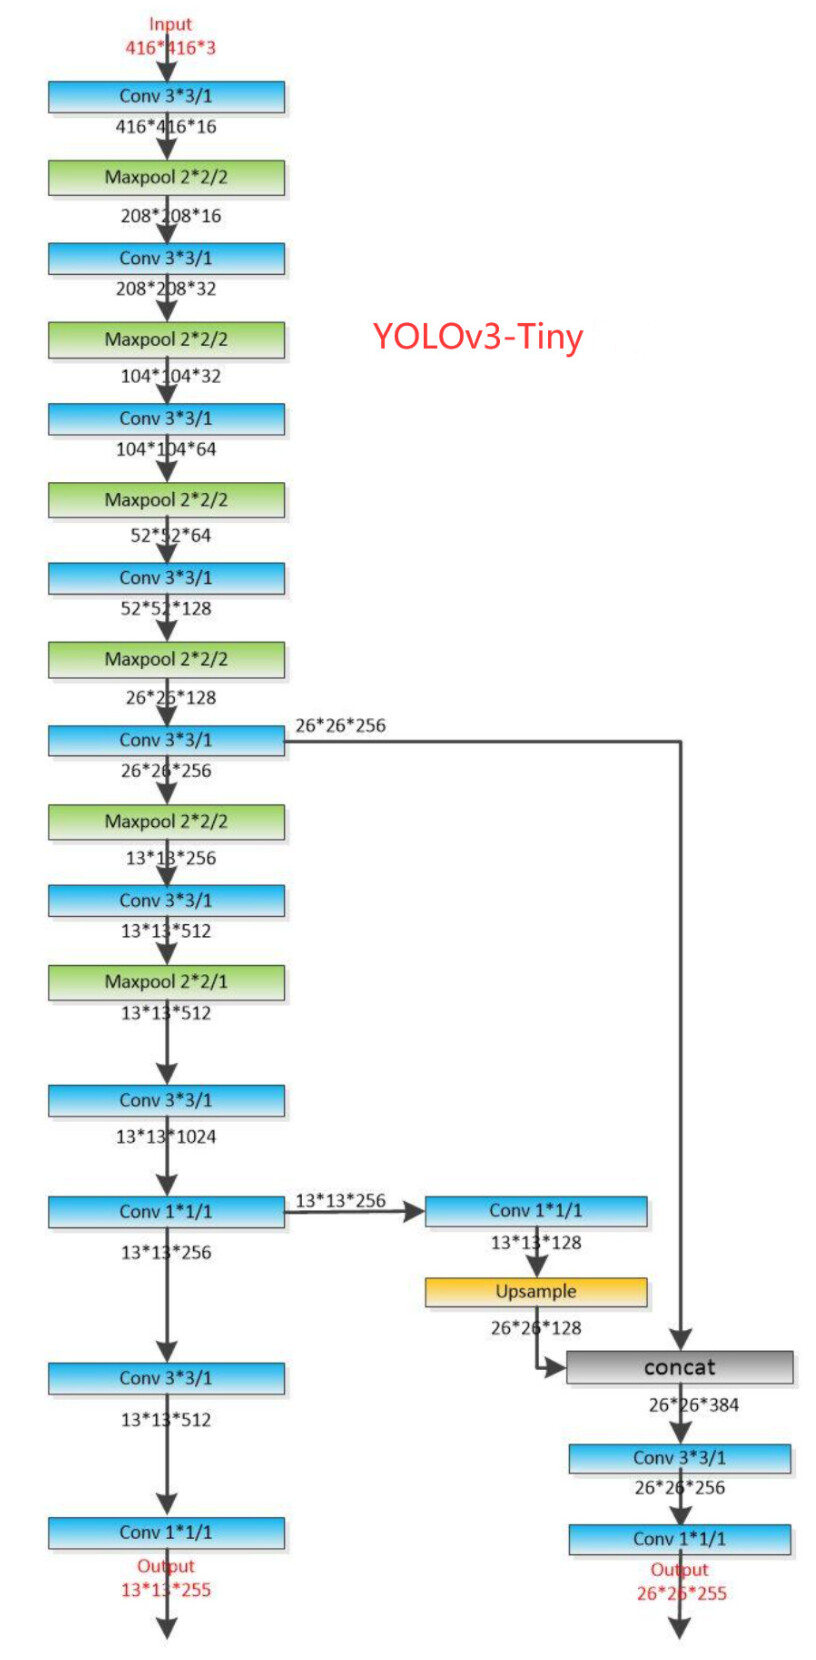
Supplemental Information: Yolov3-Tiny
Yolov3-Tiny is our first choice for projects with low-latency requirements. This neural network removes some feature layers from Yolov3 and retains only two independent prediction branches. The specific structure diagram of Yolov3-Tiny is as follows:
The process of training Yolov3-tiny is almost the same as that of Yolov3. The specific process is as follows:
- First, get the weights of a trained yolov3-tiny model:
wget https://pjreddie.com/media/files/yolov3-tiny.weights
- Then use the weight of the convolution layer to train your own data:
./darknet partial cfg/yolov3-tiny.cfg yolov3-tiny.weights yolov3-tiny.conv.15 15
- Start training your model:
./darknet detector train khadas_ai/khadas_ai.data khadas_ai/yolov3-khadas_ai_tiny.cfg_train yolov3-tiny.conv.15 -dont_show
The yolov3-khadas_ai_tiny.cfg_train file comes from the yolov3-tiny.cfg file inside the “cfg” folder, and then the parameter modification method is the same as that of Yolov3.
- Test your model:
./darknet detector test khadas_ai/khadas_ai.data khadas_ai/yolov3-khadas_ai_tiny.cfg_test khadas_ai/yolov3-khadas_ai_tiny_last.weights khadas_ai/test.jpg -thresh 0.1
The yolov3-khadas_ai_tiny.cfg_test file is copied from the yolov3-khadas_ai_tiny.cfg_train file, and then the parameters are modified in the same way as Yolov3.
P.S: the pictures and scripts used in the guide are placed in the “khadas_ai” branch of this code base:
git clone https://github.com/khadas/khadas_android_npu_library -b khadas_ai
