Hi supporters,
android pi os: VIM3_Pie_V210128
but when i install UBUNTU it is not working with HDMI Display
ubuntu os : VIM3_Ubuntu-gnome-focal_Linux-4.9_arm64_EMMC_V0.9-20200530
i’m installing in VIM3 EMMC
so please help to solve this issue
Thanks
@manojec9396 what is the screen resolution ?
i changed os and
but not with MIPI Display(1920x1080p)
numbqq
April 7, 2021, 10:50am
4
You can’t use MIPI LCD and HDMI at the same time if you use ubuntu. If you want to use the MIPI LCD please remote the HDMI cable.
yes but i have attached LCD only still not working
@manojec9396 how did you attach the LCD ? if it is not the TS050 screen, some drivers have to be changed to make it work in linux, please show the setup
Thanks for your reply
Yes the display is not TS050,
first thing is you need to enable the mipi output and get appropriate linux drivers for it, I don’t know about the specifics of what you need to do, but maybe @numbqq or @Frank can give you a gist…
Okay thanks @Electr1 ,
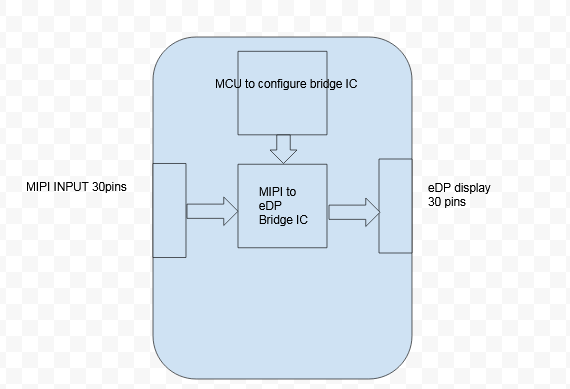
here you can this image
Hello @numbqq , @Frank
Thanks
@manojec9396 even then the bridge has to communicate with the device and appear as a “pseudo” display, for it to enumerate and send the correct signals with proper timing etc.
i found following configuration in
#############################DO NOT TOUCH THIS OPTION#############################
rootdev=UUID=ce34b447-6494-4c1f-bba0-b0db9b6738cb
#############################DO NOT TOUCH THIS OPTION#############################

# Cooling FAN mode
# auto -  auto schedule the FAN speed depend on the CPU temperature
# low  -  FAN low speed
# mid  -  FAN middle speed
# high -  FAN high speed
fan_mode=auto

# DMA coherent_pool size
# Don't touch unless you know what you are doing
dma_size=2M

# HDMI resolution auto detection
# yes - auto detection
# no  - set HDMI resolution via 'hdmi' node
hdmi_autodetect=yes

# HDMI mode
# Resolution Configuration
#    Symbol             | Resolution
# ----------------------+-------------
#    "480x272p60hz"     | 480x272 Progressive 60Hz
#    "480x320p60hz"     | 480x320 Progressive 60Hz
#    "480p60hz"         | 720x480 Progressive 60Hz
#    "576p50hz"         | 720x576 Progressive 50Hz
#    "720p60hz"         | 1280x720 Progressive 60Hz
#    "720p50hz"         | 1280x720 Progressive 50Hz
#    "1080p60hz"        | 1920x1080 Progressive 60Hz
#    "1080p50hz"        | 1920x1080 Progressive 50Hz
#    "1080p30hz"        | 1920x1080 Progressive 30Hz
#    "1080p24hz"        | 1920x1080 Progressive 24Hz
#    "1080i60hz"        | 1920x1080 Interlaced 60Hz
#    "1080i50hz"        | 1920x1080 Interlaced 50Hz
#    "2160p60hz"        | 3840x2160 Progressive 60Hz
#    "2160p50hz"        | 3840x2160 Progressive 50Hz
#    "2160p30hz"        | 3840x2160 Progressive 30Hz
#    "2160p25hz"        | 3840x2160 Progressive 25Hz
#    "2160p24hz"        | 3840x2160 Progressive 24Hz
#    "smpte24hz"        | 3840x2160 Progressive 24Hz SMPTE
#    "2160p60hz420"     | 3840x2160 Progressive 60Hz YCbCr 4:2:0
#    "2160p50hz420"     | 3840x2160 Progressive 50Hz YCbCr 4:2:0
#    "640x480p60hz"     | 640x480 Progressive 60Hz
#    "800x480p60hz"     | 800x480 Progressive 60Hz
#    "800x600p60hz"     | 800x600 Progressive 60Hz
#    "1024x600p60hz"    | 1024x600 Progressive 60Hz
#    "1024x768p60hz"    | 1024x768 Progressive 60Hz
#    "1280x800p60hz"    | 1280x800 Progressive 60Hz
#    "1280x1024p60hz"   | 1280x1024 Progressive 60Hz
#    "1360x768p60hz"    | 1360x768 Progressive 60Hz
#    "1440x900p60hz"    | 1440x900 Progressive 60Hz
#    "1600x900p60hz"    | 1600x900 Progressive 60Hz
#    "1600x1200p60hz"   | 1600x1200 Progressive 60Hz
#    "1680x1050p60hz"   | 1680x1050 Progressive 60Hz
#    "1920x1200p60hz"   | 1920x1200 Progressive 60Hz
#    "2560x1080p60hz"   | 2560x1080 Progressive 60Hz
#    "2560x1440p60hz"   | 2560x1440 Progressive 60Hz
#    "2560x1600p60hz"   | 2560x1600 Progressive 60Hz
#    "3440x1440p60hz"   | 3440x1440 Progressive 60Hz
hdmi=720p60hz

# Specify the initial console log level (0~8)
loglevel=7

# User kernel args
# Add customer kernel args here
user_kernel_args=

# Maximum CPU Frequency of VIM3 Little Core A53
# 500/667/1000/1200/1398/1512/1608/1704/1800(default)/1908/2016/2100/2208
max_freq_a53=1800

# Maximum CPU Frequency of VIM3 Big Core A73
# 500/667/1000/1200/1398/1512/1608/1704/1800/1908/2016/2100/2208(default)/2304/2400
max_freq_a73=2208

# Device Tree Overlays
#   uart3           -- Enable UART3 (uart_C, GPIO Header PIN15 & PIN16)
#   pwm_f           -- Enable PWM_F (GPIO Header PIN35)
#   i2c3            -- Enable i2c3 (GPIO Header PIN22 & PIN23)
#   spi1            -- Enable SPI1 (GPIO Header PIN15 & PIN16 & PIN35 & PIN37), pwm_f need to be removed
#   os08a10         -- Enable OS08A10 Camera
#   onewire         -- Enable onewire bus (GPIO Header PIN15)
#   disable-ts050   -- Disable TS050 LCD
#   m2x-eth         -- Enable M2X 100M ethernet. Note: 1G ethernet will be disabled.
#   otg-device      -- Enable USB OTG Device
overlays=uart3 pwm_f i2c3 os08a10
Hello @Electr1 @numbqq @Frank
@manojec9396 this is not a plug and play solution, you have to do manual configuration and set the driver parameters in the kernel by yourself
please check the TS050 implementation, create and modify it to your liking, and test
best of luck
numbqq
April 14, 2021, 12:53am
15
Hello @manojec9396
As @Electr1 said, you have to configure it yourself, you can check how TS050 works, and you need to make it works in uboot first, then is kernel.
Yes @numbqq ,
so please help me .guide me.
thanks
numbqq
April 14, 2021, 7:34am
17
Have you configured the panel timing correct in file arch/arm64/boot/dts/amlogic/khadas-ts050-panel.dtsi ?
hi @numbqq
Thanks
numbqq
April 14, 2021, 8:34am
19
You need to configure lcd timging in kernel dts.
After configuration, you need to rebuild the dtb debian package and copy them to board to install. You can check here:
Hello @numbqq
for this
After configuration, you need to rebuild the dtb debian package and copy them to board to install. “”"""""""""""""""""""
@manojec9396 those details must be provided by you from your bridge’s datasheet@numbqq